Home * Patterns * Tutorials * Made It * Our Story

Friday, December 31, 2010

Made It: Meaning of Christmas Ornamnets

~~~~~~  I ran out of photo space on blogger, so after the holidays I'll have a little more time to clear out some photos so I can update this post. Until then, here is a picture-lacking tutorial on how I made my ornaments. ~~~~~~~~~~ :) Happy New Year!!


Earlier this month I mentioned that I was making our ornaments this year. I have this list of "The Meaning of Christmas" in my Christmas book, and decided this would make a great project, and be something meaningful. And, best of all, they aren't something that my boys can destroy! Boy-proof is a MUST for us! lol.

Here's the list of items and their meanings:

Here's how I am making them:

Take a chalk pencil or some kind of marking pen and draw the item on some felt fabric. Cut out the pieces and any other details you want to add. I decided to keep mine really simple and not decorate them too much. It just makes sense to not make them all bling-bling when the purpose of them is to remember the meaning, and not be distracted by design or fanciness. Anyway...


Then I took some simple craft glue, glued on the details and let it dry for a minute. Then I took one of the main pieces and glued only right around the edge of it, leaving some room for an opening.

 ----> 

After the glue dried, I took some coordinating floss and did a simple whip stitch around the edges of it to help keep the pieces together and to add a more finished look, leaving a small opening for stuffing.

`````````````````````floss pic``````````````````

About a week ago I realized I should really be sewing them like this to add at least a little bit of cute detail.

`````````````````other way to sew pic`````````````````````

Next stuff your ornament to desired fill, and finish sewing your ornament shut. I didn't glue the last edges before sewing. You could probably do without gluing at all, but I wanted to make sure I didn't get little stuffing fuzz falling out everywhere.

``````````````````````````````````finished pic`````````````````````````

I also was going to add some ribbon before closing, but with how my boys are crazy rough with our tree already, and I knew they would do what they could to take them off anyway, I figured it might be safer to not tie them on, less the tree fell over while trying to get them off. (For the same reason I'm kind of glad we don't have our decorations out. haha.)


So instead of hanging, we just place the ornament in the tree, and they can play with them, or leave them. So far, we love them! :)


I'll show the pillow when I get it finished too. I can't decide it I want to embroider the words or just use a fabric marker. I haven't done embroidery for so long, though it has turned into a great crafting method for doing while I'm doing whatever with my boys all day! So I just may have to start doing more of it! :)

Wednesday, December 29, 2010

Blog Update

I am currently coming back to blog land, and have been working on cleaning up my blog a little bit.
I wanted to let you know that I just finished fixing my Tutorials tab at the top of the posts. There is now a nice, clean picture list of all the tutorials I have done on my blog, linked to their tutorials. There aren't a lot, but I do have a few on the way (3 or 4 more I'm hoping to get out by the end of next month, at least. Plus I need to bring a few over from my old blog). I also pretty much finished my Made It tab, but still need to link the pictures. It is now much easier to brows (is that the right spelling for this meaning???) through the different projects I've made.


I also have a giveaway planned for next month, a big announcement to make, along with a sew-along (if you want to join me). I have a super big kid project I'm working on, but have been a little stumped with, and thought it might help to blog the process. It will be fun. :)

I really have so many projects I need to finish, so I'm hoping that planning it all out on my blog will help me get everything finished up. :) Good luck with that right?! haha.

Thanks for joining me!

And here's a random picture to add some interest to this post. Haha. :)

some random side street in Wuerzburg Germany.
I LOVE the art on this wall!

Monday, December 27, 2010

Made It: Christmas Presents, Part 1

We had a fabulous Christmas this year. We never did get our decorations out of storage. lol. But with our paper chain and the simple ornaments I did finish, along with finally finishing the tree skirt, it was a simple Christmas. And pretty simple all around. A lot of the presents we gave out were home-made, and not all have been given yet, so I'll have to have a part two next week. (That and I forgot to take some pictures of some, so they'll be added with it when I get them from my sis.) It was such a wonderful month, reading scriptures and stories about the birth of Christ and singing Christmas songs every night. We really felt like it extended the Christmas Spirit throughout the month. We also didn't splurge on the boys this year, or each other, which to me, made Christmas day the best ever! Usually I'm really excited about getting this or that, but this year all I really wanted was a box of chocolates. haha. And boy are they yummy! ;)


Anyway, to get on with the fun stuff we (I) made, we'll start with my sister. We had her for Christmas this year, and since her and her hubby just got new Windows 7 phones, I couldn't resist making them some of these:
 (sorry the photos are the best, but hey, they work.) ;)

It's a phone pillow. I saw the idea at Dog Named Banjo's blog. Here's her etsy shop if you want one. I had kind of a tricky time figuring it out, and all my compliments to her, her's are fantastic!
this one is the BIL's, and I forgot to take a pic of my sis's before wrapping it. I don't have a cool phone, so I'm hoping that the angle is good on them. You can use them to charge, or to hold your phone/iPod while you watch movies, take in on the airplane to use on the tray table, etc. Such a fab idea!


Next up, I remember a while ago when my sis did a blog post about all the notes they always left each other around the house. When I saw these super envelopes over at Sew, Mama, Sew! I couldn't resist! I made one for each of them in their favorite colors. That way they can either know who the note is from, or just give that person a note in their own envelope. I'll let them figure all of that out. ;)


I loved the idea for using the buttons and interchangeable messages.

the backs of the cards have the same fabric as the inside of the envelope.

 I decided to stamp all the messages, since my embroidery skills are lacking. I didn't have a fabric ink stamp pad, so I just added some fabric textile paint to my regular acrylic craft paints and used stamps. (iron the paint after it dries to set the paint so it doesn't wash out). It was kind of tricky getting the right amount of ink on the stamp so it wouldn't smear, and some were a little more difficult than others, but I think they turned out. I also would have cut all the squares out first and then stamped, but silly me, I just stamped them all on a big piece of fabric, and guessed how far apart to stamp them. Some of the squares ended up a different size, but oh well. :) I still like it.


We had a white elephant gift exchange with the YW, and I thought these tissue holders were super cute so I made this:
I think this fabric is so much fun! :)


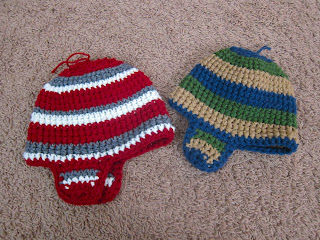
And last for now, I made new hats for the boys. They are so cute in them, if I do say so myself.  And I do like how the ear flaps turned out. :)


What did you make/get for Christmas this year?! :)


I'm linking up, so check out all the great sites on my side bar ------>

Thursday, December 16, 2010

Email: BET YOU CAN'T DO IT ON THE FIRST TRY

My sister sent the following to me in an email, give it a try! It's pretty cool. 
Leave a comment and tell me how you do! :)


This test takes 10 seconds...try it!


ALZHEIMERS' EYE TEST

(i love this part.. its absolutely amazing!)
Count every "
F " in the following text:

FINISHED FILES ARE THE RE
SULT OF YEARS OF SCIENTI
FIC STUDY COMBINED WITH
THE EXPERIENCE OF YEARS...

(SEE BELOW)


HOW MANY ?


WRONG, THERE ARE
6 -- no joke.
READ IT AGAIN !
Really, go Back and Try to find the 6 F's before you scroll down.


The reasoning behind is further down.


The brain cannot process "OF".


Incredible or what? Go back and look again!!


Anyone who counts all 6 "F's" on the first go is a genius.


Three is normal, four is quite rare.

Send this to your friends.
It will drive them crazy.!
And keep them occupied
For several minutes..!


Isn't that so crazy?!?!?! 
For the life of me I could only find 3, then when I saw there was six it took me a long time until I saw the F in "OF". Then they all showed up. 
So crazy. :)

Tuesday, December 14, 2010

Made It: Tree Skirt

We spent last Thanksgiving with my Dad and his wife and my brother and his family. While we were there my SIL and step mom started making these really cute tree skirts. They were nice enough to cut fabric strips for me and send me home with the fabric for it too. :) Since our decorations are still in storage and our tree was awful bear with out a skirt, I figured I'd just finish this one. I was too ambition and didn't wait to get the pattern and started cutting and sewing away. Come to find out it doesn't look ANYTHING like it's supposed to, but I couldn't figure out how else to make it with the fabric I had. Turns out I wouldn't have had enough fabric anyway, so no big deal. Plus our tree is modest in size, and I think the finished tree skirt would have covered our whole living room, so this works out well. :)

Thanks for your help and the fabric family! :)


 very quick Tutorial:
with a few edits.
It's super simple to make. For the center, cut 13 of one fabric and 12 of a coordinating fabric 4.5" square. Sew in a checkerboard pattern. Cut 8 strips of green and 4 strips of red 2.5" by 21". Sew strips together (green red green = strip set) and  sew one completed strip set to opposite sides of the checkerboard. For the blue cut 4 - 6.5" square  squares.Sew 2 blue squares on each end of the remaining 2 strip sets. and sew those on the remaining two sides of the checkerboard. The top is now finished. Sandwhich with batting and a backing fabric and quilt layers together. Cut (I think, may be more or less) 6 - 2.25" strips of blue fabric and use for the binding. Before sewing on the binding, cut ~5" circle from the very center of the tree skirt. Measure the middle of the skirt and the middle of one of the edges and cut a straight line. (I had found an awesome tutorial for this part, but I can't find it for the life of me. I'm sure my center would have turned out better had I been able to find it. oh well.) Then bind the entire edge. :)  You can add ties to close it or velcro or just leave it.

This is my favorite binding tutorial, though I don't really have any tips about binding the center circle, as mine doesn't not look very good. (http://crazymomquilts.blogspot.com/2008/10/binding-tutorial.html)


I tried to get Baby to pose with it, but all he wanted to do was "sleep". :)
He's totally faking! 2 seconds later he got up and unplugged the lights.
He's so stinking cute.


 I'm linking up! Come join in the party(s) and check out all the great sites on my side bar!

Why do sewing projects take so long?

It seems like every sewing project I start, no matter how small or simple it is, always seems to take F.O.R.E.V.E.R.!!! So, as I've knowingly, or unknowingly, dragged out all my Christmas projects, I think I've figured it out:

  • I dread ironing = a huge delay before I even get started. Plus numerous delays throughout whatever project I'm working on.
  • I get this unconscious anxiety when starting a new project. For some reason I have to become mental best friends with whatever I'm going to be making before I can begin.
  • I have 2 little boys. enough said.
  • Crafting + a clean house = IMPOSSIBLE! which means a bigger mess to try and craft in, or less time spent crafting and more time spent cleaning.
  • Crafting is like reading books. I can't ever seem to start and finish one book at a time, I always end up reading 5 different books at the same time. If I start one crafting project, it seems to attract 5 or 6 more to go along with it.
  • Burn out. I guess this is why I always have multiple projects going at the same time, some projects I get sick of before their done, so they sometimes don't get done until I come back around again. Though some never do get finished. oops.
  • ironing. again.
  • life. and everything else that demands some time.
  • blogging. ;) though I guess I haven't been doing too much of that lately, so at least for now it hasn't been too much of a distraction.
  • on the other hand, having the computer right next to the sewing machine really isn't a good thing. I'll be right in the middle of sewing something, stop and start surfing the web, check my email or get on facebook. Computer and sewing machine is not a good combination. ;) lol.

I guess those are some good reasons why things take so long.... now if I could just figure out a solution. ;) 

What keeps you from finishing your projects?
or do you fly through them?! ;)

Wednesday, December 8, 2010

Made It: Gingerbread House

Merry Christmas!! :)

I LOVE this time of year. And one of the best things, although I have never done it on my own, is making gingerbread houses. Ok, I guess if I never take the initiative, it must not be the best (well, not my most favorite thing about Christmas anyway), but I sure do love it.

Yesterday we made gingerbread houses with the young women at my church. It was loads of fun. Hike and Baby were with me to help and I think they liked it too. Hike mostly just ate all the candy he could reach on the table, and Baby ran around the church and begged the girls for candy too. :) Thanks Dianne!

Here's how ours turned out.


I think Hike ate the top of the tree before I put it on.


Notice the flat piece of graham cracker under the roof, that is THE BEST idea ever! It makes all the difference in the world for keeping your roof on and so the walls don't fall down.
Thanks Tiffany for the fabulous idea! :)


Maybe in another year or two we'll start making gingerbread houses as a tradition at home. Until then I'm ready to start eating away! ;)


I'd love to see your gingerbread creations!! 
Leave a comment with your link and I'll be sure to stop by!


Linking up, so go ahead and check out the linky party buttons on my side bar (towards the bottom).

Wednesday, December 1, 2010

Fab Finds: Christmas Projects

Yippy!! I am back at the sewing machine! and it feels soooo good. :) LOL. 

I've started working on a tree skirt that my step-mom started with my SIL and I last year. I actually didn't start it until yesterday, but she gave me all of the fabric for it. I don't have the pattern... though I thought I could remember it. Now that I'm getting farther along I realize that I really have no idea what I'm doing. haha. I have the basics done, but now I have so much blue fabric that I don't know what I'm supposed to do with it, and I'm stumped. Guess that won't get finished today... I'll take a picture tomorrow and post it sometime. ;) (I want to see how much life is going to let me back to the computer before I commit to anything.) 

Onto my next project that I'm really excited for...

Elizabeth from Oh Fansson! shared this on Sew Mama Sew! in July. I love it! :) And can't wait to get started. I am now really glad I bought some Christmas fabric months back... though I only have 9. Hopefully I can find 3 more patterns in my other stash of fabric. :)

I also found another tree skirt from Amy Butler that I LOVE! One day when I have a super nice tree I will have to make this one. Find the free pattern here.

***SECRET PROJECT***
I also have another project I've found that I will have to post later... it's going to be a Christmas gift, so I don't want to give away any surprises.  Now to figure out what to give with it... hum.


 While at Sew Mama Sew I also found this great tutorial on how to make your own tags. LOVE it! I've been wondering how to do it, and really like this technique! I'll have to save this one for later.


Recently my boys have been wrecking my sewing machine. They broke the removable table thing that gives you more sewing surface, which luckily I was able to jimmy rig it. I also noticed two days ago a bunch of scribbles all over the front of it. Oh boy. I'm hoping that if I make a cover for it, they'll also stop playing with all the knobs. haha. (Let me just tell you that my machine is very old and very temperamental. They always adjust tension, and no matter how much I fiddle with it to get it back where it should be, it doesn't work unless I let the thing sit for a day or two. And all of a sudden, presto. Tension is perfect again. Can anyone explain that?!) ;)

I'm using this tutorial for the basics,

but instead of the patch work I'm going to use this tutorial to make it more scrappy.
 I have a LOT of scraps, along with lots of triangles and such. We'll see how it turns out. SO excited!


What projects do you have to keep you busy this Christmas? :)


Picture links
Sewing Machine Cover: http://sewmamasew.com/blog2/?p=826

Tuesday, November 16, 2010

Fab Finds: Cricut, Cutting Vinyl and Fabric, and new Print and Cut Tutorials

Here are the instructions for cutting with vinyl.
I always forget the blade depth and pressure settings, so here they are. :)

Cutting Vinyl using Cricut & Cricut Expression Die Cutting SystemVinyl Instructions using Transfer Tape

1) Place vinyl sheet on Cricut cutting mat. Load mat into machine and confirmthat machine is set to the correct cutting mat size.2) Make cutting selection and set size as if you where cutting paper,and then press cut.Peel images off cutting mat.PREPARATION1) Place vinyl sheet on Cricut cutting mat. Load mat into machine and confirmthat machine is set to the correct cutting mat size.2) Make cutting selection and set size. For best results, set blade depth to 6 and pressure to 2.These settings will result in a "KISS CUT" or a cut that only goes throughthe vinyl leaving the backing liner uncut.3) Take ends of transfer tape in each hand with adhesive side facing down.Gently lay transfer tape over vinyl (be sure to lay it straight)image starting in the center and moving out toward the ends.4) Once tape is in place,use applicator stick to burnish*the tape on to the vinyl.Start in the center and use overlapping strokes.

APPLICATION
1)Completely clean and dry wall (or other surface) area where vinyl image is to be placed.For best results do not use a cleaner that will leave a residue.2) Lightly place image on wall using level to ensure correct placement.3) Once image is in place, use applicator stick to burnish* vinyl on to wall.For best results use overlapping strokes when burnishing*4) Gently peel back transfer tape at 45-degree angle.If vinyl starts to come off with transfer tape,lay area back down and burnish* again.

Cricut Vinyl Instructions Without Transfer Tape

PREPARATION
1) Place vinyl sheet on Cricut cutting mat. Load mat into machine and confirmthat machine is set to the correct cutting mat size.2) Make cutting selection and set size. For best results, set blade depth to 6 and preasure to 2.These settings will result in a "KISS CUT" or a cut that only goes through the vinyl leaving the backing liner uncut.

APPLICATION
1) Completely clean and dry wall (or other surface) area where vinyl image is to be placed.For best results do not use a cleaner that will leave a residue.2) Use level and pencil to draw a faint line on wall to aid in placement.3) Carefully remove the vinyl images one at a time form the backing liner and applyto the wall using the pencil line as a guide. Gently smooth down the vinyl using your fingers.4) Once all image are placed on the wall, place backing liner overthe vinyl and gently burnish* with application stick provided.5) When complete,carefully wash off or erase pencil lines.


Cutting Fabric:
I have a great video I found  that I put on my db's Crafty Corner blog along with some other links. Here's the link:   http://dbcrafty.blogspot.com/2009/05/great-tutorial-on-cutting-fabric-wthe.html

I have some other cricut info (free font links, svg files) over there too. You can find them all here:
http://dbcrafty.blogspot.com/search/label/Cricut


And, since I'm posting Cricut stuff, I just found some great info and tips on how to cut out images that you've printed on your printer, or cut shapes for your stamps! SO AWESOME! I'm so excited! :)
(No need to spend beau coup bucks on the new Cricut Imagine!)
Print and Cut


Ok, here's a video for the easiest way (I love Make The Cut!):


Here's a link that has the video instructions written out.

And here's some more links:
and here's a link with a list of other options that I haven't checked out all the way yet.

and here's another site (this link is specifically to how to use center point to cut stuff) but I bet the site has a lot of other great resources too! :) 
http://www.mypinkstamper.com/2009/01/cricut-series-7-episode-78.html

One More Note:
If you go to this link:

you can see a lot of the awesome new features of Make the Cut! 3.0, it's a beta version still, so if you buy MTC you will get the older version, but you can upgrade to this. I am seriously so excited! (and the best thing is upgrades are FREE, unlike SCAL. But that's ok. It's just one more thing that makes MTC so great.) :)

So honestly, if you own a cricut, or a gazelle, or black cat cougar, you really need to check out these videos! :) It's pretty awesome! :)

Sunday, November 7, 2010

Fab Finds: Some things that happen when you become a mama:


The following is copied from this post at this address:
I don't really want to steal it, but I loved it so much that I had to keep it, and I knew if I only bookmarked it, I'd probably never find it again. There are a lot of other great memories and lessons in the comments that people left, so go read those too! :) I sure do love being a mama! Thanks Sis for the link! :)

~~~~~~~~~~~~~~~~~~~~~~~~~~~~~~~~~~~~~~~~~~
"(For my sister who is due with her first baby in three weeks…)
Oh yes. This is the way things happen.
You get pregnant, have a baby, survive a year or so of sleep deprivation, memory loss, heavenly smiles, and diapers, and then one afternoon while you’re making a sandwich your baby is sitting on the counter, nonchalant, happy as a clam.
This is what having a baby will teach you:
That you are not in control.
That you were never really in control.
That there is grace in losing the battle, just as there is grace in quietly, patiently persisting with boundaries, bedtimes, and broccoli.
You will never be able to hear a story about a child suffering again without tears wetting the corners of your eyes, entirely unbidden, always unexpected, smudging your mascara as you consider what if.
It’s okay to start over or give up a million times. No one knows any better than you do–and when it comes to your own kid, you do, actually, know best, no matter what anyone else tells you.
It’s all about giggling.
Getting dirty is inevitable and essential. Make your peace with the effing laundry heap. It will never go away. (Although–one thing that most certainly will go away, inexplicably, and often, are single baby socks. One by one they disappear until you’ll have an entire drawer full of singletons.Think I’m kidding? Just wait.)
It’s about stopping and getting down on the floor. Especially with boys. It’s all about the floor and what can be accomplished there: block towers and tickling matches, and moments of physical affection, rough and tumble that they crave. Moms who wrestle are awesome. It’s not just a guy thing. Please don’t believe it’s just guy thing.
It’s about the fact that the floor will always have crumbs, paper clips, pencils, crayons, snippets, legos, blocks, matchbox cars, marbles, rocks, crumpled leaves, gravel, sand, bits of grass, sticks. Don’t let it get to you. It’s just not that important.
Don’t let the crying get to you either. Whatever feels like the worst day in the world, the worst hour, the worst minute, will surely pass. And you’ll blink, and they’ll be 20 months old and sitting on the counter, as if that’s okay, as if it’s not precarious and against the rules. And they’ll be grinning and giggling and drooling, and saying “No! No! No!” when you remove them, or suggest an alternative.
It’s all about alternatives. About distractions. “Oh look!” That’s a magic phrase, right there. Oh yes it is.
It’s about not getting it right the first time or the second time or even the third time. It’s knowing that any mom who looks like super mom, who is always prepared–with snacks and wipes and changes of clothes and perfect birthday party invitations–also has her off days (or else a whole lot of hired help.)
It’s about knowing that there is a learning curve and that you can’t get it right the first time, or the second, or the third. Knowing what to bring takes practice. Knowing what to expect takes a 18 years or more. Go easy on yourself.
Know that if you have ziplocs, wipes, and diapers in your car you have half a chance of avoiding disaster. A change of clothes for everyone, also in the car, is never a bad idea. When they are older swimsuits and towels and sunscreen should live in the car too, just in case. And a picnic blanket. Bandaids. Books. Juice boxes. Get over the fact that your car will look like a bomb just went off in it, always and forever more. Immaculate cars are for wimps without kids.
Carry pacifiers in your purse. Later, matchbox cars, notebook paper, animal crackers, pencils. Know that the day will come when you will sacrifice your phone (even your iPhone) or your sunglasses (even if they’re Gucci) to that little sticky pair of hands to buy ten minutes of peace, and resign yourself to this fate.
Know that you will survive on less sleep.
Forgive yourself for forgetting the little things. They’re little for a reason. Little things can be repaired, replaced, forgotten or forgiven.
Forgive yourself for the big things too. Hormones are messy. Love is messy. Learning to be a mama is messy.
But it’s glorious too. So glorious.
It will crack your world wide open. Oh yes it will."

Saturday, November 6, 2010

Our Story: Fall Family Photos


We still have family pictures hanging on our wall of when Hike was about 8 months old. I always feel bad looking at them because Baby is not in them. So... I've been planning on getting family photos for a while now. I asked a friend of mine, because she is simply awesome!, but she just had a baby, so that was out. Well, today was such a beautiful day that after we put the boys to bed I decided that when they woke up we'd go up the canyon and get family photos. Of course we were very unprepared! :) We didn't even get any socks for Baby. AND, once we got there I took a few photos to get the metering right, and the battery died. Luckily there was an outlet in one of the pavilions and we could charge it enough to get the pictures we wanted. Unfortunately by then the sun had gone behind the mountain so we didn't get any awesome sun rays coming through the trees or nice highlights. But I think they still turned out cute! And it sure was fun!

Is that totally lame that our family pictures are taken using a 'tripod' strapped to the stroller and using 'timer' mode?! haha! I guess it means you can't expect too much, but at least there were some that are wall worthy.
p.s. I do not claim in any way to be a professional photographer. ;)


It's so hard to get them all to look at the same time. ;)


I love Baby's face in this shot! 
He thought Hike swinging the branch was the best thing ever!


Brothers :)


 They did NOT want to take pictures with me. At least Hike smiled for the first shot. ;)


 Funny face. :)


 Hike did NOT want his picture taken any more. So, Neil distracted him by throwing things into the trees and making the 'helicopter seeds' fall. The only shots I got of him at this point were of him looking up. Oh well. :)

Oh, but of course he had to come running into the shot that was supposed to be just Neil and I. 
Sneaky boy. ;)


Sunday, October 17, 2010

Cash Envelope Tutorial and UPDATE


Ok, I am really sorry for the delay in posting the tutorial for this. I am still a bit sick, cough cough, and it is miserable! I've heard a couple of other people have had the same thing, which drags on and on, so unfortunately I'm not the only one. Hopefully none of you get whatever this is!

Anyway, I was thinking of just drawing up the tutorial, because honestly I have no desire to sew or craft, or do anything besides lay in bed, eat and read. ;) (not so bad I guess) haha. But THANK YOU THANK YOU Julie, who noticed that Walter and Veronica posted a link to their cash envelope tutorial on their etsy site!! Awesome!! :)

You can go to their site and buy the pattern for super cheap! She basically sells it at cost with minimum profits, which is super nice of her! :)

She is expecting their 3rd, so has closed everything down. Congrats!!! :) and hope all goes well!


She of course used oil cloth, which is a little different than using cotton. When I made mine I made some adjustments that I now realize I didn't need to make.

Here are the differences that you DO need to make when using cotton:

I do not want to take away from her tutorial, so I do want to still direct you there, but here is a list of everything you need (this will make it easier to list the differences):

(I originally had the measurements posted here, but took them off since her pattern is now for sale. It would be greatly appreciated if you could support her and buy her pattern, and if you have questions after that, I'd be happy to help you where anything doesn't make sense.)

WHAT YOU NEED: 
Oilcloth or COTTON (the black pieces are needed in both projects. What is in red is what you need to cut extra for the cotton version - cut the same size)
(1) main piece  plus (1) same size in lightweight interfacing 
(2) interior large pockets  plus (2) lightweight interfacing, 
(3) card pockets  plus (3) lightweight interfacing, 
(1) driver's license pocket plus (1) lightweight interfacing, 
(1) checkbook/reciept/shopping list pocket plus (1) lightweight interfacing
(2) closure for velcro pieces 
(6) zipper pocket pieces  ***see the end of this post for variation
Optional: (1) decorative piece going across main piece plus (1) lightweight interfacing


You will also need vinyl, velcro and zippers - the same as what is in the pattern.

*** 
Each lightweight interfacing piece will help keep the pockets and pieces more durable, and be able to better handle all the wear and tear. Cut the same size of the pieces and iron on the wrong sides of the fabric. 

Make everything the same, until you get to the bottom of PAGE 8.

"With wrong RIGHT sides together of the main piece and large interior pockets, sandwich the velcro closure between them and stitch all around the wallet using a 1/4" seam allowance."  

-- make sure the velcro closure is turned the right way inside so when you turn it inside out, it is facing the right way. (I always do a practice turning before I sew to make sure I get it right.)

On Page 9 - you don't really need to trim and square off any edges, or zig zag around the edges, since they will be turned in. You DO NEED TO TRIM THE CORNERS


I did add another step here as well. After you trim the corners, turn it right side out and sew all the way around the edge of the whole thing - as close to the edge as you can (or at least about 1/8" from the edge - no more. This will help keep it's shape, and adds a nice finished touch. :)

Make everything else the same and you are done!! :)


*** I did make all of my pockets out of different fabric.
If you only want three different fabrics, you can simply cut two pieces of each fabric, and use matching fabrics when making the pockets. But if you want them all different here's what you need to do:


instead of cutting
(6) zipper pocket pieces 
cut (2) each of (6) fabrics 7.75"w x 4.25"h 


which means you'll have 12 different pieces, 2 of each fabric. 
Then figure out what order you want them in your book and put them in that order. Then take the outer two fabrics and put those aside together. Then the next two outer fabrics and put them aside together. And the two fabrics that are in the very middle will be together. (does that make sense?)


Next take one of the sets, take one of each of the two fabrics, and sew them together, right sides facing, along the 7.75" sides. Do this with all of the fabrics, matching one fabric with the other. you will then have 6 pieces of fabric that measure 7.75" x 8" - each consisting of two different fabrics. 


Continue on with the instructions, making sure that when you sew the zippers to the fabric, you match up the fabrics. 
Making the pockets this way makes it a little trickier when sewing the vinyl pockets on. You can wait to sew them on until after you sew the zippers on, but before you sew the pockets closed. (to make sure they all end up in the right places.)
It doesn't matter that the pockets are open (between the fabric) because when you sew the pockets to the cover, you will sew right down the center where the two fabrics meet, and it will look beautiful! :)
***


I'd love to see all of them when you are finished!!! Leave me a comment and let me know when you've posted yours! :) Or you can send me pictures and I'd love to showcase them! :)


If you have any questions please let me know and I'd love to go into more detail or help you in any way I can! :) Sorry I've been such a lug... Good luck and happy sewing! :)