Home * Patterns * Tutorials * Made It * Our Story

Tuesday, August 31, 2010

Bloggity Blogs: UCreate


Wow! Can I just say that I've found so many great blogs recently, and I have no idea how to keep up with all of them, or which one I should feature first. I did find one answer... kind of. It also actually makes it a little harder though to because now there are many, many, more blogs to check out too.

Blog: UCreate

Kari has based her blog on everyone else's blogs and tutorials and creations. HOW FUN!!! I think that is the best part about blogging, getting to know everyone else! Really there are too many different posts on there that are awesome and now added to my "One-Day List".

Here is a very small sampling of what I found:

I'm not a huge jewelry wearer, but I could definitely wear this!!!


Love the design! Created by Running with Scissors.

Another awesome pillow with the tutorial.
When I saw how simply she made those zig zags it about blew my socks off!
They are so stinkin' cute! :)


Headboards can be so much fun! Don't believe me? Just check out this post!


You need to check out this post so you can see how cute the pictures are that she glued on the magnets! I LOVE this! What a simple idea and a quick visual to see what's left to do. I think I could make one of these for myself. ;)


Please visit Ucreate to find the original posts and sponsors.
I want to make sure Ucreate gets credit for their great collection, as well as the original creators!


Picture Links:

Monday, August 30, 2010

Made It:: Erasable Activity Books

I originally posted these on my old blog (that's why the blog address is on there).
You can see the original post here.


I've made a couple of these and I love them.

This is the first one that I made:

With Tic-Tac-Toe, the Dot Game, Trace the Letters, Draw my Face and a blank page for whatever. Hike is now getting old enough to start enjoying it, though still too young to really get the concepts of the games. It's still fun though. :)


I made another one for my nephew for a Christmas present! He was so excited about it! My SIL told me that he used it for hours when he first got it, and now they keep it in their church bag and he uses it every Sunday! I was glad to hear how well it is holding up, and how much it's being used when she told me that. :)

These are great because with a washable crayon, everything comes right off and you can use it over and over and over again! You can also use a dry erase marker on them (though I can't guarantee that it will always come off. You know how sometimes on your white board the color starts to stain? well, I'm sure at some point it might turn out like that. But the washable crayons haven't had that problem and it's been used for almost a year now.)

They measure 6 inches wide by 6 1/2 inched tall

I have this one in my shop:


I've changed up some of the pages a little. This still has Tic-Tac-Toe and the Dot Game, as well as Draw My Face, and a blank page. But instead of the letters I made up a squigly line page. Did you ever do those art exercises in school where you start with two lines and then have to come up with some kind of picture, and everyone's turns out different. I thought that would be fun because every time you use it, it will be different. That's what this page is for. And yes, that is one less page than my first version. On the back page there are pockets for crayons and a mini eraser. It has a simple Velcro closure.


The best thing about these... they are small enough to fit in your purse or bag and take anywhere! Hate waiting at the doctors office with nothing to do? Pull out your activity book! Take it to the dentist, the checkout line at the grocery store, that boring movie, church, road trips (though not for the driver), use it on rainy days, while waiting for your kids after school, for your kids waiting for you after school, and the list goes on. No waisting endless amounts of paper, or finding more space to scribble on once the page is already covered. And you'll always be distracted in style. :)

These might make a nice shopping list, or other quick note notebook. We'll see. (they are kind of labor intensive. It's definitely been a process coming up with them. But they're so much fun that I can't help myself. :)

...and I'm about to make some more for my shop in September.

Do you want one?
Or know someone who wants one?
If you let me know I can let you pick out the fabric before I begin.
(include your email address so I can contact you.)


Do you have any suggestions for what other pages I could do?


Thanks for all your comments! :)


p.s. I'm linking up....
go ahead and check out all the buttons on the side bar... I linked up to a few more sites as well! and really, they're all great! :)

Saturday, August 28, 2010

Fab Finds

I've found so many great creations this week! WOW! How am I ever going to keep up?

To start, here are two that I had to try out!

Flower magnets. A perfect mixture of cute, easy and fun.

I am redoing my kitchen in purple and white and figured these would be a good replacement for all those random magnets on my fridge.


I had to make a couple in these great bright colors as well.

It made me laugh because my mom came over and babysat for us last night. When we got back I asked her if she had noticed them, and she quickly responded with a yes and pointed out her favorite one. Then she noticed another one and said she liked that one too, and then this one and the one over here. It was kind of funny. Finally she ended up saying, "I guess I just like all of them." :)


And these bags. I know, I already posted about them, and shared a few that I made already, but I just can't stop! Anyone want one? haha. These would make great gifts! :)


The fabric that I ordered for my new kitchen curtains came yesterday! Yippy!
Here's what I picked.
(this and a solid white)


And here is the pattern I'm going to use to make them...

I found this over at Make It and Love It! (a must visit site).
I just love how ruffly it is! I think these will look fantastic!
Thanks Ashley!

(do you know that she is my hubby's cousin? Does that make me famous by association? haha. J/K!)


Wow. That was really random.  So much for being organized. ;)


Picture Links:

Friday, August 27, 2010

Thank You!!!

Aimee over at Sprik Space featured my Name Mobile on her Brief Bits! Yippy!!

Thank you Aimee!!!
Brief Bit Feature Button


and Thank You to everyone who has left such nice comments!! It tickles me inside to check my email and find so many kind words! I love it! You make my day!

Thank You! :)

Wednesday, August 25, 2010

Photography: Photography with a Purpose

Lately I've been thinking A LOT about how "You are what you Think". And really, it's true. We eventually, in some degree or another, always end up doing what we are thinking.

Two Sundays ago in my church class we talked about gaining our own conviction of things by doing that thing. I challenged everyone to write something down that they wanted a greater conviction of, and ways they could do it. I decided I wanted to focus on Service In The Home. WOW! What a difference! I really can tell you that as I've focused on not being so selfish, and more on helping others, trying to figure out their needs and helping to meet them, these last two weeks have been wonderful! (It was still a little rough at first, but the harmony in our home lately is so wonderful!) :)

I Love it!

So anyway, I was trying to think of what I could photograph this week so I'm not just taking random pictures. That's when I came up with

Photography with a Purpose!

  • Each week, or however often, I'll come up with a new purpose to shoot for.
  • I think for the first couple I'll focus on "You Are What You Think"
  • I'll post the idea the week before and try and have at least some pictures up on Thursday, the following week. I'll see if I can't figure out that Linky deal, and you can link your Photos with a Purpose too! I'd love to see what other people find and focus on too. - of Course you don't have to do the same as me. I'll make up a general category and you can fit in what you want.
  • I think this will be a good way to improve my photo skills, focus on positive things, and help 'become' the person that I hope to be. :)
  • Maybe I can see if I can get guest bloggers/photographers to give some photo tips too. :)

So here is the first Photography with a Purpose assignment:

Focus on something you want to improve/ gain a greater conviction of
(mine is Service in the Home)
and take pictures that reflect on things you did about it.


If you want to skip this one, the NEXT Photography with a Purpose will be:
Your Dream Board!!!
  • Things you want (like a super nice sewing machine. They don't ALL have to be your photographs for this one. But try.)
  • Talents you want to have (i.e. I want to be a better guitar player)
  • Anything else that shows your dreams and what you want to focus on in life (your children, your hubby, etc.)

Tuesday, August 24, 2010

Bloggity Blogs: I have to say...

I was only going to do one bloggity per week, but I just have to post about this new find!


One thing I LOVE is her Etsy shop (Fresh Squeezed Fabrics)! She sells fabric and patterns, and really, I could spend WAY too much money in her shop! There are so many great fabrics and designs and colors to choose from. And TODAY only she is having a "24" sale! For the 24th of August everything is 24% off! So go check out her shop and don't miss the savings! :)

This is the fabric I fell in love with!

Why do I like her blog? Because I found this tutorial and made three of these reusable snack bags today, and they turned out SO cute! :) The pattern is so easy and simple... and my favorite part: QUICK. :) (They would be so cute in the above loved fabric!!! hum...)


Here are my reusable bags that I made:


Do you notice the little hands? Hike was so great to wait while I took the pictures. Once I was done though, now that's a different story. haha. There was no way I could crop those cute little hands out of the pictures.

A friend of mine left for her first year of college today, so I whipped these up and took them over to her before she left, along with a giant bag of pretzel m&m's (a new fav), some twix and a little bag of cocunut m&m's (not so much my fav as I would have thought. Love the pretzel though!) :) I figure snacks are the only thing that are going to get her through some of her classes. And what better way to bring them to class than in a cute little bag.


In two of them I added an extra lining of super thin clear vinyl. It was actually a lot easier to sew in than I thought, and turned out pretty good. Now when those m&m's get smashed in her bag, they won't make the fabric all gross. Makes me want to lick the chocolate off of the vinyl just thinking about it. :)
(side note: my sister used to make fun of me all the time when I was little because I ALWAYS licked the chocolate off the wrappers of my candy bars. I didn't want any of it to go to waste. ;)


Back on topic: She has more fantastic patterns, great pictures, lovely fabrics. Her patterns are so simple and clear. (Can you tell I like her patterns???) ;)

Super cute phone bag! (on my to-do list) :)

and... she has a chocolate lab. If I were ever going to get a dog (if my hubby ever lets us) it will be a chocolate lab. :)


When I saw this title of one of her posts

"my name is randi and i am addicted to fabric"

I knew right away that I could say she's my new secret best friend! :) (is that super creepy and weird??? I hope not. ;) ) But really, I'd be embarrassed to tell anyone how much fabric I own.
Maybe I should open up my own fabric store. ;)

Anyway, there it is folks. :)
Let me know what you think...


Picture Links:


Bloggity Blogs: Just Something I Made

Cathe Holden is a VERY talented graphic designer and blogger! Another blog that I could look through for hours! PLUS she has a LOT of freebies! Printable fonts, labels, pictures, and I'm sure many other things I haven't found yet. She has a fabulous vintage taste! Love it! :)


Here's a sneak peak of what I found:

Little notebooks of love,
or whatever else you want to use them for,
made from cereal boxes! :)


Here is just one example of some cute printable labels!


How fantastic is that for decorations???
Things like this make me so house hungry!
I can't wait to be able to decorate our own place!!


make sure to check out older posts!!! They are a treat that keeps going and going.
There really were too many things that I wanted to highlight and remember forever!
:)

Also, her decorating and attention to detail is so much fun! I guess I don't really have space for it right now, but it makes decorating your crafty space look just as much fun as being crafty! What a great inspirational work place!!


Picture links:

Monday, August 23, 2010

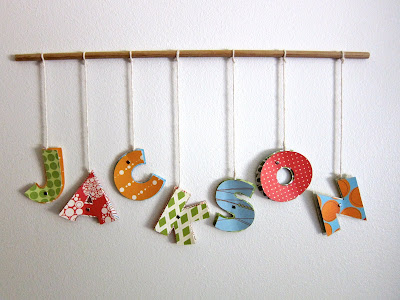
Made It: Name Mobiles

Did you see these on my old blog?

Sadly these two are no longer. Hike decided he wanted a closer look, took them off the wall and ripped them up.
I cried.


Well, now I will show you how to make your own. Yippy! :)


What you'll need:
  • Coordinating paper, cardstock may be better, but it really doesn't matter.
  • eyelets. One for each letter
  • brads, one for each letter
  • yarn, string, ribbon = whatever you want to use to hang your letters with
  • wooden dowel or other item to hang letters from
  • sawtooth picture hanger, small.
  • silent setter for making holes and setting eyelets
  • jigsaw
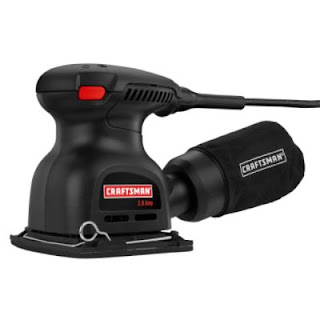
  • sander
  • drill and really small drill bit
  • hammer
  • pen
  • scissors or cricut machine


**Quick note. I put this tutorial together from three different names I was making, so that is why all the pictures are different. Also, some pictures were taken at night, and thus are not the best. Hopefully you can still get the picture of what to do ;)


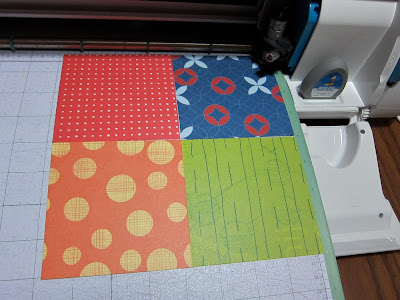
First, pick your paper. My letters end up about 3" in size, and I cut squares about 4" square to cut the letters out of. You want to have two designs per letter, a front piece and a back piece.

Here are my squares. Two for each letter.


I cut my letters out on my cricut which makes it very easy.

If you don't have a cricut, or want to cut them by hand, simply trace your letters on the backs of the paper you are using and cut. (If you do this you don't have to cut squares. Just simply trace/draw the letters on the back of the paper and you can save a lot of paper this way, and not have so much scrap paper left over.) Make sure that the letter that is going on the back is a little bit wider in every direction than the letter in front.

see how the back paper 'outlines' the front paper.


Once you have all your letters cut out you want to line up your letters how you want them to hang. Unless you put your eyelets in the direct center of each letter, they will tilt one way or another. Here is where you want to decide which way you want them to tilt so you know where to place your eyelets.
***Tip: Larger letters hang heavier. Like H, M, W, etc. If you place the next step right on the outer corner it will tilt a LOT, more than I might like anyway, so take this into consideration.


Punch a small hole first, my mom gave me this silent setter. It can be difficult at times, but definitely is worth it! Thanks mom!


Then place your eyelet.

I put the nice side of the eyelet on the back, because it will show more than if it is in the middle and gives it a more finished look.
Here you can see the backside of the L.

Once all your eyelets are set, line up your letters ontop of each other and centered. Punch a SMALL hole in the very very center of the letters.

Then place your brad to hold them together.


Pretty easy huh?!

Now you are ready to hang them.

Lay out your letters again and arrange them as to how you want them to hang in relation to hight. Cut your string, or ribbon, or yarn, or whatever you want to use with enough left over to tie knots in each end (cut it longer than you think so you have room to adjust).

Thread one end through the eyelet in each letter and tie whatever kind of knot you want. (I don't know what this knot is called that I use. Here's how I do it:


Thread the string through the eyelet (or around the dowel), wrap the short end of the string around the long end twice. Make sure your wraps are going back towards the letter or dowel. Then when you come around the third time, bring it over your two loops, go underneath them and back up. Pull the strings tight and your done! You can know slide it up and down the other knot.


Next we'll skip over to preparing your dowel. I bought a small dowel from Lowe's for about $1.
Line up your letters again so you know how long you want it to be. Mark the desired dowel length,

Cut it and sand it down a little so each end is nice and smooth.
Yup, I really used these tools.
You could probably improvise though if you don't have them.

Make sure your blade is moving really fast, and move fast through the dowel. Otherwise it seems to rip up the end and make a jagged mess.

Then take your sawtooth hanger and place it in the center of your dowel. Mark where the holes are for the nails.


With the smallest bit you have drill two tiny tiny holes where the nails will go. Go in far enough so your nails don't bend when you hammer them in. If you don't drill holes it is VERY difficult to get your nails to go in straight!
Then attach your sawtooth hanger.


Now your ready to hang the letters. Arrange them one more time exactly how you want them to hang. Take the ends of each string and tie around the dowel in the adjacent spot.

Tip: Don't clip the ends of the string until you have all letters tied onto the dowel. You may need to make the strings longer or shorter, and once you clip the ends, it's a lot harder.

Place a nail in the wall and you're ready to hang!! :) Walla! Beautiful!


If you want to add a little dimension to it, carefully bend each letter vertically right around the brad. The top paper towards the front, the back paper towards the back.


****
Variations:
  • If you don't want to attach the sawtooth hanger, you can simply tie a string around the center of the dowel and hang from the ceiling or other hook.
  • If you don't want to use a wooden dowel, you can use a hanger, a tree branch, a long pencil, a ruler, string, or whatever you have around the house.
  • Don't want your name hanging on the wall? Do your last name and hang it on your front door? Or make one or two together to say some kind of greeting like: Happy Birthday, Happy Halloween, Merry Christmas, Welcome, Brush your Teeth (for the bathroom), etc.
Have any questions or need help??? Just leave a comment and I'll get back to you! :)

If you make this, will you send me add a picture to the flickr group???
http://www.flickr.com/groups/fromblankpages/
I'd love to see the variety you come up with
and would love to share them with everyone as well! :)
Please let me know if you link to my blog. :)

Love it but don't want to make it yourself??? I'm adding a custom listing for this item to my shop. :) I'll let you know when it's up It's up! and you can go buy it and I'll make it all for you! Just let me know what colors/style you want and your set!
{please contact me for a custom order}


Thanks for stopping by!!