Home * Patterns * Tutorials * Made It * Our Story

Wednesday, April 30, 2014

How to: 10 inch Double Border Mini

Did you see my mini that I posted about yesterday? Did you also notice that Heather and Heather are both giving away a free copy of my new Star Fruit pattern? You can enter on their blogs (click their names) or on Instagram for your chance to win a copy! :)

Today I want to show you how I turned my 6 inch finished quilt block into a 10 inch double border mini. Are you ready?! (Yes, I still need help picking a binding fabric. Any suggestions???)


Cut:

Thin border:
       2 - 6.5 inch x 3/4 inch (A)
       2 - 7 inch x 3/4 inch (B)
 
Thick border:
      2 - 7 inch x 2 inch (C)
      2 - 10 inch x 2 inch (D)


Instruction:

1. Create any 6 inch finished block - left unfinished at 6.5 in x 6.5 in. I like to leave on all the paper until I've attached my first border. It adds a little more stability to the fabric and helps prevent shifting.

 2.  Lay out your block and fabric as follows:


 3. Sew both (A) pieces to opposite sides of the pattern:


4. Sew both (B) pieces to the top and bottom of the pattern:


5. Sew both (C) pieces to opposites sides of the block:


6. Sew both (D) pieces to the top and bottom.
7. Create a quilt sandwich by layering top, batting, and backing fabric.
8. Baste with pins or spray baste. I love to spray baste, especially with little blocks like this.
9. Quilt as desired. Minis are especially fun to hand stitch.
10. Square up to 10 in x 10 in.
11. Bind.


And your finished! A beautiful mini to hang on your wall, or use as a snack mat... if you dare. ;) These would make great gifts for Mother's Day, birthdays, swaps, etc!


I'd love to see your minis that you make! Will you tag them on Instagram (#fbpPatterns) or link them up HERE on my blog! You could win a free pattern, fabric, or handmade goodie from me if you do. Just saying. ;)


Diane

Tuesday, April 29, 2014

Star Fruit Mini & New Pattern!

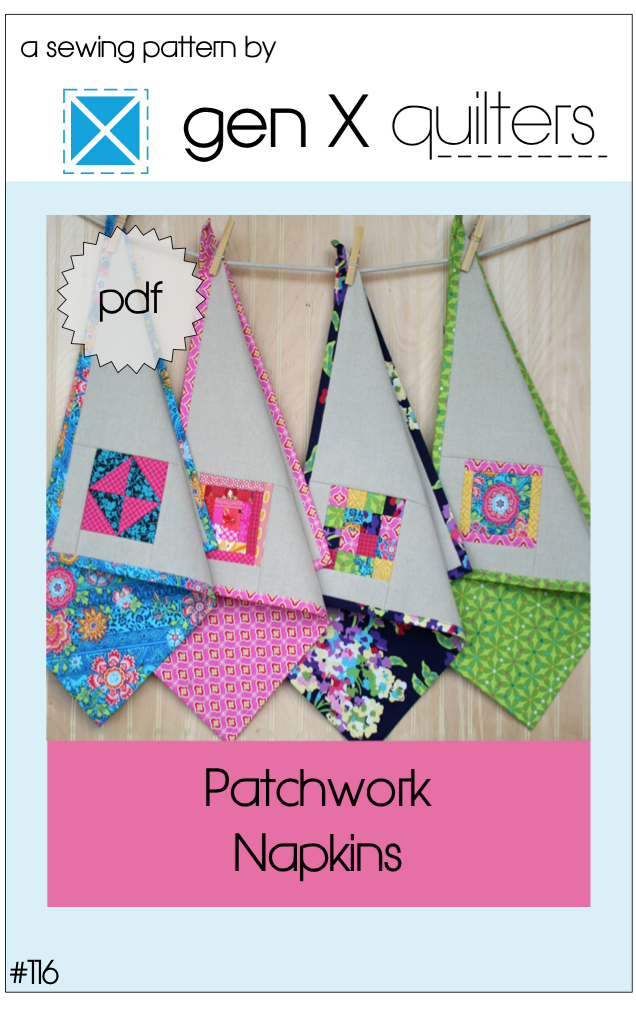
Don't forget to enter the giveaway for AnneMarie's Patchwork Napkins pattern HERE
I'll pick a winner Saturday.


I just finished up this mini, but I need help picking a binding, so I thought I should blog about it! What a novel idea. ;)

Here is the mini:

This block is for a 6 inch finished block, and with the double border it finishes at 10 inches by 10 inches. I think the thin inner border is especially nice with the sliver points in the pattern.


I didn't want to detract from the design, so I did some simple hand stitching in the white sections. 


This is my newest paper piecing pattern, Star Fruit. I really love it!


The repeat patterns are really fun too:


The pattern comes in 3 sizes: 6 inch, 12 inch, and 18 inch finished blocks.

It also includes:
  • Coloring pages
  • Cutting templates for each size
  • Reverse blocks in each size
  • Basic instructions for this block
 Here is what using the reverse blocks does:

See how it creates that perpendicular, overlapping diamond?!


I had some really fantastic help testing this pattern out!! Check out these stunning blocks!

Heather, of Quilt.Cook.Keep, (Instagram: @heatherkojan) made this block.
 I love all the solids and the bright colors!
She is also giving away a copy of the pattern, so be sure to stop by for your chance to win!!


 another Heather of Bobbins and Bullets (Instagram: @bobbinsandbullets) made this one. 
She also showed me a mock up she did of her block in a repeat that was pretty amazing. Be sure to check out her blog post to see it!
She is also giving away a copy of the pattern on her blog! Go enter!! ;)


Sarah (Instagram: @sarahhuechteman) made this block. 
I really love these colors! as well as the effect she created by weaving the red and pink.


Come back tomorrow for a tutorial on how to create the double border block! It's really easy, and can easily be used with any 6 inch finished block (which I have a few patterns that include 6 inch sizes that would be great for the center!) ;)


I will also be posting a tutorial on using my cutting templates for easy fussy cutting!! Stay tuned for that one. I fussy cut almost every piece in this mini, and I love the results! Each green point has the dots lined up, and those white dots on pink are perfect! I think it really adds to the overall design of the pattern.

All of the fabrics are from Anna Maria Horner's Good Folks line. I finally took it off my shelf and cut into some of it! I'm so proud of myself. ha! It was totally worth it!


You can find the pattern in my Etsy shop and on Craftsy


So... back to the problem, which binding should I use? Curry, a darker blue, or white? Or something else? I can't decide.


Look at me go?! Two blog posts in a row. ;)
What have you all been up to

Diane

Monday, April 28, 2014

Patchwork Napkins Blog Hop & Giveaway!

 If you are visiting my blog for the first time, Welcome! :) I hope you'll stop and stay a while, and hopefully find some things you enjoy. I am so excited to be participating in AnneMarie's blog hop for her beautiful Patchwork Napkins pattern!

When AnneMarie, of Gen X Quilters, first invited me to join her, I was so excited! In our family of 6, we've recently started using cloth napkins at full force, and I've loved using the beautiful napkins I've received as gifts. Though I hadn't yet made any of my own. This gave me the perfect excuse to get started.


I was pleasantly surprised with how fun this pattern was. I assumed that napkins would be easy to make, which they are, but I have to say that this pattern took napkins to a whole new level. It was simple, straight forward, easy to follow, and I ended up with something that I absolutely love!


 The instructions call for linen as the main front fabric, but I decided to go with some green quilters linen, by Robert Kaufman. With 4 children, 5 years old and under, being clean is not in their vocabulary, and I wanted something that would hide any stains a little better. I picked one of my favorite Amy Butler fabrics for the backing, and I love the contrast of the two.


The pattern includes instructions for 4 different quilt block designs for the corner. The instructions for each block are clear, easy to follow, and include diagrams for every step. I found it refreshing how little I had to think about what I was doing, because it's compiled so well. I could simply enjoy the process! Here are the two blocks I chose:

 
16-patch block

I actually made a paper template/window to fussy cut each of the blocks. (I cut a 1.5" x 1.5" square, and then cut a 1" square from the center. I then framed the design parts I wanted to have show in the final square, and cut around the outside of my paper template.) I used all Amy Butler prints from her Lark collection. I don't know that these prints would typically be a print you would fussy cut 1" squares from, but I wanted to make sure I had some fun designs. This part took by far the longest.


 Frame block

I was trying to frame the center black block with the ring of flowers from the same print, but it didn't work out quite as well as I had planned (mostly my top strip is off just a little). It probably would have stood out stronger had I used a different print for the frame, but I still really like it!


 One of my favorite parts about this pattern, was how easy it was to use the back for self binding. I have done this so many times on mug rugs, and other smaller items, and even a few quilts, but I've always struggled with the corners. Her instructions are fantastic!! I've never had such an easy time, doing the binding, and have it turn out so perfectly! I am so glad to have this pattern for those instructions, as much as I am for the awesome napkins!


Especially since these were so quick and easy to sew up, I think they would make great house warming gifts, wedding gifts, mother's day gifts, etc. I will definitely be doing some more selfish sewing and add some more to my collection of napkins! It's fun to have a little bit of quilting thrown in at the dinner table. Not to mention being surrounded by beautiful fabric. Who doesn't love that?! ;)


Even my little girl kept telling me how pretty they were as she helped me take pictures.


Be sure to stop by AnneMarie's blog and see all of her beautiful napkins! 
You can find the pattern HERE.

http://www.genxquilters.com/2014/04/patchwork-napkins-pattern.html
and guess what? It's ON SALE all this week, just in time for Mother's Day. Don't miss it! ;)


And don't miss the rest of the blog hop going on this week! I can't wait to see everyone else's napkins. Here is the full schedule:

Mon. Apr. 28   Diane / from blank pages...
Tues. Apr. 29   Lee / Freshly Pieced
Wed. Apr. 30   Adrienne / Little Bluebell and Amy / Sukie
Thur. May 1     Kati / From the Blue Chair
Fri. May 2        Debbie / A Quilter's Table


Would you like to win a free copy of the Patchwork Napkins pattern?? AnneMarie offered to give one away to one of my readers!

To enter:
  • Visit AnneMarie's blog post about her napkins HERE, or visit the others bloggers sites if it's later in the week, to see their napkins (see the blog hop schedule above).
  • Then come back and tell me which of the four block designs is your favorite.
I will pick a winner on Saturday May 3rd.


Thanks for stopping by! 
I hope you all have a wonderful Monday!

Diane

Wednesday, April 16, 2014

What I've been up to...

One thing I'm learning, with having four children, is that life is constantly shifting. I think things were a little easier when I only had three, and they were all fairly young, with their needs all bundled into one simple package. But now that my oldest is finishing up kindergarten, and school here in Florida seems SO serious and intense, my bundle of "needs" that I have to meet each day has expanded dramatically. On the other end of the spectrum, the simple baby stage is over. the end. Little Tommy is no longer a baby. He isn't walking just yet, thank goodness, but he is trouble with a capital T. He is fun and happy and a bundle of joy. But he is also sneaky and cunning and HAS to get into anything and everything that he shouldn't. As soon as he spies anything forbidden, he is there in a flash. If he sees me coming he moves even faster, or snags whatever object he's after and "runs" away. Trouble I tell you. I was spoiled with my two, well-behaved, middle children. I think this guy is even worse than Hunter was. ha. So yes, my demands of mother have grown exponentially in the past few months. It's fun, and I'm learning, and with the Mr. working long hours all the time, it is also exhausting. Life is wonderful in it's crazy ways.

As I have been for the past three years, I find my outlet in creating, sewing, quilting, and pattern writing. It's such a blessing to have such a fun and rewarding source of individualism. I don't know how I would mentally survive without this outlet.


So... here's where I'm at creatively right now:

I have one quilt pattern that has been kicking my butt.  BUT I have had some great and patient testers, and with some good feedback, I think I made some good headway this morning. I started all over from the beginning. I realize I got too wrapped up in all the technical stuff, that I skipped right over the simplicity of the instructions. Hopefully, I'll be able to perfect it this time around. I really can't wait to share it and get it finished up.

I have a list of other quilt patterns I want to get written up as well. I'm hoping my brain isn't going out, and that they won't give me as much trouble, as they really are a bit simpler in technique. A few I already have the fabrics for, which means serious business about getting these done. Catnap by Lizzy House, Simply Color (or Style, I can't remember - the second collection by V. and Co.) with some blue ombre fabric. :) and a few more...


In my frustration with the above mentioned quilt pattern, I've returned to paper piecing patterns in full force. I have one new pattern that is  being tested right now, and I am really loving it!! If all goes as planned, I'll be releasing it on Monday. I think it will be fabulous! (This one I'm keeping a secret) :)

I have another pattern that I've already created, and just need to finish quilting my pillow top for. Wanna see the design??  (These are both four blocks together.) I actually came up with this one as I was prepping for Sewing Summit last year. I will be releasing all the patterns I created for the class soon. I also want to put together an ebook, that goes over all the material plus more. I feel so bad that people didn't get more out of the class than we all hoped, me especially. I think it was a mix of running out of time, and everyone being so tired from the fun weekend. I think it would have been better had the class not been the last class of the day on the last day. But I still want to help people learn how to do it!! I'm just not sure how to go about it. Anyway...

 
I really love the lattice design that it creates in the background.

 I'm thinking of calling this one Flower Patch. What do you think?


And then I pulled up this old one from a few months ago,


Last night I came up with this variation, using the same pattern.


and two more this morning, which are basically the same as the first, just coloring in the centers.


What would be a good name for this pattern? I really love the design in the second option. My husband says that the yellow crosses looked like buttons to him.


We've also been trying to go to the beach and the pool when the weather has been nice. And trying to keep up on too much homework for a 5 year old. *roll my eyes*.


And on a super fun note, I am participating in a few blog hops hosted by some amazing people. I am really looking forward to it. Stay tuned in the next few weeks to find out more...


So what have you been up to?
What do you do when life starts getting the best of you?


Diane

Monday, April 14, 2014

Giveaway Winner!

I picked a winner for the Wonky Stars Pattern Giveaway. I said I'd pick the winner on Monday, right?! Well, a week late, but it's still Monday. Oops.


Congrats Karrie!!

Thank you everyone for your kind words! I hope things are going well for all of you!


My "to blog about" list is getting a bit overwhelming, so hopefully I'll get them all up here soon! I have so many fun projects to share! Not to mention all of my amazing #handmadebirthdayclub2014 gifts I received last month. I was spoiled!!!


Diane

Have you checked out Creativebug?

Have you ever checked out Creativebug? It's a website that offers all sorts of different classes. You can sign up for a monthly fee, or pay for classes individually. For only $9.99 a month, and unlimited classes, that is an awesome deal. Though even with that, I wasn't really interested in it until I saw everyone taking the Basic Line Drawing Class with Lisa Congdon. I love to draw, and it's been way too long, so it was fun to take a break from the normal daily grind, and get back into something I enjoy.


I also REALLY want to take this pattern drafting class!

Pattern Drafting Course with Cal Patch


As well as this Build a Creative Brand Class... with designers like Heather Ross and Liesl and Todd Gibson, the couple behind Oliver + S. Tell me all your secrets? Yes please! (I don't know that they are really going to tell all, but advice from people I adore is always nice.) :)

Creativebug Brand Series


Looking around at the different banners, I decided I also want to check out this workshop:


Creative Video Workshops on Creativebug.com


and oh so many more. Take a look! I also have my eye on a nice book binding class. I just need to find the time to do everything! ;)


Diane

Wednesday, April 9, 2014

50% off at Gymboree!

I try not to post a lot of sale stuff (besides my own patterns), but I got this email that I looked at today, and this is a pretty good deal!

Do you ever shop at Gymboree?? They have an awesome sale going on today


make sure you enter in the coupon code. 
I LOVE looking at all the cute kids clothes!


Happy Shopping! :)
Diane

Wednesday, April 2, 2014

New Pattern: Wonky Stars! and Giveaway!

 I got a little push from Lisa to finish my Wonky Stars pattern, during my big flash sale event, so I did. :) She had seen this photo I shared on Instagram about 85 weeks ago (according to Instagram). :) Well, she has a good memory. Because I basically forgot about it. 

This is my first four blocks I made from this pattern.
(and a slightly different version, as the very last outer piece is slightly narrower than the pattern is now).

When Lisa brought this pattern back to my attention, I pulled these blocks out and sewed them together. I am now in the process of handstitching around the stars, and will turn it into a pillow. I'm debating on giving it away for my 1,000 Follower Giveaway on Instagram... I'm still undecided. Actually, I have to ask my hubby. He gets mad that I give the good stuff away. If I keep this, I'll make something equally as awesome for the giveaway. (come follow me if you would like to win it, at a soon but later date.)


So of course I had to ask Lisa to test it out for me! She has never paper pieced before, and I love giving people an excuse to try it, so here is her beautiful finished pillow!!! I love these colors and fabrics she used! And she did an amazing job for her first time!! :) (Which means if you've never paper pieced before either, this is a great pattern to start with!)


Just so you know, the pattern itself does not include instructions on how to paper piece. BUT I do have a full tutorial on how to paper piece, which you can find HERE.


Julie also commented that she's never paper pieced either, so I sent her the pattern to try out as well. I love her fabrics as well, and it gives it such a different look! She framed it to hang in her daughters room! WOW! It looks amazing! (I've never thought to frame a quilt. But I love it!)


So there it is!!

Oh, well, here's a little info about the pattern. Inside you will find:

:: Pattern pieces to create a 6 inch finished block
:: Reversed pattern pieces for more symmetrical 6 in blocks
:: Pattern pieces for a 12 inch finished block
:: Reversed pattern pieces for symmetrical 12 in block
:: Cutting Templates for both 6 in and 12 in patterns
:: 4 pages of coloring pages to help you plan before you cut

Cutting Templates are a great way to reduce fabric waste when paper piecing. They also speed up the process, and are a super easy way to fussy cut your fabrics!


Wondering what the reversed blocks do??? Here is a mock-up of multiple blocks together:


And here is a mock-up of what the pattern looks like using the reversed blocks. See how in the above picture the lines of the stars don't line up? But in the stars below they do, and it is more symmetrical? That's what the reversed blocks do. You use two normal blocks and two reversed.

 I also rotated every other block to give it more interest.


Here is one more example I made using the 6 inch pattern. I love small things! ;)


 So did you catch that?? This pattern comes in two sizes: 12 inch AND 6 inch, all in one pattern. I like small! ;) and I like options. 


If you are interested in purchasing this, you can find it in my shops (Thank you in advance!):


Wonky Stars on Craftsy and Etsy!


Would you like to win a copy of this pattern??? :)
  • Just leave a comment below, telling me something fun like your favorite color, or something exciting going on in your life right now! :) 
I'll pick a winner on Monday!

More ways to win a copy:

I am also offering a free pattern on Instagram! So be sure to follow me there to enter as well! :) (http://instagram.com/fromblankpages).
Julie is giving one away on Instagram! Simply leave a comment to be entered. (http://instagram.com/julia_davis7)
Lisa will also be offering a free pattern, so be sure to follow her  so you don't miss it! (http://instagram.com/mtngirl81)


Thank you so much!! And Thank You ALL for your support during my Birthday Flash Sale event last month! It was so much fun! And I HOPE you will now all share what you make! (because really it makes me all giddy inside to see them being used... not because I'm a weird stalker person or anything). ;)

Diane