Home * Patterns * Tutorials * Made It * Our Story

Tuesday, September 29, 2015

Tutorial: Decorative Pillow Case with Hidden Zipper

There are a lot of pillow tutorials out there, and a lot of them are fantastic! (Sew Mama Sew is an awesome place to start if you are looking for some pillow tutorials!) Over the years I've combined my favorite techniques from ones I've liked to create the perfect pillow. Ok, maybe not perfect, but it's my favorite way to make them! I hope you'll enjoy this method as well, or at least pick up a few techniques that you can incorporate into your own pillows.


What You Need:
  • A pillow front (a quilted piece of fabric or a quilt block make for beautiful pillows! You can google decorative pillows to get a lot of ideas, or check out the patterns in my shop... I have a lot of patterns that would make beautiful pillows!) ;)
  • Fabric for the back: you'll need two pieces. 
    • One piece that is the about the same height as your pillow by the same width (for above the zipper). 
    • One piece that is between 3-4 inches by the width of your pillow (for below the zipper).
  • One zipper, equal to the width of the pillow or longer. 
  • Normal sewing supplies: thread, scissors, rotary cutter, cutting mat, ruler, sewing machine, walking foot, zipper foot, and any other tool you like to use while sewing.


Before you Start:

1 - Prepare your pillow front. My pillow fronts are almost always a quilted "quilt top" or "quilt sandwich" (a piece of fabric that will be the front of the pillow, a layer of batting, and a backing fabric. You can quilt this by machine or by hand. If you don't want it quilted, at least baste around the edge to keep the layers together.) Square up your pillow front so it is the finished size plus 1/4 inch on all sides.

 For my pillow front I'm using a block I made for the MQG fabric challenge using The Cottage Garden designed by The Quilted Fish for Riley Blake. I based my block off of one of the flowers in one of the prints.
The pillow front is cut to 14 1/2" x 14 1/2" for a 14" square pillow.


Assembling the Pillow Back
2 - Cut the fabric pieces for the back. You will need two pieces of fabric for the back. One piece go to above the zipper, and one to go below it. I didn't have enough fabric left for one solid piece to go above the zipper, so I pieced the top piece, shown below.

 Both pieces need to be the same width as your pillow.
:: Cut the top piece the same height as your pillow (you will probably end up cutting a little off the top, but it's better to be safe than sorry, and I like a little wiggle room). My top piece is 14 1/2" wide by about 14 inch tall.
:: Cut the bottom piece about 3 1/2 inches to 4 inches wide. My bottom piece is 4" by 14 1/2".

I didn't realize that my SD card was full in my camera, so a few of the photos I thought I took, didn't take, so the photos skip ahead a little, but the process is still the same!


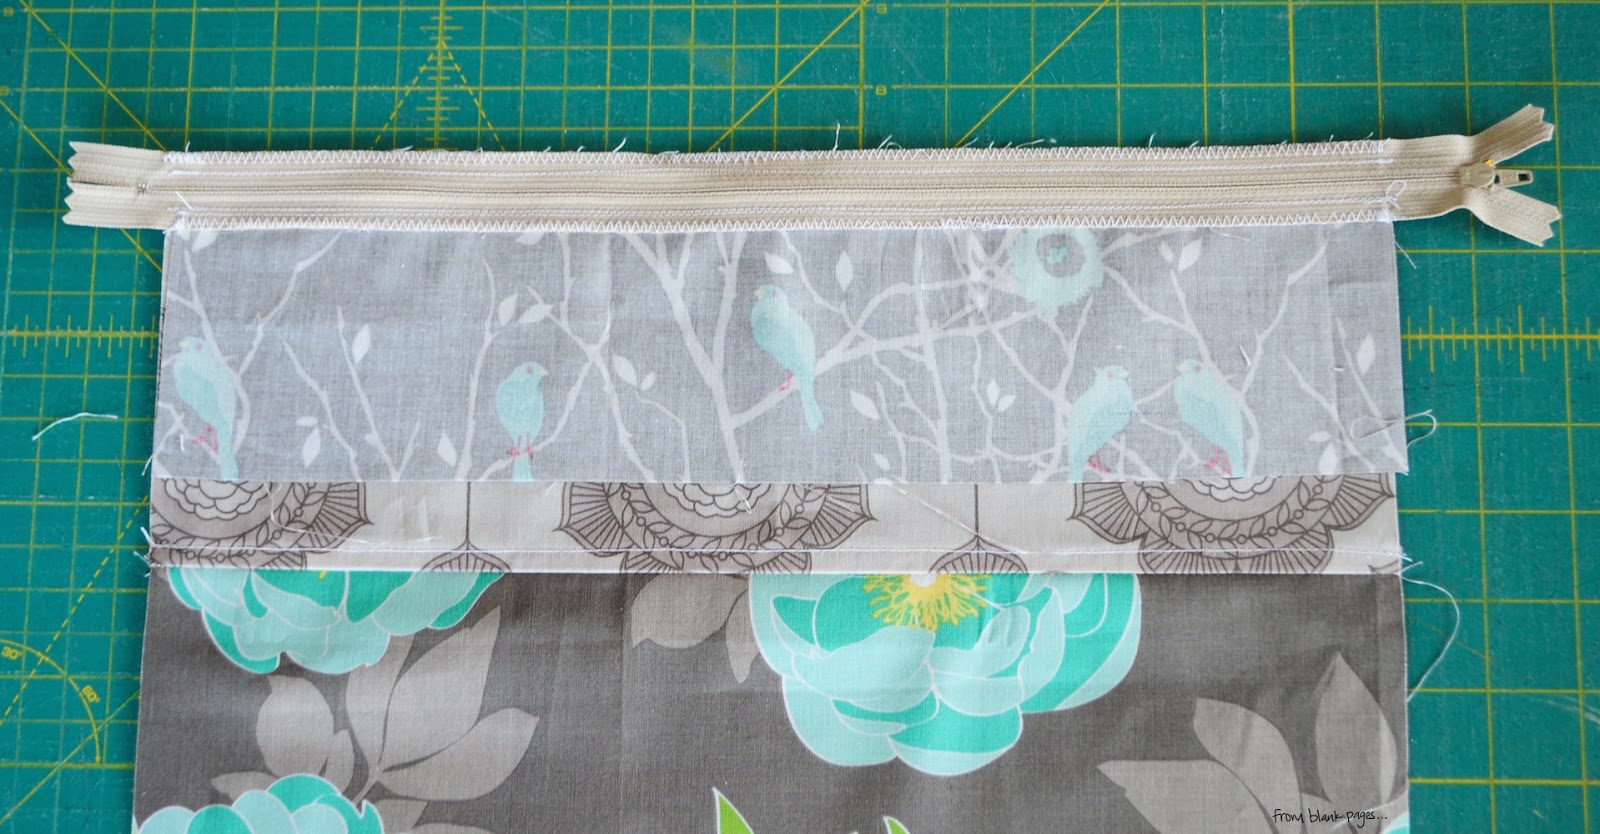
3. Layout your top piece, zipper and bottom piece. (The bottom piece is already attached in the photos, just ignore that.)


4.  Draw a thin line of glue (Elmer's washable school glue) along one side of the zipper. I like LOVE using these glue tips from Cristy of Purple Daisy Quilting. You can skip this step if you prefer pinning, and continue with step 5.


5. Flip over your fabric, aligning the raw edge of the fabric (the edge that is closest to the zipper in the above step) with the edge of the zipper (here is where you would pin the fabric to the zipper) or if you used glue, use a warm iron and gently press to set the glue.


6. Use your zipper foot and sew along the edge you just basted. Back stitch at the beginning and end.


7. Use your walking foot to zigzag along the same edge, to prevent fraying of your fabric. You won't see this part, but it'll make for a nicer finish on the inside.


 Here's what the zigzag stitch looks like on just the bottom piece.


 A close up of both sides of the zipper with the zigzag stitch.


 8. Flip over the fabric and press the fabric away from the zipper teeth using your iron. Use your zipper foot and top stitch along the edge of the fabric.

 The top stitch on just the bottom piece.


 The top stitch on both the top and bottom.


 9. Repeat these steps with the other fabric piece, so that both top and bottom pieces are attached to the zipper and top stitched as shown in the photo above.


10. Fold the top piece down and press.


11. Fold the top piece back up, with the fold in the fabric on the opposite side of the zipper. The zipper and top stitch of the bottom piece should be covered. Press to crease the fold.


12. Unfold the fabric and draw a thin line of glue near the edge of the fabric. Fold the fabric back up, careful to keep the fold on the crease. Press. OR you can simply pin the fabric in place. But don't just sew it... I tried that and it didn't look pretty. ;)


13. Use your zipper foot and sew down the fabric along the size of the zipper teeth. It should be close to your original top stitch.


Here's a close up of what it looks like under the flap and you can also see how it looks with the flap down.


14. Open your zipper so the zipper pull is towards the center of the pillow back. Top stitch both ends down, stitching over the zipper a few times to secure it (this secures the zipper pull so it doesn't come off. You don't want that to happen... trust me!)
 
Look at where the zipper sticks out and you can see just inside where I stitched across the zipper. Keep these stitches less than 1/4 inch from the edge of the fabric so they don't show on your finished pillow.


15. Trim your pillow back to the same size as the pillow front, also cutting off the ends of the zippers that are sticking out in the photo above. If you've made the top and bottom pieces taller than needed, you can know play around a little with how high up you want your zipper to be in the back. I like it towards the bottom, though not at the bottom. You could also adjust the fabric pieces so it's more in the middle if you would like... there's no right or wrong.


 Assembling the Pillow

16. Lay the pillow back over the pillow front, with right sides facing. Make sure the zipper is open at least half way, or a little more.


17. With your walking foot, stitch all the way around your pillow. Backstitch at the beginning and end. Trim your corners.


This next part I learned from this tutorial. I've only used it twice now, but I actually really love it! I'm tempted to go back and do this on all my pillows I've already made! The original tutorial says that it eliminates the floppy corners that form on pillows after a while, something I've noticed on my pillows. Try it, maybe you'll like it too! And once the pillow is stuffed, you really don't notice the tapered corners at all! This part is optional, so you can skip it if you don't want to do it, continuing to step 21.


18. Measure 1/2 inch in from each corner, mark. Measure down 5 inches on each side and mark. Use a ruler or straight edge to draw a line from the 5 inch mark to the 1/2 inch mark. Repeat on all corners.


Here's a close-up of what that looks like.


19. Use the lines you just drew as a guide, and sew 1/4 inch on the inside of them.


20. Trim the corners to your new sew line.


 21. Trim the corners (the points of the corners - you can see the difference from the above photo and the photo below). Using your walking foot, zigzag stitch around the entire pillow, careful to stay in the seam allowance. This keeps the pillow from fraying on the inside. Even though you won't see the inside, I like to know that my pillow doesn't only look great on the outside, it also has great quality on the inside!


22. Now you can turn your pillow inside out, poke out the corners and press the sides. Here is the front and back of my pillow.  (Notice how the corners look after I tapered the corners.)


The zipper is nicely hidden under the flap.


23. Stuff with a pillow insert and you are ready for a nap!

 Notice how the corners are still pointy, even though they are tapered, but not so much that they begin to be floppy. I like it. What do you think?


Thank you for stopping by! I hope you enjoyed the tutorial! 
If you have any questions, please feel free to ask!


Diane

Saturday, September 26, 2015

Nothing's Allowed PenPals: Staring Over

You may remember when I wrote this post about my fabric addiction last year, which lead to the formation of the Nothing's Allowed Penpals group. The penpal group was AWESOME!! But unfortunately I didn't organize it very well, and after a short time it mostly flopped.


As a quick overview for anyone that is not familiar with it, this group is a penpal group where NOTHING is allowed! The only expense should be the cost of the stamp. Don't send candy, goodies, don't buy fancy stationary, nothing. You can send recipies, quick notes, doodles, art, someone sent me some garland made with heart shapes cut from magazines, which I LOVE!, etc. All that is sent is something from the heart!

The point in this is to help us disconnect from the need to always buy "things" and have "things". If you read the post I first linked to, I talk about what I went through in my own personal struggle of my fabric/shopping addiction. After reading so many responses, and hearing others stories, I realized I wasn't alone. I wanted to provide a way to feel the "needs" that we have, without busting our budgets, or forming dependencies on things that don't fulfill. People are what are real, and relationships are what are most rewarding!


As for my own experience in the group, I had high hopes to send EVERYONE mail every month or two. Well, sending a quick note to 70+ people is actually rather time consuming and it became pretty overwhelming.

Fast forward to the last month. I've been thinking a LOT about friendships and friends, and how incredibly important it can be to know that there is someone who has your back! Friends are essential in life! And honestly, I am kind of a horrible friend. I do have lots of friends, but in the busyness of life I am afraid I'm not very good at returning the friendships that others have given to me, online or in person. Which I really want to correct!

In my efforts to rectify this and come up with a solution I've thought a lot about this group, and how great it could be if done correctly!


Friday, September 25, 2015

New Pattern: DUSK + a Giveaway!!

Hi Everyone! How is everyone? I hope you're well! Ever since school started at the beginning of this month, things have been non-stop! I'm finally starting to feel like I am finding a little time to relax, and it's so nice!

I want to let you know about a new pattern that I released this week! It's called Dusk!


Wednesday, August 12, 2015

I've been pretty quiet... And a little intimidated.

I feel like for the past 9 months or so, that I've been really quiet and reserved. I've had so many things I've wanted to blog about, or share, and even started blogging about, but I just haven't been able to hit publish! I don't know why. Well, I do. For some reason I've felt rather intimidated to open up and share things that are such an intense part of who I am. Which seems odd considering the things I have shared on my blog. Maybe it was just being pregnant that did it, but I think I'm ready to start opening up again, and kick this intimidation out the door.

Friday, August 7, 2015

Sew-Along: Polaroid Sleeping Bag: Making the Polaroid


This post is part of the Polaroid Sleeping Bag Sew-Along. You can find the main post and supplies list, along with links to all available posts in the series, HERE.

http://fromblankpages.blogspot.com/2015/07/sew-along-polaroid-sleeping-bag.html


Are you ready to get started??

Today I'll share the complete process for making the inner polaroid section of each block (The I-spy print + white sashing). My blocks are larger than the standard polaroid blocks you may have seen. If you would like to make smaller polaroid blocks, I suggest checking out Karen's post over at CapitolaQuilter.


I actually suggest that you check out Karen's post no matter what, because she has some great tips that I wish I had remembered before I had started my blocks. I'll reference her suggestions throughout this post, but I'm not going to show you how to do them.


For a quick run through, here is how we will create one polaroid block:

Take one charm square (4 1/2 inches by 4 1/2 inches) (A)
Sew to the top: 1 inch by 4 1/2 inch white strip (B).
Sew to each side: 1 inch by 5 inch white strip (C).
Sew to the bottom: 2 1/2 inch by 5 1/2 inch white strip (D).

*After you attach each section, press seams towards the white fabric.*

And you have one center of a polaroid block!

Super simple!


Cutting Fabric:
All instructions are for creating 50 polaroid blocks, which is how many you'll need to make one sleeping bag.


I-Spy Charms:

What you'll need:

(A) 50 - I-spy charms, each 4 1/2 inches by 4 1/2 inches.


By I-spy, I am referring to prints that have fun, playful designs or images that will make it fun for a child to look at and pick out the different items in the print. That's the reason I chose this block for my sleeping bags! When we are out camping and the kids can't sleep, they can stay up looking at all the different pictures on their bags.


I had a huge stack of I-spy charms (5 inches by 5 inches) from some Flickr swaps I participated in a few years ago. I simply cut those down to size, and then cut out squares from my stash for the rest of the prints.

Karen has a great idea for making a viewfinder window to get just the right fussy cut. If you want to do that, cut out a square that is 4 1/2 inches by 4 1/2 inches, and then cut out a 4 inch square from the middle. The border of the window needs to be 1/4 inch on all sides for an accurate fussy cut.

Set your charms aside.


White Sashing:

You will need 1 yard of white fabric.

Before you begin, read through the entire tutorial. Also check Karen's post in case you decide to use her method for attaching the sashing, which I think is really great!

You will need:


- (B) 50 - 1 inch by 4 1/2 inch strips
How To:Cut: 6 - 1 inch by WOF (at least 41 inches long) strips.
Subcut each WOF strip into: 9 - 1 inch by 4 1/2 inch strips.


- (C) 100 - 1 inch by 5 inch strips (2 strips per block)
How To:Cut: 13  - 1 inch by WOF strips.
Subcut each WOF strip into: 8 - 1 inch by 5 inch strips.


- (D) 50 - 2 1/2 by 5 1/2 inch strips
How To:Cut: 3 - 5 1/2 inch by WOF strips.
Subcut each WOF strip into: 16 - 2 1/2 inch by 5 1/2 inch strips 
*You will need 2 additional 2 1/2 by 5 1/2 strips, which I recommend simply cutting out of a corner of your fabric than cutting an entire extra strip of fabric that might end up going to waste.
*If you have a usable 42 1/2 inches per strip, then you can get 17 pieces from each WOF strip - eliminating the need for cutting two more extra pieces.


Assemble Blocks:


1. Attach ONE white 1x4 1/2 inch strip to the TOP of ONE charm square. Repeat for all 50 charms.

** If you want to do this using Karen's method, do NOT subcut the WOF strips. Instead, sew 9 (A) charms to the WOF strips - make sure you sew the strips to the TOP of the charms. Be sure to sew the charms close together or the strips might not fit 9 charms. Then trim at exactly 4.5 inches.**


2. Attach ONE white 1x 5 inch strips to each SIDE of your (AB) block.

**Again, you can use Karen's method to attach strips to each SIDE of the now (AB) charm piece. Attach one side, trim and then attach the second side. You should be able to sew 8 charms per strip. Make sure to sew them close together so you don't run out of room on the strip. Trim to 5 inches. **


3. Attach ONE 2 1/2 x 5 1/2 inch strip to the BOTTOM of each (ABCC) block.

** If you want to use Karen's method for the last piece, you'll need to cut your strips 2 1/2 inches by WOF. You should be able to sew 7 charms per strip, which means you'll need to cut just over 7 strips. Attach strips to each BOTTOM of the now (ABCC) block. **


Tips:

These really are straight forward. And if you are making 50, it can be a bit monotonous. Here are a few things I recommend doing to make it easier and faster.
  • Cut out ALL your fabric first. 
  • Chain piece!!
  • If you do chain piece, here is my quick and easy method for cutting apart all of the blocks:
:: Fold your charms accordion style, so they are folded on top of each other, not around each other.
:: Go through each side and trim the little strings. It's SO fast and then your blocks are already stacked nicely together. :)


And that's it for the first step! I'm still working on sewing all my white strips to the charms. I'm maybe a fourth of the way done. If you have any questions, let me know!! :)


If you are sewing along, be sure to link up your pictures! :)


    An InLinkz Link-up


Diane

Meet My Little Ela!

Hi again! I can't believe how time has flown by!! If you haven't seen on Instagram (sorry neglected little blog... Instagram gets all my attention) we have a new little addition to our family!

Eleanor "Ela" Joyce was born 2 weeks ago!

She is the sweetest little thing!! And I'm so happy that she fits right with our little clan. :)

She has CHUNKY round cheeks! 1 day old.


Everyone meeting her for the first time! And of course making themselves at home in the hospital bed which is QUEEN size! Have you seen a queen size bed in the recovery room before?? It was AWESOME! I slept so good! :) And the food was delicious!


As soon as we got home, these two got down to business. Isn't this what being a dad is all about?! Naps are the best with Dad! ;)


Going out for the first time! (Dr's appointment) She's such a doll! And I love the sweet gifts we've received from friends! Cutest moccs from Katey! And this sweet swaddling blanket from Emily - check out Little Unicorn if you haven't heard of them before. They have GREAT stuff!


1 week old!
Things to remember: She gets the hiccups everyday. Has the cutest sneeze. She keeps me up all night long! But she's super cute and never cries (except when she's hungry and we don't feed her right away). Her sister loves to hold her for the longest time, is always singing to her and playing with her! Tommy likes to say "hi" to her and point out that she has a nose and eyes; helps me change her diaper - brings me the diaper and wipes; and is kind of good at putting her binky in her mouth. :) Hunter likes to hold her and forces her to wrap her little fingers around his finger , and really wants her to look right at him. Jackson likes to hold her a little, and for the midst part only interacts a little, but he likes her. She smiled when Dad tickled her, and seems annoyed at his poky beard when he gives her kisses. :) We sure love her and are so lucky to have her in our family!!


Grandma came and stayed with us for the first week. It was the BEST!!! We were all sad to see her go. What a blessing! She really made the transition to 5 kids a breeze! And I'm happy to say that this second week on my own, went WAY better than I had expected. It wasn't without it's bumps and bruises, but we made it. :)


Our first family photo with all of us! :D
I am so in love with all of these little people! (and the big guy too, of course! Now more than ever!!)


2 weeks old!
It seems like she was just born yesterday!! We all love her more than ever!! Things to remember: Tommy is my little helper. He gets me diapers and wipes, and puts her binky in her mouth (and calls her binky "pee-pee" which is quite humorous). Mabel loves to sing to her and comes to her rescue if she ever starts crying, and tells her, "don't. even. think about it!!!" Jackson runs to her when she starts making noises. And Hunter randomly pops in and talks to her for a bit. Building good relationships already!! She sleeps pretty good, waking up anywhere from 2 to 4 times during the night, which I'll take. She cries before she poops. and smiled at Tommy today!! She's starting to look around more when she's awake. She LOVES being in the solly wrap, and I love it too! My favorite baby carrier! I wish I had it 5 babies ago. :) This week went a lot better than expected on my own. Though the kids have been extremely emotional!!  but I think we're starting to get to a good place. Oh, and LOVING this cute name blanket from @sewsara!! #sewsaranameblanket


Morning photo shoot. Photographers: Tommy took the top pictures. Mabel took the bottom pictures. We were cropped in all of them, but at least Ela wasn't.


She is so adorable!!! I want to snuggle her forever!!


I really cannot believe how fast the last two weeks have flown by! Especially this week, I feel like I wake up, have breakfast, look at the clock and it's already noon! Then I blink and it's already 4 pm and almost time for the Mr. to come home from work. It's actually been pretty nice, and I have LOVED spending the days just holding her. I'm trying to enjoy this newborn stage as much as possible before she grows. (Newborns are my favorite!!)

We love you Ela!!

Diane