Home * Patterns * Tutorials * Made It * Our Story
Showing posts with label pillows. Show all posts

Tuesday, December 29, 2015

Pillow Tutorial and a Coupon!

Hi! I hope you've all had a wonderful holiday season so far!! It came quickly and I feel it is going by just as quick! We've had so much snow, and have been enjoying it as much as we can! I hope you are all safe and enjoying whatever weather you are receiving wherever you are in the world!


I told you I'd let you know as soon as my pillow tutorial was up, and it is!

You can find the tutorial HERE!


 I love how my pillow turned out, and now I can finally send it to my sister. 4 months later. ;)


The tutorial includes lots of photos, and some fun techniques I've picked up through the years. I hope you like it!


As the days rush by, I can't help but reflect on what an amazing year 2015 has been! There have been so many changes, exciting events, and so many opportunities present themselves throughout the year! I am humbled and grateful for every one of them, good or bad. I'm a little sad to say goodbye to such an amazing year!

I'm also extremely excited to say hello to 2016!! With new opportunities already at my doorstep, and so many possibilities to choose from with where I want to go with my family, business, and life in general, I can't wait to see how it all turns out! I'm excited to take it one day at a time, and thoroughly enjoy the ride!


To celebrate the goodbye's and the hello's, here's one last coupon to end the year with any patterns you wished you'd tried, or to start the year with the ones you want to make in the coming year!

Use code: "GoodbyeHello" to save 10% 
off anything in my Etsy shop (including sale items, bags, and destash fabric) 
or in my Bigcartel shop!


Coupon good until Jan 1st, 2016 at midnight.


Happy New Year!!! 
Wishing you safe and happy celebrations!


Diane

Tuesday, September 29, 2015

Tutorial: Decorative Pillow Case with Hidden Zipper

There are a lot of pillow tutorials out there, and a lot of them are fantastic! (Sew Mama Sew is an awesome place to start if you are looking for some pillow tutorials!) Over the years I've combined my favorite techniques from ones I've liked to create the perfect pillow. Ok, maybe not perfect, but it's my favorite way to make them! I hope you'll enjoy this method as well, or at least pick up a few techniques that you can incorporate into your own pillows.


What You Need:
  • A pillow front (a quilted piece of fabric or a quilt block make for beautiful pillows! You can google decorative pillows to get a lot of ideas, or check out the patterns in my shop... I have a lot of patterns that would make beautiful pillows!) ;)
  • Fabric for the back: you'll need two pieces. 
    • One piece that is the about the same height as your pillow by the same width (for above the zipper). 
    • One piece that is between 3-4 inches by the width of your pillow (for below the zipper).
  • One zipper, equal to the width of the pillow or longer. 
  • Normal sewing supplies: thread, scissors, rotary cutter, cutting mat, ruler, sewing machine, walking foot, zipper foot, and any other tool you like to use while sewing.


Before you Start:

1 - Prepare your pillow front. My pillow fronts are almost always a quilted "quilt top" or "quilt sandwich" (a piece of fabric that will be the front of the pillow, a layer of batting, and a backing fabric. You can quilt this by machine or by hand. If you don't want it quilted, at least baste around the edge to keep the layers together.) Square up your pillow front so it is the finished size plus 1/4 inch on all sides.

 For my pillow front I'm using a block I made for the MQG fabric challenge using The Cottage Garden designed by The Quilted Fish for Riley Blake. I based my block off of one of the flowers in one of the prints.
The pillow front is cut to 14 1/2" x 14 1/2" for a 14" square pillow.


Assembling the Pillow Back
2 - Cut the fabric pieces for the back. You will need two pieces of fabric for the back. One piece go to above the zipper, and one to go below it. I didn't have enough fabric left for one solid piece to go above the zipper, so I pieced the top piece, shown below.

 Both pieces need to be the same width as your pillow.
:: Cut the top piece the same height as your pillow (you will probably end up cutting a little off the top, but it's better to be safe than sorry, and I like a little wiggle room). My top piece is 14 1/2" wide by about 14 inch tall.
:: Cut the bottom piece about 3 1/2 inches to 4 inches wide. My bottom piece is 4" by 14 1/2".

I didn't realize that my SD card was full in my camera, so a few of the photos I thought I took, didn't take, so the photos skip ahead a little, but the process is still the same!


3. Layout your top piece, zipper and bottom piece. (The bottom piece is already attached in the photos, just ignore that.)


4.  Draw a thin line of glue (Elmer's washable school glue) along one side of the zipper. I like LOVE using these glue tips from Cristy of Purple Daisy Quilting. You can skip this step if you prefer pinning, and continue with step 5.


5. Flip over your fabric, aligning the raw edge of the fabric (the edge that is closest to the zipper in the above step) with the edge of the zipper (here is where you would pin the fabric to the zipper) or if you used glue, use a warm iron and gently press to set the glue.


6. Use your zipper foot and sew along the edge you just basted. Back stitch at the beginning and end.


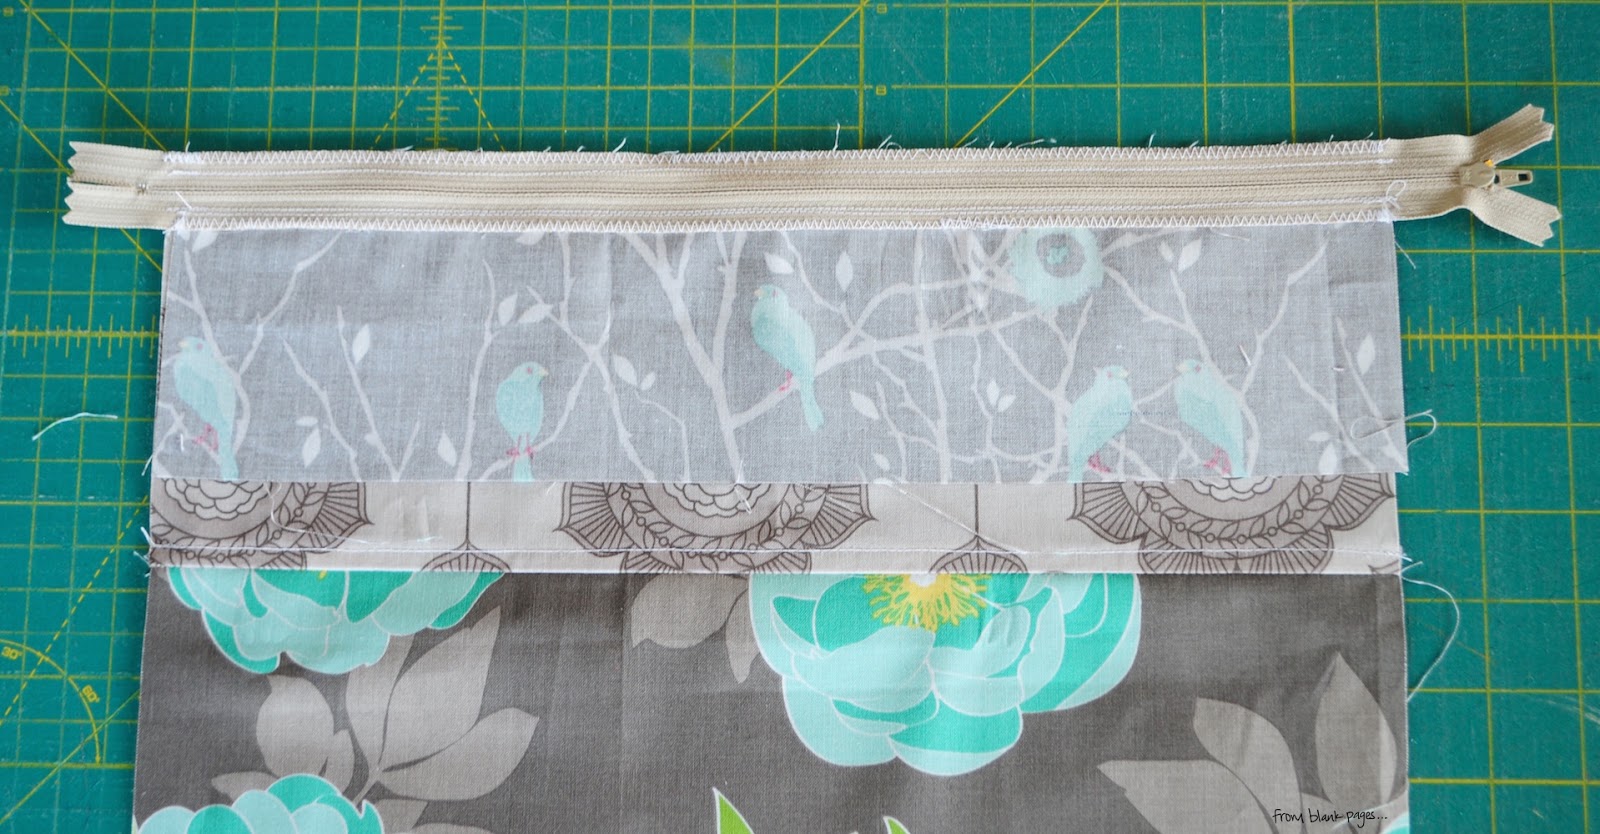
7. Use your walking foot to zigzag along the same edge, to prevent fraying of your fabric. You won't see this part, but it'll make for a nicer finish on the inside.


 Here's what the zigzag stitch looks like on just the bottom piece.


 A close up of both sides of the zipper with the zigzag stitch.


 8. Flip over the fabric and press the fabric away from the zipper teeth using your iron. Use your zipper foot and top stitch along the edge of the fabric.

 The top stitch on just the bottom piece.


 The top stitch on both the top and bottom.


 9. Repeat these steps with the other fabric piece, so that both top and bottom pieces are attached to the zipper and top stitched as shown in the photo above.


10. Fold the top piece down and press.


11. Fold the top piece back up, with the fold in the fabric on the opposite side of the zipper. The zipper and top stitch of the bottom piece should be covered. Press to crease the fold.


12. Unfold the fabric and draw a thin line of glue near the edge of the fabric. Fold the fabric back up, careful to keep the fold on the crease. Press. OR you can simply pin the fabric in place. But don't just sew it... I tried that and it didn't look pretty. ;)


13. Use your zipper foot and sew down the fabric along the size of the zipper teeth. It should be close to your original top stitch.


Here's a close up of what it looks like under the flap and you can also see how it looks with the flap down.


14. Open your zipper so the zipper pull is towards the center of the pillow back. Top stitch both ends down, stitching over the zipper a few times to secure it (this secures the zipper pull so it doesn't come off. You don't want that to happen... trust me!)
 
Look at where the zipper sticks out and you can see just inside where I stitched across the zipper. Keep these stitches less than 1/4 inch from the edge of the fabric so they don't show on your finished pillow.


15. Trim your pillow back to the same size as the pillow front, also cutting off the ends of the zippers that are sticking out in the photo above. If you've made the top and bottom pieces taller than needed, you can know play around a little with how high up you want your zipper to be in the back. I like it towards the bottom, though not at the bottom. You could also adjust the fabric pieces so it's more in the middle if you would like... there's no right or wrong.


 Assembling the Pillow

16. Lay the pillow back over the pillow front, with right sides facing. Make sure the zipper is open at least half way, or a little more.


17. With your walking foot, stitch all the way around your pillow. Backstitch at the beginning and end. Trim your corners.


This next part I learned from this tutorial. I've only used it twice now, but I actually really love it! I'm tempted to go back and do this on all my pillows I've already made! The original tutorial says that it eliminates the floppy corners that form on pillows after a while, something I've noticed on my pillows. Try it, maybe you'll like it too! And once the pillow is stuffed, you really don't notice the tapered corners at all! This part is optional, so you can skip it if you don't want to do it, continuing to step 21.


18. Measure 1/2 inch in from each corner, mark. Measure down 5 inches on each side and mark. Use a ruler or straight edge to draw a line from the 5 inch mark to the 1/2 inch mark. Repeat on all corners.


Here's a close-up of what that looks like.


19. Use the lines you just drew as a guide, and sew 1/4 inch on the inside of them.


20. Trim the corners to your new sew line.


 21. Trim the corners (the points of the corners - you can see the difference from the above photo and the photo below). Using your walking foot, zigzag stitch around the entire pillow, careful to stay in the seam allowance. This keeps the pillow from fraying on the inside. Even though you won't see the inside, I like to know that my pillow doesn't only look great on the outside, it also has great quality on the inside!


22. Now you can turn your pillow inside out, poke out the corners and press the sides. Here is the front and back of my pillow.  (Notice how the corners look after I tapered the corners.)


The zipper is nicely hidden under the flap.


23. Stuff with a pillow insert and you are ready for a nap!

 Notice how the corners are still pointy, even though they are tapered, but not so much that they begin to be floppy. I like it. What do you think?


Thank you for stopping by! I hope you enjoyed the tutorial! 
If you have any questions, please feel free to ask!



Diane

Friday, July 3, 2015

May finishes 2015

Since I'll be posting lots of finishes this week, this blog post is also a part of A Week of Finishes, an event I put together in 2013, and decided to revisit again. If you have any recent finishes you'd like to link up, grab a button and please do! (you can share blog posts, flickr photos, or IG photos.) I love to see what other people have been making!

from blank pages...


I only have two finishes for May, but I think they are my favorite so far!! And both are pillows.

First up, my Rockstar Pillow.


I made this for my boys room, but it's been sitting on our living room couch for the last 2 months. It's just so comfy! :D Plus, I need to make the boys quilts, so it really doesn't match their room yet anyway. right?!

I made 4 - 9 inch blocks to create this design (makes an 18 inch block). With the borders it's about 21 inches - which is perfect for the Ikea pillow forms we have.


 I made my zippered back a little differently with this pillow, creating a flap, rather than just trying to hide the zipper with the seams (I don't know how to explain how I did it before). But I LOVE this!! So much nicer!


You can find the Rockstar pattern Here.


And here is my last project for the Handmade Birthday Club! I sent this to Sarah. This is probably my most favorite Celestial Star block I've made! (though that might not include some of the blocks from my Celestial Star Quilt. But as a stand alone, I definitely would LOVE to make another pillow just like this one!

I seriously love this! My heart starts racing just looking at it! lol.


I picked the prints based off of one picture in Sarah's instagram feed that said she was loving coral and navy. I added a few more colors to add some interest. Why is it that the fabric pulls I'm most unsure and nervous about always turn out to be my favorite?? I need to step out of my comfort zone more often!!


Phone picture - and it's a little off. But here's the stack I started with. I definitely like it, but I was nervous about it before I actually made the block.


 I did some simple handstitching, outlining the white diamonds. and then went around the entire center with a thinner thread to add some more stability to it. I really like simple, and I hope it's enough to hold up well.


 Of course I did another zipper with the flap. Maybe I'll have to find time to do a quick tutorial. It's SO easy! and quick!


 and with a pillow form inside. 
My heart is just glowing looking at these pictures. I love this so much!

This pillow was another project from my 2nd Quarter Finish-Along list with Adrianne of On The Windy Side.

You can find the Celestial Star pattern Here.


from blank pages...


If you want to share any finishes you've had for the year, feel free to link them up below! :)


Diane


Wednesday, July 1, 2015

March 2015 Finishes

Since I'll be posting lots of finishes this week, this blog post is also a part of A Week of Finishes, an event I put together in 2013, and decided to revisit again. If you have any recent finishes you'd like to link up, grab a button and please do! (you can share blog posts, flickr photos, or IG photos.) I love to see what other people have been making!

from blank pages...


Alright! Finally getting around to documenting my finishes! Here are the things I finished in March! :)

Tuesday, February 3, 2015

January 2015 Finishes

I've decided to make it a goal this year to document all my finishes for the year. I really don't have any idea what all I made last year, though I'd love to go back and compile a list (which I did end up starting HERE. I need to make some cool mosaics to make my list more interesting though). I figure if I blog about each months finishes, that will be much easier to keep track of it all for this year. (Plus it will give me a good excuse to make sure I blog). ;)

January's projects were pretty simple, but nice to get some things finished!

I made two Love mug rugs:

 one as part of Sandi's Learn More Sew More event:

I REALLY love having a square mug rug. I think it's my new favorite mug rug shape!

Friday, October 3, 2014

Made It: Swappers Anonymous

A year and a half ago (early 2013) two friends and I decided to do a little private swap! I was so excited! It is always fun making things for people you know and love!  Well, we started last spring, and decided to set the deadline for May or June... Tommy was born the end of April, so it was kind of busy, but definitely doable. Well, then there were some delays for other people and we decided to push it back, and back some more. Then I was teaching at the Sewing Summit last year, and that was REALLY busy, and right after that we moved to Florida... so anyway, our deadline became a bit fleeting on my end and it became a slow project amidst everything else going on. I think it was last December or maybe January of this year (?) that I finally finished up one project. Then we moved from Florida to Idaho and there goes more delays... I finally finished the other package this summer... but I don't think I really shared much of it. Anyway... I shared one picture on Instagram yesterday, and decided I should share everything because I received some amazing gifts that I just LOVE! :)


I'll start with the goodies I received. :)

Marika made me some amazing placemats and napkins (she did make me 6 of each - some must be in the wash). As well as a cute clutch. I love these placemats! They really are the most perfect colors!! We use them all the time, and I've probably washed them a bajillion times. Which means maybe I should have ironed them before photographing them, oh well. I think they are awesome in all their crinkly goodness! ;)


Tiffany made me the best pillow ever! Again, my favorite colors! I LOVE it! It lives on our couch and is one of my favorites! I ended up making my own insert from it from some other pillows that exploded in our dryer when I washed them. oops. :) But it works perfectly!


She also made me some cute fabric baskets that are perfect in my cubbies by my sewing area. love!


Here is what I made.

First I made this super cute fox hoop for Tiffany! I used the Frosted Pumpkin Stitchery pattern from the Woodland Sampler, and simply enlarged it and added a few more dandelions.

I can't remember how large the hoop is, maybe 6 inches? So this is way bigger than the pattern.


A also made her this sewing machine cover. I love how it turned out. The color scheme is not one I have made much in, but I really love it! It is paper pieced, and some of those strips are super thin. It took for.ever. But I think it was definitely worth it! I love the design! I'd love to scale it up and do a quilt with this! Or it would be cute for a mini or mug rug or something. Anyway, it was really fun!


 I didn't get any really good pictures of the entire thing, but here's the best one.


 modeling over my smaller sewing machine. ;)


 Here's a shot of the back, showing off the quilting. I did really close wavy lines, but went around the x's.


I also sent some Lizzy House charms that she had mentioned earlier that she loved.


For Marika I made a Celestial Star Pillow. I really love the bold colors and the how the border pattern wraps around the pillow. This is definitely a favorite! and all of my family was SO sad when I sent it away (my son and my hubby were heart broken that it wasn't for them. lol.) :)


and how it looks on a pillow form. I like how the border wraps around.

I hand stitched the top, and I really like how subtle it is.


Here's a good shot of the border pattern.


I lucked out with the back - the pattern matches up so close on each side of the zipper!


I also made a tissue cover from some Anna Maria Horner Good Folks prints (the inside print is from the Pretty Potent collection), and included some more goodies, as well as some Erin McMorris charms and scraps.


I know I was super delayed with so much going on in life, but it was fun! I hope my gifts are loved and used as much as the gifts I received! It really is special to have some home made goodies around the house. :) Thanks Tiffany and Marika!!!


Ps. Don't forget to link up your finished Celestial Star projects on THIS POST! Winners will be picked and announced Monday morning!

Diane