
This blog post was first shared on CraftyPlanner.com as part of the Learn More Sew More Paper Piecing event. I am re-posting the same blog post on my blog today.
I am so excited to be guest posting with Sandi as part of the Learn More Sew More event! Paper piecing is easily my favorite method of quilting! I know it can seem scary at first, and even difficult. But I believe with the right tricks and tools, it is something that everyone can do and enjoy.
Today I am going to share with you my techniques for paper piecing letters. Letters are so much fun, and can really add a lot of versatility to a quilt! There are a few paper piecing alphabet patterns available on the market that you can choose from. But before we begin I want to share with you a few pictures of what others have made with two of my alphabet patterns, My First Alphabet and My ABC's. (You can find my patterns at fromblankpagesPatterns.com, or if you are in the EU, you can purchase them in my Etsy shop.)

Ashley (@crafterbynight) - Using My First Alphabet


Brittney (@bselbyquilting) - Using My First Alphabet


Sarah (@sewingingtheannexe) - Using My ABC's: Numbers & Punctuations


Kirsten (@materialgirlkirsten) - Using My ABC's Lowercase
Aren't these fantastic?!! They add another mile of projects to my to-do list. ;) See how much fun adding words to a project can be?! Either in with other quilting elements, or using them on their own.
Tackling an entire alphabet might seem a little daunting, so we are going to start out small. You can download my FREE LOVE pattern on Craftsy here or in my shop HERE. This pattern gives you the upper and lower case letters L, O, V, E. Just in time for a fun Valentine's Day project! :) Or any other project you want to use them with. I'll show you how I piece each of the uppercase letters.
I'll wait while you download and print out your pattern. Go ahead and cut out the pattern pieces and pick out your fabrics for the letters and background as well. Just don't get distracted. ;)


Alright, let's get started!
Supplies:
Besides the necessary tools like a sewing machine and thread, this is my line up of tools that I use:

- Rotary cutter and mat (mat not shown)
- Clear ruler (I love my 1" x 6" for paper piecing!)
- Glue stick (I prefer a lapel stick, but didn't realize that until I bought a huge package of elmer's glue sticks. oh well.)
- Elmer's washable school glue
- Glue tip (these have changed my life! You can purchase them from Cristy here.)
- scissors
A Few Things About the Pattern:
- These patterns are piece by number. Start with 1, and go in order.
- Patterns are backwards. After piecing your fabric to the back, your letters will be correctly oriented.
- Section D is a spacer section, adding space between letters.
- Numbers are followed by a "b" for background fabric, or "c" which is the letter.
- The shaded area around the pattern is the seam allowance. If you resize the letters, you will need to remeasure the seam allowance to be 1/4".
- I have re-numbered the some of the patterns to match the order that I piece them in the following videos. They won't look the same as in my pictures, but I will refer to the sections as how they are in your pattern.
Cutting Fabric:
If you've happened to purchase any of my patterns, you may already know I'm a HUGE fan of cutting templates!! Cutting out your fabric before starting, in the correct size and shape, makes paper piecing SO much easier and faster! With an alphabet pattern, cutting templates really aren't practical though. With so many templates needed, it would take too long. I do have a quick method for cutting out your fabric that is just as beneficial, and a lot faster (though not quite as accurate. I still prefer cutting templates for any other pattern. You can see my tutorial on how I use and how to make your own templates here.)
We'll start with the letter L. This is a pretty basic pattern, all rectangles. We're going to focus on one section at a time.

First, fold your pattern over so all you see is 3c.

Place the pattern piece over your fabric.

Cut around the pattern piece with AT LEAST 3/8 inch EXTRA on each side. I cut with scissors because it was easier while creating this tutorial, but you can cut this on your cutting mat with a rotary cutter, and it's a lot easier.

This is your fabric for section 3c.
Fold your pattern so you have section 2c isolated.

Place pattern over fabric and cut around with a minimum of 3/8" extra. Try to stay as true to shape as possible! Cut under the pattern, being careful not to cut the paper.

Repeat with the background pieces. Here are all my fabric pieces for the L.

Now you have all your pieces! Great job!
The E is basically the same, as it's also all rectangles, just a few more of them.

Here are just a few pictures to show you how I cut out different sections.
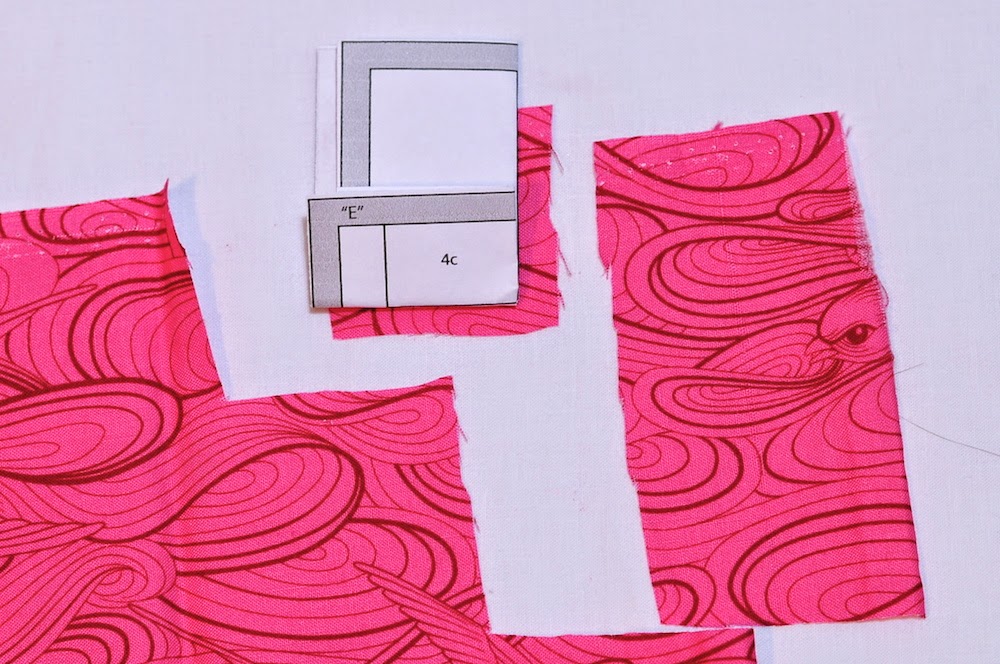


Repeat for all the background pieces.
And here area ll my sections cut out.

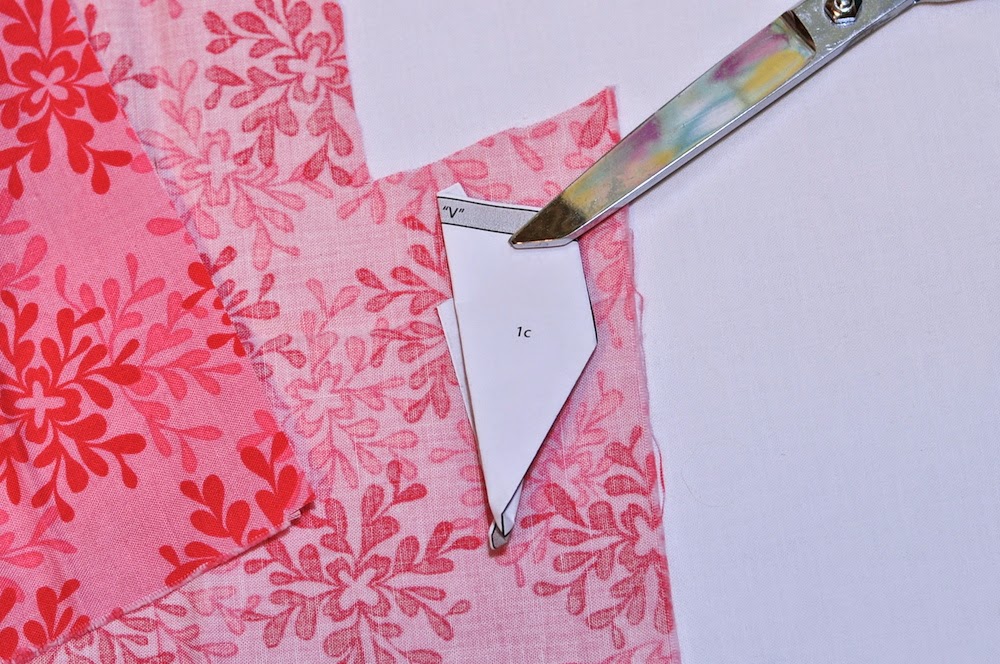
The V can be one of the trickier letters to piece. With the slanted lines, it can be difficult to cut the right amount of fabric to cover the entire section, without wasting a lot of fabric. I am a HUGE fan of no waste, so let me show you my trick:

NOTE!!! If you are using a print fabric, you MUST turn your fabric over so the wrong side is facing up. Otherwise the piece you cut will be reversed = the wrong shape, and you won't be able to use it. This wasn't as important with the L and E, as they are rectangles, and are the easily reversed. But for any shape that isn't a square or a rectangle, you want to cut from the wrong side of your fabric. If you are using a directional print, you'll want to pay close attention to this as well.
Below is section 3c:

Here is my 3c section.

Notice how it is the reverse of the pattern?

But when I flip the pattern over, it's the correct angle. Cutting your fabric pieces in the exact shape as your pattern section, takes all the hassle and fuss out of paper piecing these odd shapes. I will show you how I easily piece this in the video in the next section of this tutorial.

When I started paper piecing, I would normally cut a huge rectangle, and then hope I could cover the entire section when I went to piece it. It was a pain. Cutting your fabric on an angle, like pictured here, takes all the guess work out of it! As long as you stay as true to the original shape as you can. Now all you have to do is fold under the one edge, and it's a guarantee fit, no struggle involved.
Continue folding up the pattern just as we did with the L. Place it on the WRONG SIDE of the fabric. Cut around all sides with an extra 3/8" on all sides.
Here are my prints cut out:

Here are all my V pieces. Notice that the outer pieces are also cut on an angle. I'll show you in my video below how I piece these. Similar letters that have these diagonal lines are X, W, N, and S.

The O is a little more intense. It has a lot more smaller sections, but isn't any more difficult. Let's cut out our fabric:
Big sections are simple. You can cut them as rectangles. We'll start with 8c and 9c. Notice that my fabric is RS down.


6c and 7c are also simple rectangles.

The small inner triangles may look tricky, but they're not. Simply cut a large square.

Then cut the square on the diagonal. You now have two of the four inside pieces.

Repeat for the next two pieces.

Section 1b is a simple square.

The outside triangles are a little trickier. Fold up your pattern just like we did with the L, to help you mimic the exact shapes, making sure to add an extra 3/8" on all sides. It's ok if they aren't exact (like my bottom left piece) but the closer they are, the easier it is.

Here are all my O pieces.
Cutting all your fabric before you begin piecing will make the entire process much quicker. With new patterns I tend to go slower as I learn the pattern. Once I am familiar with a pattern, I use some of my favorite methods to speed things up, such as chain piecing (working on multiple pattern pieces at a time) and piecing multiple sections on a single pattern at a time, when it is possible. These are some tips that I will show you in my videos below.
Paper Piecing Videos:
I have put together three different videos, showing you each step I take to paper piece the L, V, and O. I'll warn you, they are silent (I figured no one wanted to hear an "Olivia, Olivia..." tv show that my kids were watching, or an old Ben Stiller movie from the 90's that my hubby watched while I made the other videos. lol. I was going to add music, but that's against YouTube policy, unless you want to hear me sing. ha!) But I did write out each step in the video. I know for me, if I can see someone do it I have no problem doing it myself, so I like to make videos when I can. :) If you already know how to paper piece, and just want to see the tips that I mentioned above plus a few more, all my tips are in each video, so you can get away with only watching one. :) The O video is the longest, so I sped up a lot of parts... I wish I could piece an "o" in 7 minutes! lol. This video especially shows how I piece multiple sections at a time, which really does speed up the process. Hopefully it'll be useful.
*These tutorials are made on the assumption that you are already familiar with paper piecing. I didn't include instructions like, shorten your stitch length, which you always want to remember, or detailed instructions on each step of the process, but you can see how I do everything, minus ironing and sewing on the lines. Sandi listed a number of paper piecing tutorials to get you familiar with the process on her post from last week. I also have a tutorial on my blog here.
Paper Piece the Letter L
Paper piecing the letter E is going to be just like the letter L, only with more pieces. Because the process is similar, I didn't make a video for the E.
Here are my finished L and E pattern pieces.


Paper Piece the Letter V
Paper Piece the Letter O
Here is my finished O.

And now you should have your four letters!! CONGRATS!! If you are piecing the lowercase letters, they will be similar to the tutorials above, except the lowercase "E" will be more similar to the O.

Once you finish your letters you can sew them together, make a bag, pillow, a mug rug, garland, whatever! The possibilities are endless!
I decided to sew my letters together and make a square mug rug!

I made a second mug rug with some letters I pieced last year.

And that's it!!
RECAP: My biggest tip is to cut your fabric out correctly! That alone will make paper piecing a much more joyful experience, for the novice to advanced quilter!
I hope you'll share what you make! Send me an email (I'm happy to answer questions as well!) fromblank pages {at} gmail {dot} com. Or if you are on Instagram, tag your photos with #fbpPatterns! Be sure to check out all the other projects made with my patterns there as well!
Thank you Sandi!! I really enjoyed putting this together! Thanks for letting me share! :)

So cute! I love the look of those fat letters.
ReplyDelete