Home * Patterns * Tutorials * Made It * Our Story
Showing posts with label guest blogger. Show all posts

Monday, March 2, 2015

Tutorial: Paper Piecing the Letters L, O, V, and E

This blog post was first shared on CraftyPlanner.com as part of the Learn More Sew More Paper Piecing event. I am re-posting the same blog post on my blog today.


I am so excited to be guest posting with Sandi as part of the Learn More Sew More event! Paper piecing is easily my favorite method of quilting! I know it can seem scary at first, and even difficult. But I believe with the right tricks and tools, it is something that everyone can do and enjoy.

Today I am going to share with you my techniques for paper piecing letters. Letters are so much fun, and can really add a lot of versatility to a quilt! There are a few paper piecing alphabet patterns available on the market that you can choose from. But before we begin I want to share with you a few pictures of what others have made with two of my alphabet patterns, My First Alphabet and My ABC's. (You can find my patterns at fromblankpagesPatterns.com, or if you are in the EU, you can purchase them in my Etsy shop.)


Ashley (@crafterbynight) - Using My First Alphabet


Thursday, January 22, 2015

Flaky Snow Pals by Adornit! AND Trees At Night Pattern!

Hi! I am really excited to be guest blogging today over at the ADORNit blog!! I was lucky enough to be able to play with the Flaky Snow Pals collection, and I can't tell you all the project ideas I came up with! This is a great line, with great colors and prints! I think the snowmen are the cutest! (without being too cutesy - they're perfect!) My children also had a fun time looking through them all and picking out their favorite prints! I think some personalized pillowcases are in their future. ;)


You might have already seen my Trees At Night pattern in my Craftsy shop, but today I'm sharing my pillow I made using some of the more basic prints in the collection. I really love the colors, and as the project came together, I was really impressed and happy with how well they all work together!


Here is my Trees At Night pillow!


Monday, January 12, 2015

Learn More Sew More with CraftyPlanner: LOVE

Good morning everyone!! (or afternoon, depending on where you are, I guess...) I am really excited to let you know that Sandi of CraftyPlanner has invited me to be a guest blogger as part of her Learn More Sew More challenge! This month she is covering Paper Piecing, which of course is my favorite method for quilting! :)
Hop on over and see my extensive tutorial for how to paper piece my LOVE letters! These are a great intro into any of my alphabet patterns. I share all my tips and tricks to make the process as easy and quick as possible.


AND, if you make at least one of the letters and share a picture of it on Instagram with the tag #LMSMpaperpiece, you will be entered to win a copy of My ABCs Complete (which includes the upper and lower case alphabet patterns) AND the Numbers and Punctuations pattern.

Be sure to tag your pictures with #fbpPatterns too, so I can see what you make! ;)


AND to go along with it, these are my first AND second finishes of the year! Wahoo! :) It feels good to finish something already. ;) I am really excited to use this cute little mug rug!


 p.s. IF I were to go this square mug rug again, I'd leave off the spacer between the L and O. But that's ok, I still like it. :)


I hope you'll go check it out!!

Diane

Friday, September 12, 2014

Celestial Star QAL: Guest Blogger: Jennifer + Quilting + a Giveaway!

Celestial Star QAL with from blank pages...


I am so excited to have Jennifer, of Ginger Peach Studios, guest blogging today!! She is amazing! She is super talented, super nice, takes beautiful photos (as you'll see below), and one of those people you just want to be friends with. :) We haven't known each other long at all, but when she said she'd be wiling to post today, I couldn't have been more excited!! Today she is sharing her creation process and TWO Celestial Star minis that she made, one of which she is giving away to one of you!


****************

Hi there! My name is Jennifer. First and foremost I would like to thank Diane for inviting me to share with her readers. I have had such a rewarding experience working on my Celestial Star QAL projects. Even though my projects were small in scale, The lessons learned from making them, have changed me both personally and creatively. Some lessons were completely unexpected and I am excited to show you what I made and learned in the process.


Let me tell you the story of how these to mini quilts came about. When I first saw the Celestial Star pattern I instantly loved it. Who doesn't love a super complicated looking paper-pieced star?? I'm a sucker for intricate, detailed numbers like this that require (or at least appear to require) lots of technical skill. Patterns like this get me all googly-eyed with possibilities. They set the gears in motion and I begin planning all the king-sized bed quilts that I will make for every member of my family. This always happens when I find a pattern I love. And then reality sets in.

My reality probably looks a lot like many others out there so here goes. Since December of last year when my daughter was born, I have been a stay at home mom. I have an infant, a 7-year-old, a husband, two pets to take care of, and a home to keep up. I also seem to have a severe case of crafting ADD or what I've heard others call Creative Flex. Creative Flex is a severely debilitating crafting condition wherein one gets immersed in a project just long enough for it to give you a fantastic idea for another epic, amazing project so you abandon the original project and dive full-boar into the new one. It's very serious. If you have piles and piles of WIP's in your house you may be suffering from it too. You should probably get that checked out. What I mean to say is that ever since I was (self-)diagnosed, I have tried to be a little more cautious about the kinds of projects I can realistically tackle given my current set of circumstances. It would have been completely typical for me to decide to make a huge quilt, go buy a ton of fabric, cut the pieces, get about a third of it pieced, get antsy to start working on something else, and do just that. I know this about myself. I've accepted, and made my peace with it. I also knew for certain that I loved this star and wanted to give the challenging pattern a go. It seemed a mini was the ticket for me. Plus the walls of my studio literally have one framed thing hanging there and it has nothing to do with sewing. Neither is it a picture of my kids but I digress…


So I downloaded the pattern and set to work. I settled in on the couch one night with my coloring pages, pencils in hand, Harry Potter on the screen, and my very favorite little boy sitting by my side. I couldn't imagine a more relaxing evening. As I'm sitting there coloring he becomes interested in what I'm doing and tells me he wants to color too. Of course this was not a problem because of all the fantastic coloring pages included with the pattern. I handed one over and together, he and I spent the evening coloring and watching one of our favorite movies. Perfect indeed.


It is here where two unexpected things happened, one elated me, one deflated me. Let's do the negative first. I became frustrated with my colored pencils rather quickly. I didn't have enough colors and I was impatient with myself because in the time it took me to color one block I would have ideas for three more which I could not begin coloring until I had finished the first. Creative Flex much? I tell you its both a blessing and a curse. It was the lack of color nuance though that was really getting me down because I didn't want "crayola red". I wanted hex code #8a2d43. Now, that's kind of a joke because I don't actually think in hex codes, but you get the point. There are about a million different nuances of "red" and Crayola provides you with about one or two of those options. I didn't like what I was creating with them. So there I was, growing more, and more frustrated with my lacking skills all the while completely oblivious to what is transpiring on the coffee table in front of me. My frustration got the best of me and after coloring six or so blocks I decided one of those would have to do. I set the pencils down and turned my attention to the movie.

http://gingerpeachstudio.com/wp-content/uploads/14505458360_33cda1f93a_k-e1405816288115.jpg

As I'm watching, I notice my son keeps turning to look at me then turning back around. I inquire as to whether or not everything is ok. He assures me that everything is fine. After 3 or 4 times of him doing this I realize he doesn't want me to see what he's coloring and the reason he keeps turning around is to make sure that I'm watching the movie and not him. I was more than intrigued, but I played it cool. When he's finished He tells me he has a surprise for me. Beaming, he shows me his coloring page and in that moment my prior frustrations melted away and I had a mini quilt design. This was the mini my bare studio walls needed. And, as if that wasn't enough to melt my heart and make me shine with pride, he had written me a love note on the back of the coloring page. I nearly fell over with joy. As parents I feel like we spend so much time and energy trying to manufacture memorable experiences for our kids. We take trips, go to the zoo, have birthday parties, etc.. Here in this moment a completely unforeseen but memorable event happened between my son and I. Not only did I share a real and special connection, but it launched a project that we could plan and work on together. A moment of divine inspiration.


This was the first time he and I had ever collaborated on a quilt together. His design, his fabric choices, my work. Plus, I had a special plan for that love note that would be a surprise for him when it was all bound and finished. He was so excited that I wanted to make his design that we immediately went to my stash and started pulling fabrics. The next day I couldn't wait for the baby to nap so I could get started.

I am so happy with the way this mini quilt turned out. I named it the Love Note Quilt for obvious reasons. The front is my son Delbert's Celestial Star design and the back features his note to me hand-embroidered exactly as he did it, in his handwriting, with all the grammatical and spelling errors that are telltale of his tender age. I am proud to say that I now have two items hanging in my studio. The aforementioned, and this beauty of an heirloom with a place of honor over the mantle. I am pleased to report that he loved it and was so surprised by the note on the back. It reads:

"My mom loves me 1st. My mom loves me 2nd. My mom loves me forever. I love my mom more than Floppy Dog."


http://gingerpeachstudio.com/wp-content/uploads/photo-5.jpg

Funny side note. Floppy Dog is a Beanie toy that he has loved since he was very little. He has had other loved toys that cycle in and out depending on what he's interested at the particular moment, but Floppy Dog is different. Floppy Dog is a mainstay. He sleeps with him almost every night. He told me after I showed him the quilt that he was glad the note was on the back because if it were on the front Floppy Dog might see it and get his feelings hurt. Kids are so sweet and innocent.


Now you're probably wondering where the other mini comes into play. For that story I must backtrack a bit. After the night of coloring and movie watching I had given up on my coloring skills and decided that Delbert's design was the one. The next morning my sister is at my house and I tell her the story of what had happened the night before and my frustration with the colored pencils. She looks at me with the most nonchalant face and says, "Why don't you just color them in Photoshop?" She then shows me exactly how that is done. A process which I documented and blogged here. This was the about the same day that Diane had blogged about using the value test to choose your colors. I had never chosen colors this way and decided that it was necessary skill builder exercise for me. I decided that if I wasn't going to make a whole quilt, I certainly could make two minis. One to preserve a precious memory and one to help me build technical skill. One to keep and one to give away. Guess which one I'm keeping. Hint, not the one in the photo below. ;-)

http://gingerpeachstudio.com/wp-content/uploads/photo-3.jpg

I followed Diane's instructions for the value test and decided I would use solids to make the 'average' value of the grey be easier to see. My plan was to first choose one of my greyscale designs that I liked. From there, I went to Design-Seeds to find a fresh color palette. I made a new coloring page in Photoshop using the color palette that I chosen. After doing so I realized that my color page didn't exactly "line up" with the grayscale page when I applied the value test to the two coloring pages. My solution to this was to pull several similarly colored fabrics for each color in the palette I was using and then choose the one that best matched the greyscale version.


After narrowing down all the solid options I settled on these colors and went to work on them.

http://gingerpeachstudio.com/wp-content/uploads/cc.jpg

I am so happy with the way this mini turned out. I love the color palette. and I especially love the way the quilting makes the center star come to the foreground. I chose an adorable print from the Crafty Chloe line for the back and finished her off with some Liberty love.

http://gingerpeachstudio.com/wp-content/uploads/photo-2.jpg

I truly loved these projects. Both for different reasons. I relished the new method for choosing colors. The value test was completely new for me and I think it really added dimension to the finished quilt. The Love Note quilt, however, will be cherished. For now it hangs above the mantle and I suspect it will remain there for a very long time. Regarding the other mini, I have a happy bit of news for all you readers out there. How would you like to hang it up on your studio wall? All you have to do is enter the rafflecopter below and this pretty little mini could be yours. Thank you so much for reading my long-winded story. If you're looking for me in the future, or you'd like to know what I'm up to, you can find me at the Ginger Peach Studio where I sew and do things that make me happy.

a Rafflecopter giveaway


Thank you Jennifer!! I love your story! What a great memory to have and be able to cherish for years to come. Isn't that what quilting is all about? The special experiences and memories those quilts create. Your minis are SO beautiful!! I wish I could win yours! ;)


Thanks for stopping by and good luck everyone!! :)

Diane

Friday, August 1, 2014

Celestial Star QAL: Guest Blogger: Courtney Lyons & Finishing Your Quilt Block

Celestial Star QAL with from blank pages...

I am SO excited to introduce you to Courtney Lyons, of petit lyons. Courtney and I first "met" while co-hosting a blog event a few years ago with Rachel of imagine gnats. Over the years she has made me some beautiful items, always including her precious Anna Maria Horner prints (she's so generous!), and I just have to say that she has been a great friend! We also had our youngest boys in the same week last year, so watching them grow together has been so much fun! I feel like they should be best friends. I hope that one day they, and we, will finally get to meet in real life. :) I hope you will stop by and say hi!


Today Courtney is sharing some great tips for joining your wedges and creating a beautiful finished block! I absolutely love how her finished block turned out!!

******************


Hello, Celestial Star Quilt-Along-ers! My name is Courtney and I blog at petit lyons. I'm here today to share some tips for paper piecing. I love paper piecing, but when you tackle a large block made up of many units, it can be really difficult to get everything looking perfect. I know my center point is not quite perfect, but I'm still happy with my block!


I chose to use some of my new cotton + steel fabrics since this was such a special block.  Now I just have to decide if it is going to be a mini quilt or pillow and how I will quilt it.


 I decided to join the wedges to make two halves.  I started with the twelve wedges with paper still on.  I always try to leave the paper on until the end.  Because of the odd angles of paper piecing you get some sections on the bias, which can make them stretchy.  The paper helps to keep everything in shape as does starch.


I usually press seams open, but for this style of paper pieced block I find a pressed open seam is way too bulky around the center point. When you get to your final seam joining the two halves with pressed open seams it is almost too bulky to sew over.  

I took my first two wedges and pressed one center seam up and the next down.  Then I removed the paper from the seam allowance.  I find it easiest to remove the seam allowance bit once the seam is finished. 


To join these two pieces I nest the center seams together and make sure the point and the outside edge are lined up.  You can pin here, but I'm not a pinner unless absolutely necessary!


Sew along the seam from the outer edge toward the center and stop at the seam allowance line, reverse to secure your stitch.


Continue around the wedge, alternating the center seam up and down, until you have completed half of your block.  Tear out the seam allowances as you sew each seam.


Press all of your seam allowances for the wedges in the same direction and repeat for the remaining half.


 Join the two halves the same way you joined the wedges, matching the outer edge and nesting the center seams together.  This is a spot where even I will pin : )  Just a few pins at the parts that are most important to get lined up.


Continue to press the seams in one direction all the way around the block, and the center points will start to fan out.  This means you won't have a giant bump to try to quilt through, like you would if you pressed seams open.   It may be tempting to trim off some of the points, but remember that these are a vital part of your seam allowance and to do so would create a scant seam.


I just want to note that I learned about spinning seams from Cristy and her helpfulness on Instagram.  She has a tutorial coming soon if you are interested in learning more.  I have found them to work amazingly well on pinwheel style blocks where 8 wedges are joined to make a square, but a little trickier with the 12 piece blocks.   I hope to get some more practice in soon!


 Good luck to everyone on your quilt along, your pictures so far are amazing! Thanks to Diane for creating yet another amazing pattern and for having me guest post here today.

*****************

Thank you so much Courtney!! This is fantastic!! :)

Be sure to link up your finished quilt block pictures in this post HERE. or on Instagram (hashtag #CelestialStarBlock) I love seeing them! :) and the giveaway for the $25 gift cards to the Fat Quarter Shop ends on Thursday the 7th. I'll pick winners sometime that day. :)


And, does anyone want to do some Celestial Star Social Sewing tonight?! I'll be on instagram tonight, and probably a lot next week cranking out my blocks if you want to join me! Just use hashtag #CelestialStarSewcial and we can all work on them together. And you can help keep me motivated to keep sewing!! (I struggle with endurance when it comes to doing the same thing over and over again. Luckily all my blocks are different designs, so hopefully that will help.) ;)


Have a great weekend!!

Diane


Saturday, July 26, 2014

Celestial Star QAL: Guest Blogger: Cristy Fincher & Paperless Paper Piecing


Celestial Star QAL with from blank pages...


I am thrilled to introduce you to today's guest blogger: Cristy Fincher. I have had nothing but positive experiences interacting with her. Not only is she one of the nicest people I've ever *met* (online only, we have yet to meet in person, and look forward to the day), but she is nothing but generous in sharing herself, her knowledge, and her talents. Of which she has many. I can't say enough good things about her. She has been a great support and friend to me along my journey of quilting and I continually learn so much from her. (Wipe that tear :)' ) lol. Anyway, she's awesome. She also blogs at Sew Much Like Mom, has an online store (that she just re-launched this weekend) at Purple Daisies Quilting, with endless resources for any level of quilter, and is @CristyCreates on Instagram. Be sure to follow along with her and all she does! You don't want to miss anything from this girl.
 Thanks for joining us Cristy!


***************


Hi! I'm Cristy Fincher from Sew Much Like Mom. I'm really excited to be Diane's guest and to share Paperless Paper Piecing with you. It's one of my favorite techniques. I hope you'll give it a try!


I love the precision of traditional paper piecing, but like some of you, I really don't enjoy tearing off all of the papers at the end. Over 10 years ago, my mom, Sharon Schamber, developed Paperless Paper Piecing, an amazing technique that gives you the precision of paper piecing with the freedom's limited by foundations. And the best part is that there are no papers to tear off in the end. Paperless Paper Piecing can be used as an alternative to paper piecing with virtually any pattern. I use it whenever I have the chance.


If you're not familiar with Paperless Paper Piecing, don't worry! I'll walk you through it, step by step, and I have another great post that walks you through the basics. In Paperless Paper Piecing, the assembly of the block, or unit, is done in a similar layering fashion as paper piecing, but, instead of sewing one piece at a time, all of the pieces are layered and glue basted in place, then sewn together. It's amazing and wonderful! I know this information may seem very extensive, but very detailed instructions are important to me. I don't want to skip a single step. The technique is simple, but as with anything new, it takes giving it a try to really "get it". Are you ready? Let's get started.


Preparing for Paperless Paper Piecing:

Let's get our supplies together. You'll need:

  1. Fabric cutting templates from Diane's Celestial Star pattern.
  2. Templates of the block units for piecing: Center-Inner, Center-Outer, Left of Center-Outer, Right of Center-Outer
    1. You'll only need 2 copies of each, which is much different than with paper piecing. Print one copy of each on paper, and one copy onto freezer paper. (Additional copies are optional.)
  3. Your coloring page of your design plan
  4. Fabrics
  5. Washable Elmer's School Glue & Fine Tip
  6. Scissors, Rotary Cutter, Rotary Ruler
  7. Pencil, Fine Sharpie
  8. Spray Starch (not Sizing, or non-starch products, like Flatter), 1/2" stencil brush or dense paint brush
Preparing the Templates:

I printed, and rough cut, one each of the inner and outer piecing templates onto regular paper. You can do this on freezer paper as well. If you choose to use freezer paper, print enough so you have 2 copies of each type of template. You will not need 12 of each, as with paper piecing.


The cutting templates can be cut in any fashion you prefer. Paperless Paper Piecing is very forgiving, and doesn't require extremely precise fabric pieces. Although, I like templates, because they cut down on waste. Take a look at Diane's method; it is wonderful. The only difference for cutting the fabrics for PPP is to cut with the wrong side of the fabric facing up. This is most important if you are using prints and/or cutting rights and lefts.


Be sure to have your design plan handy, and your fabrics ready to go. Prior to cutting my fabric with my templates, I prefer to iron them with a light spraying of starch. I love how well starched fabric pieces together. (I'm not going to walk you through cutting the fabrics, because Diane's post covers it perfectly. Just make sure to cut the fabrics with the wrong side up.)


Converting to Paperless Paper Piecing:

Most of the Paperless Paper Piecing patterns I make are made for the technique, but almost any paper piecing pattern can be converted to Paperless Paper Piecing (I'll often refer to it as PPP in this post, too).


Diane's Celestial Star converts flawlessly to PPP. I'll walk you through how to convert the pattern. And please feel free to use my conversions. There's no need for you to reinvent the wheel ;).


PPP patterns are layered, glue basted and assembled BEFORE sewing. This is unique, but so crazy awesome. Since we won't be layering two pieces, then sewing, then trimming, then layering..., we have to change to order of the paper piecing template a bit.


First, we decide on our layering order. Generally, the PPP layering order for the fabrics is done in the opposite order of paper piecing. This is because we will be layering and assembling our units with the wrong side up. Essentially we are making the mirror image. You can see the edits I made to the Inner template in red, in the picture below. An essential component to PPP is turning the edges of our fabrics to create a seam line. If I've already lost you, please refer back to my previous post on PPP.


Cristy's Conversions:
  1. Reverse the farbic layering/placement order.
  2. Mark the turning lines (dashes) for each piece. 
    1. Piece 1: top edge, touching pieces 2, & 3, is turned
    2. Piece 2: the side edge, touching piece 4, is turned
    3. Piece 3: the side edge, touching piece 4, is turned
    4. Piece 4: no edges are turned, as it will lay on top of all the pieces
  3. Mark the sewing order. The sewing order is essentially the reverse order of the layering. I wrote the sewing order on the lines that indicate the seam. In most cases, the sewing order is almost the same as with paper piecing.
    1. Seam 1 joins pieces 3 & 4 (I marked #1 between 4 & 2 on this template, by mistake. This pattern is symmetrical, so my mistake isn't a huge deal. If it weren't symmetrical, I would be sure to fix it.)
    2. Seam 2 joins pieces 2 & 4.
    3. Seam 3 joins pieces 1, 2, 3 & 4
  4. Knowing your sewing order is very important. If you were to sew seam 3 first, you would sew over the ends of seams 1 & 2 before they were sewn, and have to do some unpicking. If you were to mistakenly sew the wrong seam first, it's okay. You can unpick it, and sew the proper one. With everything being glue basted, all of your pieces will stay in place.
  5. The conversions are the same for all 12 of the inner pieces.


Here is a picture of the conversions for the outer piece. Whether you're making the center, right of center or left of center, the conversions are the same.


Prepare the Turning Template:

We will need to make a template from freezer paper to help us turn the edges of our fabric pieces. If you've used freezer paper for appliqué, or other sewing uses before, this will probably be pretty self explanatory. We will be making the template out of two layers of freezer paper, for durability and reuse-ability.
  1. Cut two strips of freezer paper.
  2. Press them together with the shiny sides DOWN. 
  3. Trim one edge to get a nice straight edge.
  4. Draw a dashed line (or any other doodle you'd like) to remind you that it's the straight edge. Or cute both edges straight, giving you a double edged template.


The Paperless Paper Piecing Technique:

Layering and Glue Basting:


Now the fun begins!!!


Turn your iron on (cotton setting is perfect) and keep it dry (no steam, please). Have your spray starch, stencil brush and Elmer's Washable School Glue + Fine Tip at the ready.


Spray some starch into a small bowl or in the lid of the starch bottle, like I did here. It will foam up. After the foam settles, it will be liquidy.


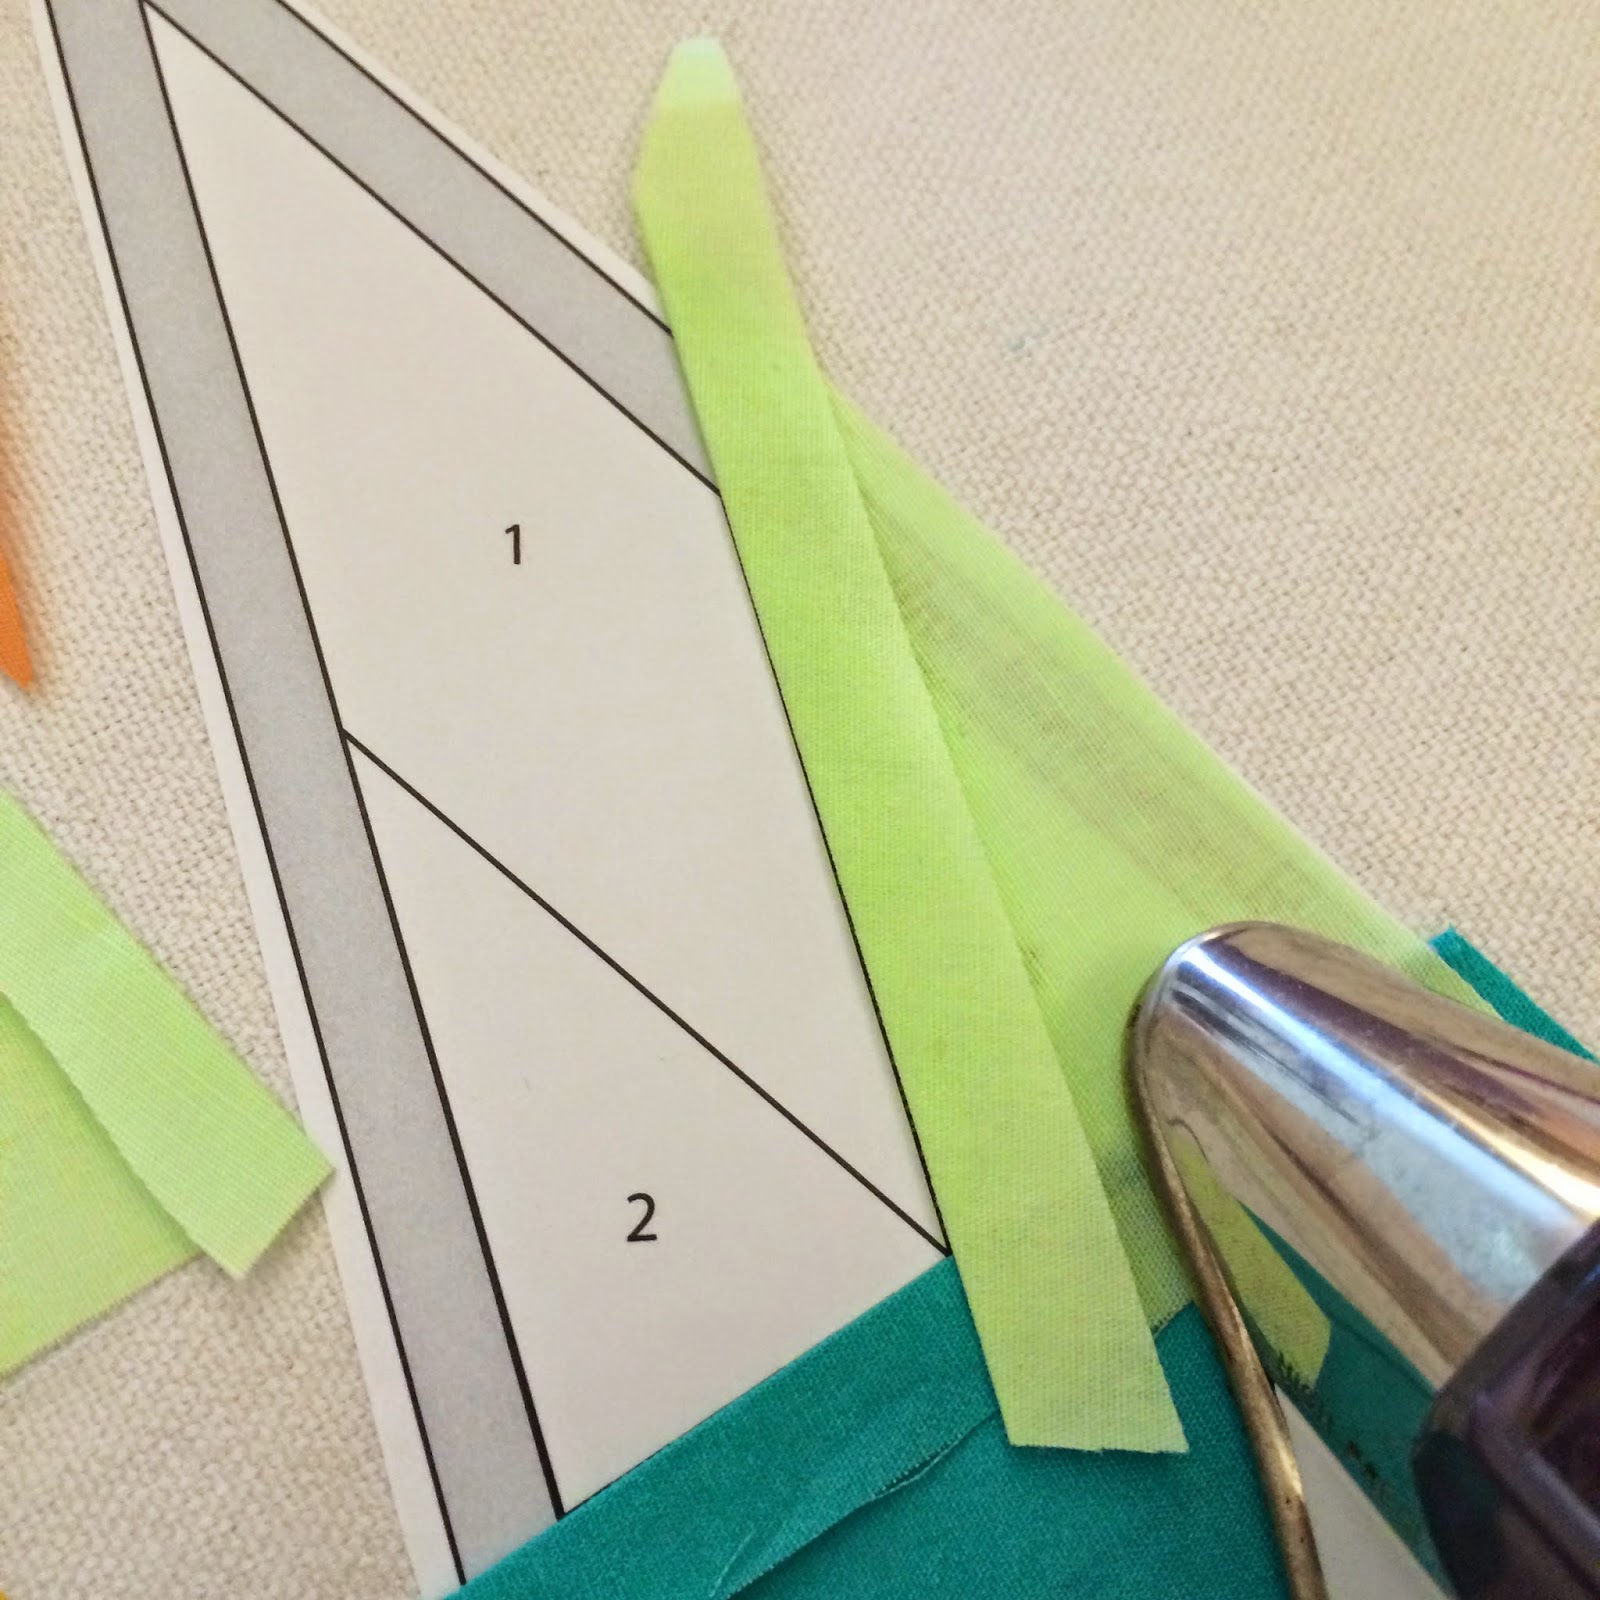
Next we'll be turning the edges of our fabric pieces, according to the conversions we made on the templates.


Starting with piece #1, have your freezer paper turning template, starch and stencil brush nearby.


Place the freezer paper, shiny side down, onto the BACK of piece #1. Line up the straight edge about 1/4"-3/8" from the edge of piece #1. Press it in place with your hot, dry iron.


 Dip your brush into the starch.


Paint starch onto the edge of the fabric, from one end to the other. Be careful not to paint too much onto the freezer paper template, as we don't want soggy paper.


Next, pull the edge of the fabric over the edge of the freezer paper, and press with your hot, dry iron. This will make a nice, crisp crease. This crease will end up being your seam line. Then peel the template off, while it's still a tad warm. So cool!!


Repeat for each piece with a turned edge.


Here you can see all of the turned edges, nicely pressed. Remember, wrong side up! In these pictures, you can see how the turned edges of pieces 1, 2 & 3 match what we wrote on the template. Piece #4 doesn't get turned because it's last and will lay on top of all the pieces.


Now, let's get to the layering!


Lay piece #1 in it's place on your layout template, and anchor with a couple of straight pins. When laying it in place, the edge of the crease should be right on top of corresponding black line. The black line can peek out a tiny bit. If it's completely covered, or not covered at all, the actual seam will be inaccurate.  The outside edges of each piece should overlap the seam allowance edge, just like with paper piecing. (Here, I'm layering them on another template to show you how the layering is done, without covering up the converted template. Usually, I layer right on top of the conversions.)


 Draw a line of glue near the edge of the crease, where you'll be layering piece #2. This is the beginning of our use of glue basting. Glue basting is an amazing tool that helps us hold our pieces of fabric together, temporarily, while enabling us to achieve more accurate piecing. When you wash the final quilt, the glue will wash away. I have several blog posts and videos can teach you more about glue basting.


Heat set in place.


Draw a line of glue for piece #3.


Place piece #3 in place and heat-set.


Draw a line of glue on the edges of pieces 2 & 3.


Lay  piece #4 in place and heat set. The last piece is always my favorite!


Here's what it looks like after all the pieces are layered and glue basted.


Take the pins out and turn the unit over for the big reveal. Doesn't it look lovely?! Now it's ready to sew.


Speedy Shortcuts:

  1. Use mulitple layout templates, and assemble your units in an assembly line.
  2. Turn all edges before layering.
  3. Use a longer turning template and turn two pieces as the same time.


 Let's take a look at the assembly for one of the outer units:


Piece #1 is already on the template, as it's done the same way as piece #1 of the inner unit. I turned pieces #2 & #3 at the same time, on a longer turning template. This makes turning edges much quicker. Then I placed them on the layout template.


After turning piece #4, draw a small spot of glue on the edge of piece #2, where it will overlap. Then lay it in place and heat-set. Feel free to use an additional pin as an anchor.


Draw a spot of glue on the edge of pieces #3 & #4, where piece #5 will overlap.


Lay piece #5 in place and heat-set.


Draw glue on the edges of pieces #2 & #3, where piece #6 will overlap. Lay piece #6 in place and heat-set.


And last, but not least, draw a line of glue on the edges of pieces #4 & #5, where piece #7 will over lap. Place piece #7 in place and heat-set.


Release the unit from the layout template, and take a peek at how lovely and precise it is.


Sewing and Trimming the Units:


Open the crease for sewing line #1 on the inner unit. See that nice crease there? That's your sewing line, where you will be creating your seam. For each seam, you will sew right on the crease.


Beginning with your needle down, at the top of the seam, begin sewing directly on the crease. If you sew to the right of the crease, it will be too big. If you sew to the left, it will be too small.


See this little bump? That's where the seams of the other pieces are. When you get to this point, be sure to stay on the crease line, and be sure not to sew on top of the bump. Doing that will create a pucker. I've done this many many times. It's an easy fix. Just unpick that section of the seam and resew it. Having everything glue basted keeps your pieces in place when you need to fix little mistakes like a pucker.


Trim the seam to a nice 1/4". You can trim with scissors or a rotary. I generally use scissors and "eyeball" the 1/4" because it's a bit quicker for me.


After trimming, press the seam. Repeat, for each seam, one seam at a time. It's very important that you trim each seam before sewing the next, just as with paper piecing. 

Want to chain piece? Paperless Paper Piecing is perfect for chain piecing! After assembling each unit, you can chain piece each of the first seams, press, trim, then move on to the second seam. 


 Here are two inner units, sewn and trimmed.


And two outer units, sewn and trimmed.


Trimming the Units:


Trimming the units, to prepare them for the final assembly, is unique, easy and accurate.


First, print one copy of each piecing/layout template onto freezer paper. Remember, print onto the paper side. Here you can see the shiny side vs. the paper side. I highly recommend printing with an inkjet printer. If you print with a laser printer, the ink will smear when you press it with your iron.


Rough cut one of each inner, and outer templates. Lay each template, shiny side down onto a piece of blank freezer paper. Again, we'll be making a template with 2 layers of freezer paper. Press the templates in place. Be sure there are little to no bubbles.


Trim each template, cutting off the seam allowance. When you trim, cut right down the center of the black line. If you cut to the right, the template will be too big. If you cut to the right, it will be too small. This is a good rule of thumb for cutting any template for any type of use in quiting.


Trimming templates, all trimmed and ready to go!


Line up the black lines/seam lines of the trimming template with the actual seams of the unit. Press the template in place with your hot, dry iron.


Line up the edge of the trimming template with the 1/4" mark on your ruler. Trim with your rotary cutter. Repeat for each edge, and for each unit.


Next, mark at dot at the tip of the template. This indicates the stopping/starting point for sewing two, or more, full units together.


After trimming and marking the point, simply peel the trimming template off of the unit. Easy peasy! And the template is reusable!


Troubleshooting: If your seam lines don't match the template perfectly, get it as close as you can. Hold the template with your hand, and give the sewn unit a gentle tug to guide it into place. When you've got it as close as you can, press it in place. I think the most important line to match up is the one that intersects the other pieces.


Repeat for each inner and outer unit.


Joining the Inner & Outer Units:

Now, you're inner and outer units are ready to be joined. This is one of the easiest parts of the technique.


Draw a line of glue across the edge of the outer unit, clost to the edge (about 1/8" from the edge).


Center and line up the edges of the inner and outer unit. Heat-set in place.


Sew together.


Repeat for all units. (Yep, you can see where I messed up a seam, and had to restitch. Thankfully, I only made the seam to short. Making it wider was easy, and I didn't have to unpick anything.)


After sewing, press the seam toward piece #1 of the inner unit. Repeat to join each inner/outer unit according to your design plan.


Finally, you're ready to join full units to one another.


Draw a line of glue along the edge of one fully assembled unit. Again, about 1/8" away from the edge. Avoid putting glue past the point of that dot we drew at the tips, earlier. Remember, we aren't actually sewing through the glue. It's just holding our pieces together in order to help us achieve more accurate piecing. And when you wash the final quilt, the glue will wash away.


Match up the seams of your units, and heat set.


Sew your units together, starting at the dot we marked at the tip of the unit. Start with your needle down, right on the dot. Stitch 2-3 stitches then backstitch. This will secure the end, which will eventually become the center of the block, where all the seams intersect.


The backstitch.


This is what it will look like at the tip, after being sewn.


After sewing, press your seam to the side. I always recommend pressing to the side, especially when a seam is the strength of the block and quilt, as with these units of the Celestial Star. When you press your seams open, the strength of the block is only as strong as the thread holding it together. A seam that 's pressed open runs a high risk of popping once it's quilted or with washing, use and over time. A seam that's pressed to the side is easier to quilt, especially if you choose to "stitch in the ditch", and it's much stronger as it relies on the fabric AND the thread for its strength. (Miters and binding strips are two places where I do press my seams open. Otherwise, pressing to the side is my preference.)


Continue piecing the units together, according to Diane's instructions. At each tip of a unit, be sure to stop and backstitch at that dot we drew. Then, press to the side, in the same direction, each time.


When you have the two halves, of 6 units each, ready to sew together, sew straight across, without stopping at any dot. This will join the units, and allow the center seams to "spin", which relieves any bulk in the center of your block. If you were to press all of these seams open, you could end up with quilt a bit of bulk in the center, and the center may not match up as nicely.

This is the Celestial Star block I made, using Paperless Paper Piecing.


This is the center, after joining all units, pressing to the side, and spinning the center.


Thank you for joining me today! I hope you learned a bit in this post, and consider giving Paperless Paper Piecing a try, with this pattern or with any other paper piecing pattern. 

I really love Diane's Celestial Star, and can't wait to make many more. I also can't wait to see what you create. 

Happy Stitchin'!
~Cristy


************

Thank you so much Cristy for that great tutorial! I already love glue basting, and I can't wait to give this a try!!


I hope everyone is having a great time with the QAL! Sorry for the hiccups in schedule this week. I am starting to feel better, and look forward to next week being a better week. ;) I also realized that I need to get sewing so I can finish up my quilt in time!! ;) How are you coming along?! Keep the pictures coming! I love them!! :)


Diane