Home * Patterns * Tutorials * Made It * Our Story
Showing posts with label How to. Show all posts

Thursday, March 24, 2011

Fab Finds: Boys Clothes

I went to trade out Jackson's clothes the other day and was surprised to find that we don't have any 18 month to 2 year clothes. Luckily he's small so he's doing ok in his 12 months clothes, but some of them are definitely getting small/short (mostly his pants).

Well I LOVE all the tutorials over at Made! Dana does such a wonderful job at making up patters for really cute clothes... and all you need are older clothes. ;)

Here are my three top favs that I want to make for Jackson (maybe I'll get them done before he's too big. :)


Front flat pocket tutorial. I LOVE these pockets!


These are seriously some awesome pants! I want some for me!!! :)
Maybe after I have this baby and lose a couple pounds. ;)


Super easy, super cute shirts!


Links:

Thursday, March 3, 2011

Fab Finds: Sewing Projects

Some days, while blog hopping and project browsing, I end up with a million tabs open of things that I want to make... someday. :) Today is one of those days. Instead of just hiding them away in my bookmarks, I thought I'd share:


First I'll start with some fun projects and quilts from Oh Fransson!


I love this quilt made with Scrappy Hedgerow Blocks


This Charm Squares Baby Quilt would be a fast and easy way to use up some of my fabric and charm packs. So cute!
Here's the link to the pdf tutorial: http://www.sewmamasew.com/store/media/blog/SMSCharmSquaresBabyQuilt.pdf


Over at i have to say... She did a tutorial on HST blocks and has a whole slew of ideas on how to piece them together! She made this cute doll quilt, and I would love to do this for a baby blanket! :)


Over at Ruffles and Stuff she made these FANTASTIC Monster Pillows!
They really are big too! Bigger than a little boys head. How fun!! and easy.
They're made of felt, so the faces stay on super easy. There is also a pocket in the back to hold all of the pieces. Love it!


Love this cute dress I found at Little Big Girl Studio. And what an awesome cause!!


LBG studio


And this awesome Sleepover Pillowcase Tutorial at A Lemon Squeezy! LOVE it! :) 

My boys don't use pillows yet, so I have a while until I need to make these up, but I still love them! :) Maybe I should make some for Neil and I.


And then I found this Stuffed Animal Net Tutorial there too. We definitely need one of these!


Charm Squares Baby Quilt http://www.ohfransson.com/oh_fransson/2010/03/charm-squares-baby-quilt-redux.html

HST block ideas: http://ihavetosay.typepad.com/randi/2011/03/my-entry-1.html

Monster Pillows: http://www.rufflesandstuff.com/2011/02/celebrating-boys_28.html


Tuesday, December 14, 2010

Made It: Tree Skirt

We spent last Thanksgiving with my Dad and his wife and my brother and his family. While we were there my SIL and step mom started making these really cute tree skirts. They were nice enough to cut fabric strips for me and send me home with the fabric for it too. :) Since our decorations are still in storage and our tree was awful bear with out a skirt, I figured I'd just finish this one. I was too ambition and didn't wait to get the pattern and started cutting and sewing away. Come to find out it doesn't look ANYTHING like it's supposed to, but I couldn't figure out how else to make it with the fabric I had. Turns out I wouldn't have had enough fabric anyway, so no big deal. Plus our tree is modest in size, and I think the finished tree skirt would have covered our whole living room, so this works out well. :)

Thanks for your help and the fabric family! :)


 very quick Tutorial:
with a few edits.
It's super simple to make. For the center, cut 13 of one fabric and 12 of a coordinating fabric 4.5" square. Sew in a checkerboard pattern. Cut 8 strips of green and 4 strips of red 2.5" by 21". Sew strips together (green red green = strip set) and  sew one completed strip set to opposite sides of the checkerboard. For the blue cut 4 - 6.5" square  squares.Sew 2 blue squares on each end of the remaining 2 strip sets. and sew those on the remaining two sides of the checkerboard. The top is now finished. Sandwhich with batting and a backing fabric and quilt layers together. Cut (I think, may be more or less) 6 - 2.25" strips of blue fabric and use for the binding. Before sewing on the binding, cut ~5" circle from the very center of the tree skirt. Measure the middle of the skirt and the middle of one of the edges and cut a straight line. (I had found an awesome tutorial for this part, but I can't find it for the life of me. I'm sure my center would have turned out better had I been able to find it. oh well.) Then bind the entire edge. :)  You can add ties to close it or velcro or just leave it.

This is my favorite binding tutorial, though I don't really have any tips about binding the center circle, as mine doesn't not look very good. (http://crazymomquilts.blogspot.com/2008/10/binding-tutorial.html)


I tried to get Baby to pose with it, but all he wanted to do was "sleep". :)
He's totally faking! 2 seconds later he got up and unplugged the lights.
He's so stinking cute.


 I'm linking up! Come join in the party(s) and check out all the great sites on my side bar!

Sunday, October 17, 2010

Cash Envelope Tutorial and UPDATE


Ok, I am really sorry for the delay in posting the tutorial for this. I am still a bit sick, cough cough, and it is miserable! I've heard a couple of other people have had the same thing, which drags on and on, so unfortunately I'm not the only one. Hopefully none of you get whatever this is!

Anyway, I was thinking of just drawing up the tutorial, because honestly I have no desire to sew or craft, or do anything besides lay in bed, eat and read. ;) (not so bad I guess) haha. But THANK YOU THANK YOU Julie, who noticed that Walter and Veronica posted a link to their cash envelope tutorial on their etsy site!! Awesome!! :)

You can go to their site and buy the pattern for super cheap! She basically sells it at cost with minimum profits, which is super nice of her! :)

She is expecting their 3rd, so has closed everything down. Congrats!!! :) and hope all goes well!


She of course used oil cloth, which is a little different than using cotton. When I made mine I made some adjustments that I now realize I didn't need to make.

Here are the differences that you DO need to make when using cotton:

I do not want to take away from her tutorial, so I do want to still direct you there, but here is a list of everything you need (this will make it easier to list the differences):

(I originally had the measurements posted here, but took them off since her pattern is now for sale. It would be greatly appreciated if you could support her and buy her pattern, and if you have questions after that, I'd be happy to help you where anything doesn't make sense.)

WHAT YOU NEED: 
Oilcloth or COTTON (the black pieces are needed in both projects. What is in red is what you need to cut extra for the cotton version - cut the same size)
(1) main piece  plus (1) same size in lightweight interfacing 
(2) interior large pockets  plus (2) lightweight interfacing, 
(3) card pockets  plus (3) lightweight interfacing, 
(1) driver's license pocket plus (1) lightweight interfacing, 
(1) checkbook/reciept/shopping list pocket plus (1) lightweight interfacing
(2) closure for velcro pieces 
(6) zipper pocket pieces  ***see the end of this post for variation
Optional: (1) decorative piece going across main piece plus (1) lightweight interfacing


You will also need vinyl, velcro and zippers - the same as what is in the pattern.

*** 
Each lightweight interfacing piece will help keep the pockets and pieces more durable, and be able to better handle all the wear and tear. Cut the same size of the pieces and iron on the wrong sides of the fabric. 

Make everything the same, until you get to the bottom of PAGE 8.

"With wrong RIGHT sides together of the main piece and large interior pockets, sandwich the velcro closure between them and stitch all around the wallet using a 1/4" seam allowance."  

-- make sure the velcro closure is turned the right way inside so when you turn it inside out, it is facing the right way. (I always do a practice turning before I sew to make sure I get it right.)

On Page 9 - you don't really need to trim and square off any edges, or zig zag around the edges, since they will be turned in. You DO NEED TO TRIM THE CORNERS


I did add another step here as well. After you trim the corners, turn it right side out and sew all the way around the edge of the whole thing - as close to the edge as you can (or at least about 1/8" from the edge - no more. This will help keep it's shape, and adds a nice finished touch. :)

Make everything else the same and you are done!! :)


*** I did make all of my pockets out of different fabric.
If you only want three different fabrics, you can simply cut two pieces of each fabric, and use matching fabrics when making the pockets. But if you want them all different here's what you need to do:


instead of cutting
(6) zipper pocket pieces 
cut (2) each of (6) fabrics 7.75"w x 4.25"h 


which means you'll have 12 different pieces, 2 of each fabric. 
Then figure out what order you want them in your book and put them in that order. Then take the outer two fabrics and put those aside together. Then the next two outer fabrics and put them aside together. And the two fabrics that are in the very middle will be together. (does that make sense?)


Next take one of the sets, take one of each of the two fabrics, and sew them together, right sides facing, along the 7.75" sides. Do this with all of the fabrics, matching one fabric with the other. you will then have 6 pieces of fabric that measure 7.75" x 8" - each consisting of two different fabrics. 


Continue on with the instructions, making sure that when you sew the zippers to the fabric, you match up the fabrics. 
Making the pockets this way makes it a little trickier when sewing the vinyl pockets on. You can wait to sew them on until after you sew the zippers on, but before you sew the pockets closed. (to make sure they all end up in the right places.)
It doesn't matter that the pockets are open (between the fabric) because when you sew the pockets to the cover, you will sew right down the center where the two fabrics meet, and it will look beautiful! :)
***


I'd love to see all of them when you are finished!!! Leave me a comment and let me know when you've posted yours! :) Or you can send me pictures and I'd love to showcase them! :)


If you have any questions please let me know and I'd love to go into more detail or help you in any way I can! :) Sorry I've been such a lug... Good luck and happy sewing! :)

Tuesday, August 31, 2010

Bloggity Blogs: UCreate


Wow! Can I just say that I've found so many great blogs recently, and I have no idea how to keep up with all of them, or which one I should feature first. I did find one answer... kind of. It also actually makes it a little harder though to because now there are many, many, more blogs to check out too.

Blog: UCreate

Kari has based her blog on everyone else's blogs and tutorials and creations. HOW FUN!!! I think that is the best part about blogging, getting to know everyone else! Really there are too many different posts on there that are awesome and now added to my "One-Day List".

Here is a very small sampling of what I found:

I'm not a huge jewelry wearer, but I could definitely wear this!!!


Love the design! Created by Running with Scissors.

Another awesome pillow with the tutorial.
When I saw how simply she made those zig zags it about blew my socks off!
They are so stinkin' cute! :)


Headboards can be so much fun! Don't believe me? Just check out this post!


You need to check out this post so you can see how cute the pictures are that she glued on the magnets! I LOVE this! What a simple idea and a quick visual to see what's left to do. I think I could make one of these for myself. ;)


Please visit Ucreate to find the original posts and sponsors.
I want to make sure Ucreate gets credit for their great collection, as well as the original creators!


Picture Links:

Monday, August 23, 2010

Made It: Name Mobiles

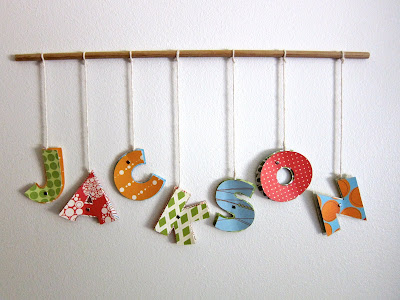
Did you see these on my old blog?

Sadly these two are no longer. Hike decided he wanted a closer look, took them off the wall and ripped them up.
I cried.


Well, now I will show you how to make your own. Yippy! :)


What you'll need:
  • Coordinating paper, cardstock may be better, but it really doesn't matter.
  • eyelets. One for each letter
  • brads, one for each letter
  • yarn, string, ribbon = whatever you want to use to hang your letters with
  • wooden dowel or other item to hang letters from
  • sawtooth picture hanger, small.
  • silent setter for making holes and setting eyelets
  • jigsaw
  • sander
  • drill and really small drill bit
  • hammer
  • pen
  • scissors or cricut machine


**Quick note. I put this tutorial together from three different names I was making, so that is why all the pictures are different. Also, some pictures were taken at night, and thus are not the best. Hopefully you can still get the picture of what to do ;)


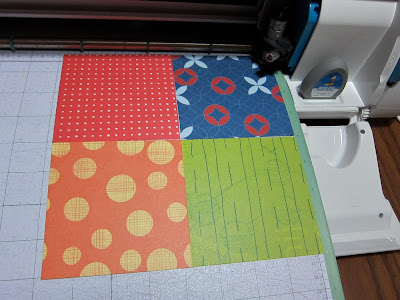
First, pick your paper. My letters end up about 3" in size, and I cut squares about 4" square to cut the letters out of. You want to have two designs per letter, a front piece and a back piece.

Here are my squares. Two for each letter.


I cut my letters out on my cricut which makes it very easy.

If you don't have a cricut, or want to cut them by hand, simply trace your letters on the backs of the paper you are using and cut. (If you do this you don't have to cut squares. Just simply trace/draw the letters on the back of the paper and you can save a lot of paper this way, and not have so much scrap paper left over.) Make sure that the letter that is going on the back is a little bit wider in every direction than the letter in front.

see how the back paper 'outlines' the front paper.


Once you have all your letters cut out you want to line up your letters how you want them to hang. Unless you put your eyelets in the direct center of each letter, they will tilt one way or another. Here is where you want to decide which way you want them to tilt so you know where to place your eyelets.
***Tip: Larger letters hang heavier. Like H, M, W, etc. If you place the next step right on the outer corner it will tilt a LOT, more than I might like anyway, so take this into consideration.


Punch a small hole first, my mom gave me this silent setter. It can be difficult at times, but definitely is worth it! Thanks mom!


Then place your eyelet.

I put the nice side of the eyelet on the back, because it will show more than if it is in the middle and gives it a more finished look.
Here you can see the backside of the L.

Once all your eyelets are set, line up your letters ontop of each other and centered. Punch a SMALL hole in the very very center of the letters.

Then place your brad to hold them together.


Pretty easy huh?!

Now you are ready to hang them.

Lay out your letters again and arrange them as to how you want them to hang in relation to hight. Cut your string, or ribbon, or yarn, or whatever you want to use with enough left over to tie knots in each end (cut it longer than you think so you have room to adjust).

Thread one end through the eyelet in each letter and tie whatever kind of knot you want. (I don't know what this knot is called that I use. Here's how I do it:


Thread the string through the eyelet (or around the dowel), wrap the short end of the string around the long end twice. Make sure your wraps are going back towards the letter or dowel. Then when you come around the third time, bring it over your two loops, go underneath them and back up. Pull the strings tight and your done! You can know slide it up and down the other knot.


Next we'll skip over to preparing your dowel. I bought a small dowel from Lowe's for about $1.
Line up your letters again so you know how long you want it to be. Mark the desired dowel length,

Cut it and sand it down a little so each end is nice and smooth.
Yup, I really used these tools.
You could probably improvise though if you don't have them.

Make sure your blade is moving really fast, and move fast through the dowel. Otherwise it seems to rip up the end and make a jagged mess.

Then take your sawtooth hanger and place it in the center of your dowel. Mark where the holes are for the nails.


With the smallest bit you have drill two tiny tiny holes where the nails will go. Go in far enough so your nails don't bend when you hammer them in. If you don't drill holes it is VERY difficult to get your nails to go in straight!
Then attach your sawtooth hanger.


Now your ready to hang the letters. Arrange them one more time exactly how you want them to hang. Take the ends of each string and tie around the dowel in the adjacent spot.

Tip: Don't clip the ends of the string until you have all letters tied onto the dowel. You may need to make the strings longer or shorter, and once you clip the ends, it's a lot harder.

Place a nail in the wall and you're ready to hang!! :) Walla! Beautiful!


If you want to add a little dimension to it, carefully bend each letter vertically right around the brad. The top paper towards the front, the back paper towards the back.


****
Variations:
  • If you don't want to attach the sawtooth hanger, you can simply tie a string around the center of the dowel and hang from the ceiling or other hook.
  • If you don't want to use a wooden dowel, you can use a hanger, a tree branch, a long pencil, a ruler, string, or whatever you have around the house.
  • Don't want your name hanging on the wall? Do your last name and hang it on your front door? Or make one or two together to say some kind of greeting like: Happy Birthday, Happy Halloween, Merry Christmas, Welcome, Brush your Teeth (for the bathroom), etc.
Have any questions or need help??? Just leave a comment and I'll get back to you! :)

If you make this, will you send me add a picture to the flickr group???
http://www.flickr.com/groups/fromblankpages/
I'd love to see the variety you come up with
and would love to share them with everyone as well! :)
Please let me know if you link to my blog. :)

Love it but don't want to make it yourself??? I'm adding a custom listing for this item to my shop. :) I'll let you know when it's up It's up! and you can go buy it and I'll make it all for you! Just let me know what colors/style you want and your set!
{please contact me for a custom order}


Thanks for stopping by!!