Home * Patterns * Tutorials * Made It * Our Story
Showing posts with label Decor. Show all posts

Saturday, April 9, 2011

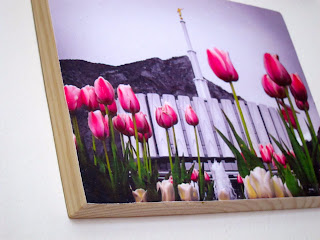
Made It: Temple Plaques

Temple Plaques


During General Conference (you can listen or watch it here - http://lds.org/general-conference/sessions?lang=eng), President Monson talked about Temple's and said,

"To you parents of young children, may I share with you some sage advice from President Spencer W. Kimball. Said he: “It would be a fine thing if … parents would have in every bedroom in their house a picture of the temple so [their children] from the time [they are] infant[s] could look at the picture every day [until] it becomes a part of [their lives]. When [they reach] the age that [they need] to make [the] very important decision [concerning going to the temple], it will have already been made.”

I liked that. We have one picture with the temple hanging in our house, but it's definitely not clear that it is a temple. 

 This is one of our wedding pictures, obviously. It always makes me smile!


These plaques are super easy to make! You can use any picture, drawings (kids drawings), paintings, or fabric to cover the board. Even add some embellishments, vinyl, or whatever else when your done. I used 8" plywood boards that I got from Lowe's, I had the boards already cut from when I was making plant presses (they are about 5" wide maybe. You can ask the people at the hardware store to cut them down to size after you pay for them which is really convenient). Make sure to sand them so they are really smooth.  Find whatever picture you want to use adjusted the pictures to be just a little bit bigger than your wood. I printed mine out on photo paper so they would look nice, and used mod podge to attach the pictures. First I did a layer of mod podge on the board and glued the picture on. Press out any air bubbles. Then turn them over (picture side down), trim the edges


Repeat on all sides. 
I cut a little bit into the picture/under the board so nothing is for sure hanging out.


 Then mod podge over the top to seal it. Carefully press out any air bubbles.  To finish them up drill a small hole in the back, slanted up, to hang them on.


Neil picked the Logan Temple of course.

Hunter picked the Salt Lake Temple... I love this shot!

And Jackson picked the Provo.


These really were super fast and easy to make, and the possibilities are endless!

If you want to use a temple picture, there is this site that has hundreds of pictures to choose from!
(http://www.ldschurchtemples.com/photographs/)


My Favorite thing about these... if my boys just happen to take them off the wall THEY CAN'T DESTROY THEM!!! Yeah! :) 

Diane


Friday, December 31, 2010

Made It: Meaning of Christmas Ornamnets

~~~~~~  I ran out of photo space on blogger, so after the holidays I'll have a little more time to clear out some photos so I can update this post. Until then, here is a picture-lacking tutorial on how I made my ornaments. ~~~~~~~~~~ :) Happy New Year!!


Earlier this month I mentioned that I was making our ornaments this year. I have this list of "The Meaning of Christmas" in my Christmas book, and decided this would make a great project, and be something meaningful. And, best of all, they aren't something that my boys can destroy! Boy-proof is a MUST for us! lol.

Here's the list of items and their meanings:

Here's how I am making them:

Take a chalk pencil or some kind of marking pen and draw the item on some felt fabric. Cut out the pieces and any other details you want to add. I decided to keep mine really simple and not decorate them too much. It just makes sense to not make them all bling-bling when the purpose of them is to remember the meaning, and not be distracted by design or fanciness. Anyway...


Then I took some simple craft glue, glued on the details and let it dry for a minute. Then I took one of the main pieces and glued only right around the edge of it, leaving some room for an opening.

 ----> 

After the glue dried, I took some coordinating floss and did a simple whip stitch around the edges of it to help keep the pieces together and to add a more finished look, leaving a small opening for stuffing.

`````````````````````floss pic``````````````````

About a week ago I realized I should really be sewing them like this to add at least a little bit of cute detail.

`````````````````other way to sew pic`````````````````````

Next stuff your ornament to desired fill, and finish sewing your ornament shut. I didn't glue the last edges before sewing. You could probably do without gluing at all, but I wanted to make sure I didn't get little stuffing fuzz falling out everywhere.

``````````````````````````````````finished pic`````````````````````````

I also was going to add some ribbon before closing, but with how my boys are crazy rough with our tree already, and I knew they would do what they could to take them off anyway, I figured it might be safer to not tie them on, less the tree fell over while trying to get them off. (For the same reason I'm kind of glad we don't have our decorations out. haha.)


So instead of hanging, we just place the ornament in the tree, and they can play with them, or leave them. So far, we love them! :)


I'll show the pillow when I get it finished too. I can't decide it I want to embroider the words or just use a fabric marker. I haven't done embroidery for so long, though it has turned into a great crafting method for doing while I'm doing whatever with my boys all day! So I just may have to start doing more of it! :)

Tuesday, October 12, 2010

Fab Finds: More Halloween

(unfinished post, but I'm posting it anyway.)


Happy October!! :)

There are just too many cute Halloween things out there. I need to clean out my bookmarks so I can save room for more. ;)


Friday, September 24, 2010

Fab Finds: Halloween

I really love Halloween. My hubby is not so excited about dressing up and celebrating. But I drag him along and we always have a lot of fun. I think he's starting to enjoy it more! :)

Last year I found so many cute Halloween decorations and ways to decorate your pumpkins. Here are my pictures from last year. (and the link to the original post: ok, it's to all the Holiday ideas that I had on dbByDesign. So there is some Christmas stuff and even a few Father's Day ideas. Nothing wrong with starting early right?! haha)


Pumpkin, Pumpkins and Pumpkins


and a few more...


an up close view of the quilt idea - so clever:


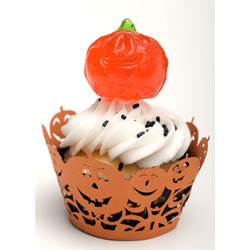
Cute Halloween Cupcakes


They have plenty more ideas plus directions and how-to's on their site. ClickHERE to check them out!


I LOVE looking at all the photos. I've started putting a collection together from this years finds, it's not quite as complete yet, but I'm getting so excited for Halloween already!

Stay tuned for this years photos. I'll wait until I get a few more to put together. Otherwise I'm not sure how impressive it will be compared to all of these. ;)

As much as I love looking at all of these, and the many more that are out there, I am so lame when it comes to decorating. (Hopefully that will change when we actually have a house to decorate. Right now there just isn't a whole lot of extra space). :) 

What are your favorite Halloween decorations? or activities?


Picture Links:
If you want to find the links to all (most) of the photos. Simply go to the original post of these and click on the pictures. Most of these I found from the BHG Holiday emails. :) 

Tuesday, August 31, 2010

Bloggity Blogs: UCreate


Wow! Can I just say that I've found so many great blogs recently, and I have no idea how to keep up with all of them, or which one I should feature first. I did find one answer... kind of. It also actually makes it a little harder though to because now there are many, many, more blogs to check out too.

Blog: UCreate

Kari has based her blog on everyone else's blogs and tutorials and creations. HOW FUN!!! I think that is the best part about blogging, getting to know everyone else! Really there are too many different posts on there that are awesome and now added to my "One-Day List".

Here is a very small sampling of what I found:

I'm not a huge jewelry wearer, but I could definitely wear this!!!


Love the design! Created by Running with Scissors.

Another awesome pillow with the tutorial.
When I saw how simply she made those zig zags it about blew my socks off!
They are so stinkin' cute! :)


Headboards can be so much fun! Don't believe me? Just check out this post!


You need to check out this post so you can see how cute the pictures are that she glued on the magnets! I LOVE this! What a simple idea and a quick visual to see what's left to do. I think I could make one of these for myself. ;)


Please visit Ucreate to find the original posts and sponsors.
I want to make sure Ucreate gets credit for their great collection, as well as the original creators!


Picture Links:

Saturday, August 28, 2010

Fab Finds

I've found so many great creations this week! WOW! How am I ever going to keep up?

To start, here are two that I had to try out!

Flower magnets. A perfect mixture of cute, easy and fun.

I am redoing my kitchen in purple and white and figured these would be a good replacement for all those random magnets on my fridge.


I had to make a couple in these great bright colors as well.

It made me laugh because my mom came over and babysat for us last night. When we got back I asked her if she had noticed them, and she quickly responded with a yes and pointed out her favorite one. Then she noticed another one and said she liked that one too, and then this one and the one over here. It was kind of funny. Finally she ended up saying, "I guess I just like all of them." :)


And these bags. I know, I already posted about them, and shared a few that I made already, but I just can't stop! Anyone want one? haha. These would make great gifts! :)


The fabric that I ordered for my new kitchen curtains came yesterday! Yippy!
Here's what I picked.
(this and a solid white)


And here is the pattern I'm going to use to make them...

I found this over at Make It and Love It! (a must visit site).
I just love how ruffly it is! I think these will look fantastic!
Thanks Ashley!

(do you know that she is my hubby's cousin? Does that make me famous by association? haha. J/K!)


Wow. That was really random.  So much for being organized. ;)


Picture Links: