Home * Patterns * Tutorials * Made It * Our Story
Showing posts with label Quiet. Show all posts

Monday, January 17, 2011

Made It: Children's Church Bag, Part 2

Two weeks ago I posted a tutorial on how I made my bags for my boys. (Which of course can be used for a million other things besides church bags. I've even used them already for bags when I didn't want to take everything in my purse. haha.)

But for the intended purpose, here are a few of the things I put in them for church, and a few fun ideas that I haven't put together yet. :) I have a LOT of links to some wonderful ideas, so I hope you have as much fun looking as I did. :)


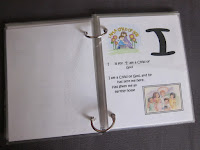
First of all, I printed out this cute ABC Church Book, from The Idea Door. It was super easy to cut and laminate with my YourStory machine. Then I just punched two holes in one side and used the  Loose Leaf  rings and here's a cute book. :


I think if I were to make one again I would change a couple of the pages to use different words, or maybe different descriptions, but this works and my boys like to look at it. :)


I also made a few manila folder activity folders that I found from this site well, I can't find it, but I know it's somewhere in the links at the bottom. I'll keep looking and update this when I find it. I like it because you can print them out black and white and color them yourself, or print them pre-colored, which I did and saved a LOT of time. :) How easy are these? Super. Print, laminate, cut, add velcro, tape to the folder, and your done! :)


After a bit of use I think I want to make these different too. I think if I can find more churchy stuff (like more bible oriented ones like Noah's Ark) than I would actually make a fabric book out of flannel. When the boys take the velcro off it's kind of loud, and I think if it were simply stuck to flannel it wouldn't be as loud. Plus they wouldn't have to match it up quite as exactly - which also means they'd have a little more freedom to play with them. Here's how I'd do it. Cut out flannel pieces that are two pages across. Trace the basic outlines onto the flannel and draw over them with a fabric marker. Then use crayon to color the pictures in and iron to set the color (I love that idea! so simple!). Make a fabric pocket on the facing page and label the activity. Sew the pages together and your done! :) (I think it would take a little bit more detail to make sure all the pages end up in the right places, but I think it would work pretty well.) The other thing with these books is that the pockets don't work very well. All of our Noah Ark animals are always falling through. It's impossible to keep the pocket taped on when you're always trying to reach in and get the pieces out. See...


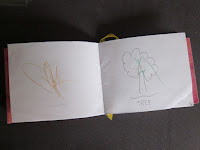
I also added a small handmade book for drawing. This was a practice book when I made all the books for the YW's last year - that's why it's pink and my boys are using it. :) On a couple of pages I drew some simple outline pictures for them to color. But mostly they just scribble right now.


That said, I also have some of these WONDERFUL Twistables Colored Pencils in there.
Crayola : Twistables Erasable Colored Pencils, 12 Assorted Colors/pack -:- Sold as 2 Packs of - 12 - / - Total of 24 Each
I love that they are washable/erasable, and if Jackson has a hold of them, we can just turn them down and I don't have to worry about him coloring on anything! I do really want to get the Mini Twistables Crayons though (I didn't know they had those when I bought these). Hunter likes to turn them out too far and then the tips break. I don't think I would have to worry about that with the crayons since they are SO thick!


I do also have another little book I put together. All it is are pictures of Jesus, and a few other pictures that are key to the Gospel, which I laminated, punched holes in and used the rings to hold together. I found these at the Church Distribution Center for very inexpensive, but I know you can also find some of them at Deseret Book. (Both places you can order online if you don't have one nearby).


I really like this, especially while we take the Sacrament, to help them know what we're supposed to be doing while everyone is being so super quiet. :) 


Ultimately we're trying to get away from bringing toys or fun stuff to church. We've decided that we want them to learn to be reverent and learn that it's important to be focused on what church is about. The husband is trying to get me to not bring anything, but I think a few things are alright. I think I might actually leave out some of the manilla folders that don't also teach, perhaps come up with some of my own stuff. But until then, here are a few more ideas and places you can go to find great ideas.


And of course when they get old enough to read, we'll add some scriptures in there too. :)

I really like this first book that is all about Jesus (or there is one that is on the Sacrament) - but my boys aren't old enough to read, so I think this will have to wait. (http://www.mormonchic.com/mommy/quiet_books.asp) Plus at this link there are more ideas, like the picture book that I made, a fabric quiet book that is pretty general (not churchy), and a photo book of your baby or family.


Links of all my bookmarks....

General Quiet Books:


Churchy Stuff (LDS and general Christian links):


The actual pdf files of ideas and things to download:


A few random links I had in my bookmarks that I know have some great stuff, but nothing specific in these links, just a lot more links:


If you have links to other websites or posts, or something of your own that you've made that fits here, leave it in the comments and I'll add it to my lists! :)

Thanks for stopping by! 
Linking up at these great parties ---> (check my sidebar for daily links)

Tuesday, January 4, 2011

Made It: Children's Church Bag, Part 1

***UPDATE: I've done some clean up on this pattern as well as made it into a PDF pattern, the Mini Tote Bag. You can find the pattern in my Craftsy Shop HERE. The pictures are the same as here on my blog, so if you want a bigger reference for them, hang around as you make your bags! :)


For, well, ever, until now, we've always brought a huge diaper bag full of books, toys, snacks, etc, with us to church to pacify our children while they needed to sit quietly. Well, that doesn't always turn into quiet time. A couple of Sunday's ago, a friend of mine told me about what one of the families do in our ward. They only let their children bring their scriptures and perhaps some paper or church books. That's it. Then she tells them BEFORE church that when they are reverent and obedient they receive blessings, which for them equals a treat or some reward when they get home. If they are noisy or misbehave during church they don't get that "blessing". I like this because it's not bribing! :) lol.

Anyway, Hunter has NEVER let me sit through church, not even when he was an infant, but in the last couple of months he has gotten a lot better, and I think he is ready for this. Jackson will do fine I'm sure since he's pretty mellow anyway.
And so I have started my next project: Church Bags!


Here I will give you my tutorial of how I've made my bags, and then in the second part, I'll show you the collection of things that I have made/found to put inside them. :) I think (hope) these will be a hit, and that they will like carrying their own bags. I also figure that they can be the ones to put the items inside them so they will already know that we don't have any snacks for them, and thus cutting down on disappointment and being loud when we tell them in church that we don't have any for them. :)

What you'll need:

2 coordinating fabrics (1 for the inside and 1 for the outside. you'll need about 1/2 yard of each fabric)
scissors
sewing machine
thread
straight pins
ruler or cutting mat and straight edge
and anything else you might need to sew with or cut fabric with


Cut fabric into the following pieces:

1 of each fabric:
     12" by 25 1/2" (for the main bag)

2 of each fabric:
     2" by 17"  (for the straps. This will make shorter straps for children, but long enough that I can still fit it on my shoulder in case I ever carry it.)

1 each of inside fabric only:
    6" by 13 1/2" - for larger inside pocket
    4 1/2" by 10 1/2" - for smaller inside pocket


Begin by: (backstitch every time you start and stop sewing)


A. POCKETS

click on photos to enlarge
  1. Take the pocket pieces and fold them in half, right sides together, hamburger style (do you remember that term from elementary school?!) :)
  2. Sew around the three edges with 1/4" seam allowance (SA) - not on the folded edge (A.2.a). Leave a 2" opening for turning on the side opposite the fold (A.2.b).
  3. Trim the corners
  4. Turn right side out and push out corners using chopsticks, bone folder or something pointed. Fold the opening under 1/4" and press/iron the entire pocket
  5. Along the folded edge sew a straight line about 1/4" from the edge
  6. Do the same thing to the next pocket piece

    B. INSTALLING POCKETS


    1. Lay the inside piece of fabric flat on your working surface, right side facing up. 
    2. Take your smaller pocket and with a ruler line up your pocket  2 1/2" from one short edge, and 4" from both sides. This will center your pocket on the one side. Pin in place at the four corners and along the long sides. (2a. I actually like to use my clear ruler in this step. I lay it on the top and adjust the pocket underneath it until it is centered and straight. I think it is a lot easier to line up this way.)
    3. Take your larger pocket, and on the opposite end of your fabric, line it up so it is 2 1/2" from the short edge and 3 1/4" from each edge. Pin in place as you did the first pocket.
    4. Sew each pocket in place by sewing 1/8" from the edges along the long side, bottom (sewing the opening shut) and the other long side, leaving the top open. I like to backstitch a lot at the top where I start and stop to give it a little extra strength, since little hands will be digging in them, I figure they could use it. :)

      C. STRAPS


      1.  Take one strap piece of each fabric and lay right sides together. 
      2. Sew along each long side with 1/2" SA, DO NOT sew the short ends closed
      3. Take a safety pin and pin one end of the strap, going through only one piece of fabric
      4. Push the safety pin inside the strap and work it down through to the other end, pulling the fabric in with it. This is a little tricky at first, but once you get started it should only take you 30 seconds to turn the whole strap! I love this method!
      5. Press your strap flat. (mine were a little lumpy. You can remidy this by either only sewing 1/4" SA (your straps will be wider), or cut your straps 1/2" thinner and sew with a 1/4" SA, or use something flat to run through your strap after turning to smooth it out. Or just leave it a little lumpy. It really isn't noticeable.)
      6. Sew along each side of the strap, about 1/8" from the edge. This will give it a crisp, neat look. (I forgot this step on the green bag, oops. ;) This step isn't dire, but it will definitely keep it staying flat.)
      7. Do the same thing with the other strap.

        D. MAKING THE BODY OF THE BAG
           
        1. Take the  outside piece and fold it in half, right sides together, hamburger style
        2. Sew along each long side with a 1/2" SA
        3. Crease the fold as well as you can with your finger
        4. Taking one bottom corner, we're going to square up the corner. (I don't know how to explain this really.) Try and get the seam line lined up with the very center of the bag bottom (where you creased it) - it should look like the picture, with the seam going straight down the center of the triangle.
        5. Line it up on your cutting mat, or using a ruler, pin it where the triangle is 1 1/2" across. Try and get it as straight as possible. (I like to lay it on my cutting mat, line the seam line up so it is straight with a line on the mat. Then measure where it is 3/4" on each side of the seam and mark with pins, or other marking tool.
        6. Sew across this line
        7. Cut the corner off, about 1/4" from your new seam
        8. Repeat this with the other corner.
        9. Repeat this entire process with the inside of the bag.

          E. PIECING BAG TOGETHER

          1. Turn the outside fabric right side out and lay flat.
          2. At the opening, measure 2" from each side seam and mark with pins.
          3. Taking one strap, lay the ends on top of the outside bag body on the inside of the pins you just used for marking.
          4. Pin in place (only through the one side of the bag).
          5. Do the same thing with the other strap on the other side of the bag.
          6. The ends of the straps should line up even with the edge of the bag.
          7. Make sure that the fabrics that are facing each other (on the straps and the bag body) are the same, otherwise when you make the bag, you will have opposite fabrics on the straps than the body. Make sense? It will.)
          8. Carefully stuff the outside fabric bag and straps into the inside fabric bag, matching up the bottom corners
          9. Match up the side seams, folding the SA in opposite directions and pin in place.
          10. Repin the straps to both layers of the bag. Make sure that the straps are fully inside/between the two layers.
          11. Pin the two bags together in the middle of the straps.
          12. Starting at the back of the bag (I used the side with the larger pocket), sew a 1/2" SA around the entire top of the bag, leaving a 2 1/2" opening where you started (E.12.a). Make sure to backstitch at the beginning and end!! I also backstitch when I sew over the straps to make them a little more sturdy.
          13. Pull the inner bag out of the outer bag (makes it easier to turn if they are not together) and Turn right side out through the opening.
          14. Push the inside of the bag into the outside of the bag, wrong sides should be facing each other.
          15. Press the top where your fabrics are sewn together. Turn opening in 1/2" and press.
          16. Now sew around the entire top edge of your bag with a 1/8" SA, making sure not to sew your straps down (make sure they lay out like in the photo).
            YOU'RE FINISHED!! :)

            the green bag has wider straps. 
            I sewed them with 1/4" SA, whereas the blue/red bag is sewn with 1/2" SA.


            *a few tricks: I despise ironing, so I actually just finger pressed everything in this project. Though I do iron the fabric before I cut it so that the pieces are all straight and the right sizes.
            This pattern is very general. You can use it with any variations to make any size or style of bag you may like. Add embellishments or pockets to the outside before sewing the bag body. You can sew multiple fabrics together  for a multi pattern/fabric bag. Etc. The possibilities are endless!
            Here is are two examples of bags that I made practically the exact same way as this one, just bigger and with a few more details:

             
            This second bag only has the "one" strap sewn in at the side seams. I actually used two straps, only sewing in one end of each, with pointed ends and then tied them in a knot at the ends so you can adjust the length.


            Now all you have to do is fill with whatever fun stuff you want, or wait until Part 2 for some ideas, and you are set! :)

            If you have any questions, or something doesn't make sense, 
            Leave a comment and I WILL get back to you. :)