Home * Patterns * Tutorials * Made It * Our Story
Showing posts with label Books. Show all posts

Saturday, April 21, 2012

I WON!! Dare, Dream, Do

The other night while posting giveaways at The One Stop Giveaway Shop, I found one at Sarah Jane Studios (she's amazing!!). It was for a signed copy of Dare, Dream, Do: Remarkable Things Happen When You Dare to Dream by Whitney Johnson. I took a peak at it on Amazon and it looks so great! Anyway, of course I entered, and guess what?! I WON IT! :) WAHOO!!


Sarah emailed me the next morning and told me. And she gave me the kindest compliment ever! I was in a bit of shock! I still remember when my SIL first showed me all her amazing work online. And her she was telling me she liked my stuff?! oh my goodness! That just about made my year! :) Anyway, I just don't want to forget that moment. lol. :)

Thank you Sarah! And thank you Whitney!! I will be sure to give an update on the book once I receive it and read it! (It will be one I will definitely read!)


Diane

Tuesday, July 19, 2011

db By Design: Shop Update


Have you seen these before???

DSC_0782  DSC_0785  DSC_0788  DSC_0795  DSC_0797 DSC_0798

They are fully equipped with erasable pages, two washable markers, an eraser, a pocket in the bag to hold markers and eraser, velcro closure to keep it all together, cute fabric so your always playing in style.


DSC_0726

There two options of replacing the Hangman Page with a lined page. If you would prefer a lined page, just let me know! :)


DSC_0720

These also work well with washable crayons (I've only tried the Crayola brand of both crayons and markers). These can also be fully hand washed (lay flat to dry). And the eraser can be popped in the washing machine.


I have a few, 9 to be exact, that I am about half way finished with. I decided to go ahead and add them to my shop if anyone would like to snatch them up! They won't take too long to finish up and mail out, but please allow up to 2 weeks at the most.

Here are the fabric choices that I have available right now:

Pink Butterflies  IMG_1141   Green Flowers  Blue Dots  Red Letters  Blue Bird Forest  IMG_1155  Green Striped Berries  Blue and Black

(the second picture from the top, with the red and white squares, flowers, owl, etc. will have a back pocket as in the last activity book picture with the crayons)


You can find them in my shop here.


Once these are gone, I'll make some more. Last time I took custom orders from the beginning and let people choose their own fabric, so I'll probably do that again. I'll let you know.


I also have a few mug rugs if you haven't seen them yet, as well as some more bags on the way! :)

DSC_0407

DSC_0410


Thanks for stopping by! :)


Diane


These activity books are 100% my creation. Do not copy or reproduce any part of these in any way. Thanks!

Monday, January 17, 2011

Made It: Children's Church Bag, Part 2

Two weeks ago I posted a tutorial on how I made my bags for my boys. (Which of course can be used for a million other things besides church bags. I've even used them already for bags when I didn't want to take everything in my purse. haha.)

But for the intended purpose, here are a few of the things I put in them for church, and a few fun ideas that I haven't put together yet. :) I have a LOT of links to some wonderful ideas, so I hope you have as much fun looking as I did. :)


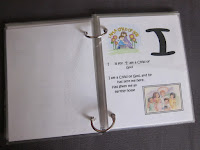
First of all, I printed out this cute ABC Church Book, from The Idea Door. It was super easy to cut and laminate with my YourStory machine. Then I just punched two holes in one side and used the  Loose Leaf  rings and here's a cute book. :


I think if I were to make one again I would change a couple of the pages to use different words, or maybe different descriptions, but this works and my boys like to look at it. :)


I also made a few manila folder activity folders that I found from this site well, I can't find it, but I know it's somewhere in the links at the bottom. I'll keep looking and update this when I find it. I like it because you can print them out black and white and color them yourself, or print them pre-colored, which I did and saved a LOT of time. :) How easy are these? Super. Print, laminate, cut, add velcro, tape to the folder, and your done! :)


After a bit of use I think I want to make these different too. I think if I can find more churchy stuff (like more bible oriented ones like Noah's Ark) than I would actually make a fabric book out of flannel. When the boys take the velcro off it's kind of loud, and I think if it were simply stuck to flannel it wouldn't be as loud. Plus they wouldn't have to match it up quite as exactly - which also means they'd have a little more freedom to play with them. Here's how I'd do it. Cut out flannel pieces that are two pages across. Trace the basic outlines onto the flannel and draw over them with a fabric marker. Then use crayon to color the pictures in and iron to set the color (I love that idea! so simple!). Make a fabric pocket on the facing page and label the activity. Sew the pages together and your done! :) (I think it would take a little bit more detail to make sure all the pages end up in the right places, but I think it would work pretty well.) The other thing with these books is that the pockets don't work very well. All of our Noah Ark animals are always falling through. It's impossible to keep the pocket taped on when you're always trying to reach in and get the pieces out. See...


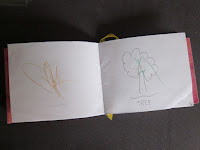
I also added a small handmade book for drawing. This was a practice book when I made all the books for the YW's last year - that's why it's pink and my boys are using it. :) On a couple of pages I drew some simple outline pictures for them to color. But mostly they just scribble right now.


That said, I also have some of these WONDERFUL Twistables Colored Pencils in there.
Crayola : Twistables Erasable Colored Pencils, 12 Assorted Colors/pack -:- Sold as 2 Packs of - 12 - / - Total of 24 Each
I love that they are washable/erasable, and if Jackson has a hold of them, we can just turn them down and I don't have to worry about him coloring on anything! I do really want to get the Mini Twistables Crayons though (I didn't know they had those when I bought these). Hunter likes to turn them out too far and then the tips break. I don't think I would have to worry about that with the crayons since they are SO thick!


I do also have another little book I put together. All it is are pictures of Jesus, and a few other pictures that are key to the Gospel, which I laminated, punched holes in and used the rings to hold together. I found these at the Church Distribution Center for very inexpensive, but I know you can also find some of them at Deseret Book. (Both places you can order online if you don't have one nearby).


I really like this, especially while we take the Sacrament, to help them know what we're supposed to be doing while everyone is being so super quiet. :) 


Ultimately we're trying to get away from bringing toys or fun stuff to church. We've decided that we want them to learn to be reverent and learn that it's important to be focused on what church is about. The husband is trying to get me to not bring anything, but I think a few things are alright. I think I might actually leave out some of the manilla folders that don't also teach, perhaps come up with some of my own stuff. But until then, here are a few more ideas and places you can go to find great ideas.


And of course when they get old enough to read, we'll add some scriptures in there too. :)

I really like this first book that is all about Jesus (or there is one that is on the Sacrament) - but my boys aren't old enough to read, so I think this will have to wait. (http://www.mormonchic.com/mommy/quiet_books.asp) Plus at this link there are more ideas, like the picture book that I made, a fabric quiet book that is pretty general (not churchy), and a photo book of your baby or family.


Links of all my bookmarks....

General Quiet Books:


Churchy Stuff (LDS and general Christian links):


The actual pdf files of ideas and things to download:


A few random links I had in my bookmarks that I know have some great stuff, but nothing specific in these links, just a lot more links:


If you have links to other websites or posts, or something of your own that you've made that fits here, leave it in the comments and I'll add it to my lists! :)

Thanks for stopping by! 
Linking up at these great parties ---> (check my sidebar for daily links)

Monday, October 4, 2010

Shout Out: THIS

A couple weeks ago, I finished an awesome book! I really do like to read, but until I picked up this book, it had been over a year probably since I had actually finished one. ;) You know how life goes. That, and sometimes it's hard to find that book that draws you in and doesn't let you put it down! This is one of those books! 


It's about vampires, yes. But it's not what you may think! It's very well written, full of surprise turns and events that you don't expect. Great character development, and full of wisdom and ideas that make you think a little deeper than just some corny romance vampire novel. Especially with Halloween coming up, this book would be a great October read, or a November read, or December, or January.... you get the point. It's a great book and very entertaining for the young and old alike. :)

Be sure to check it out at:

It's a vampire book that will be sure to leave you wanting for more! ;) 

I couldn't not do a shout out for such a great book! Be sure to check it out at their website, or visit Amazon.com and order yours today. :)

Monday, September 6, 2010

Made It: Book binding

This week I am teaching the girls in my church group how to bind books. I am so excited!! It's going to be so much fun! :)

Anyway, while searching for the links and books I used to teach myself, I decided to share all the journals I made for their birthdays this year! It was so much fun! I really love it! :)

These journals all turned out to be about 7" by 5" and the spine is 1" thick, or around there.
Before I started I asked them what their favorite scriptures were and also added some good quotes and spaced them throughout the pages. As they use the journal they will also have different scriptures placed throughout to help build them up! :) I also placed the following quote on the inside cover. I love it!

"The good biographer will... weed out the irrelevant and seek the strong, novel and interesting..."
"What could you do better for your children and your children's children than to record the story of your life, your triumphs over adversity, your recovery after a fall, your progress when all seemed black, your rejoicing when you had finally achieved?
"Some of what you may write may be humdrum dates and places, but there will also be rich passages that will be quoted by your posterity."
(President Kimball, "Angels May Quote From It", New Era, Oct. 1975)

"Those who keep a personal journal are more likely to keep the Lord in remembrance in their daily lives"
("President Kimball Speaks Out on Personal Journals", New Era, Dec. 1980, p.27)


I made each journal according to their favorite color. It was a lot of fun embellishing them with ribbon and buttons, or whatever else. I'm not a scrapbooker, so nothing fancy. But I think they were pretty excited about them. :) (Some of them I definitely wanted to keep for myself! haha.)


If you want the Word document I used for the signatures let me know. I'd love to share. :)


Here are the links I found for the instructions.

Bookbinding 101 (http://www.diyplanner.com/node/442) Super simple and basic instructions! and really easy to follow!
Bookbinding 102 (http://www.diyplanner.com/node/456) The next step, great instructions still, how to make one with multiple signatures.


I did make a few changes, mostly because of how I decorated them and the supplies I had. I used two pieces of cardstock, folded in half, and glued at the spine. I glued the scrapbook paper only to the spine as well. I liked that a lot better than glueing it to the entire cardstock. Make sure to do all the embellishments before you glue the cover together so you don't have to sew buttons through to both sides.

On one of them I used fabric to cover it instead of paper. I sewed it on with my sewing machine! I think this would be a lot of fun if I had a quilters foot and didn't have to fight my machine to sew designs on it. :}

Here's another one I did with fabric


and the first one I made, I gave it to my mom! :)


If you have any questions on how I made these specifically, please ask! :)

And don't forget to visit all the linky parties (lists on my side bar) all week to see what others have made! :)

Thanks for stopping by!