Home * Patterns * Tutorials * Made It * Our Story

Friday, September 12, 2014

Celestial Star QAL: Guest Blogger: Jennifer + Quilting + a Giveaway!

Celestial Star QAL with from blank pages...


I am so excited to have Jennifer, of Ginger Peach Studios, guest blogging today!! She is amazing! She is super talented, super nice, takes beautiful photos (as you'll see below), and one of those people you just want to be friends with. :) We haven't known each other long at all, but when she said she'd be wiling to post today, I couldn't have been more excited!! Today she is sharing her creation process and TWO Celestial Star minis that she made, one of which she is giving away to one of you!


****************

Hi there! My name is Jennifer. First and foremost I would like to thank Diane for inviting me to share with her readers. I have had such a rewarding experience working on my Celestial Star QAL projects. Even though my projects were small in scale, The lessons learned from making them, have changed me both personally and creatively. Some lessons were completely unexpected and I am excited to show you what I made and learned in the process.


Let me tell you the story of how these to mini quilts came about. When I first saw the Celestial Star pattern I instantly loved it. Who doesn't love a super complicated looking paper-pieced star?? I'm a sucker for intricate, detailed numbers like this that require (or at least appear to require) lots of technical skill. Patterns like this get me all googly-eyed with possibilities. They set the gears in motion and I begin planning all the king-sized bed quilts that I will make for every member of my family. This always happens when I find a pattern I love. And then reality sets in.

My reality probably looks a lot like many others out there so here goes. Since December of last year when my daughter was born, I have been a stay at home mom. I have an infant, a 7-year-old, a husband, two pets to take care of, and a home to keep up. I also seem to have a severe case of crafting ADD or what I've heard others call Creative Flex. Creative Flex is a severely debilitating crafting condition wherein one gets immersed in a project just long enough for it to give you a fantastic idea for another epic, amazing project so you abandon the original project and dive full-boar into the new one. It's very serious. If you have piles and piles of WIP's in your house you may be suffering from it too. You should probably get that checked out. What I mean to say is that ever since I was (self-)diagnosed, I have tried to be a little more cautious about the kinds of projects I can realistically tackle given my current set of circumstances. It would have been completely typical for me to decide to make a huge quilt, go buy a ton of fabric, cut the pieces, get about a third of it pieced, get antsy to start working on something else, and do just that. I know this about myself. I've accepted, and made my peace with it. I also knew for certain that I loved this star and wanted to give the challenging pattern a go. It seemed a mini was the ticket for me. Plus the walls of my studio literally have one framed thing hanging there and it has nothing to do with sewing. Neither is it a picture of my kids but I digress…


So I downloaded the pattern and set to work. I settled in on the couch one night with my coloring pages, pencils in hand, Harry Potter on the screen, and my very favorite little boy sitting by my side. I couldn't imagine a more relaxing evening. As I'm sitting there coloring he becomes interested in what I'm doing and tells me he wants to color too. Of course this was not a problem because of all the fantastic coloring pages included with the pattern. I handed one over and together, he and I spent the evening coloring and watching one of our favorite movies. Perfect indeed.


It is here where two unexpected things happened, one elated me, one deflated me. Let's do the negative first. I became frustrated with my colored pencils rather quickly. I didn't have enough colors and I was impatient with myself because in the time it took me to color one block I would have ideas for three more which I could not begin coloring until I had finished the first. Creative Flex much? I tell you its both a blessing and a curse. It was the lack of color nuance though that was really getting me down because I didn't want "crayola red". I wanted hex code #8a2d43. Now, that's kind of a joke because I don't actually think in hex codes, but you get the point. There are about a million different nuances of "red" and Crayola provides you with about one or two of those options. I didn't like what I was creating with them. So there I was, growing more, and more frustrated with my lacking skills all the while completely oblivious to what is transpiring on the coffee table in front of me. My frustration got the best of me and after coloring six or so blocks I decided one of those would have to do. I set the pencils down and turned my attention to the movie.

http://gingerpeachstudio.com/wp-content/uploads/14505458360_33cda1f93a_k-e1405816288115.jpg

As I'm watching, I notice my son keeps turning to look at me then turning back around. I inquire as to whether or not everything is ok. He assures me that everything is fine. After 3 or 4 times of him doing this I realize he doesn't want me to see what he's coloring and the reason he keeps turning around is to make sure that I'm watching the movie and not him. I was more than intrigued, but I played it cool. When he's finished He tells me he has a surprise for me. Beaming, he shows me his coloring page and in that moment my prior frustrations melted away and I had a mini quilt design. This was the mini my bare studio walls needed. And, as if that wasn't enough to melt my heart and make me shine with pride, he had written me a love note on the back of the coloring page. I nearly fell over with joy. As parents I feel like we spend so much time and energy trying to manufacture memorable experiences for our kids. We take trips, go to the zoo, have birthday parties, etc.. Here in this moment a completely unforeseen but memorable event happened between my son and I. Not only did I share a real and special connection, but it launched a project that we could plan and work on together. A moment of divine inspiration.


This was the first time he and I had ever collaborated on a quilt together. His design, his fabric choices, my work. Plus, I had a special plan for that love note that would be a surprise for him when it was all bound and finished. He was so excited that I wanted to make his design that we immediately went to my stash and started pulling fabrics. The next day I couldn't wait for the baby to nap so I could get started.

I am so happy with the way this mini quilt turned out. I named it the Love Note Quilt for obvious reasons. The front is my son Delbert's Celestial Star design and the back features his note to me hand-embroidered exactly as he did it, in his handwriting, with all the grammatical and spelling errors that are telltale of his tender age. I am proud to say that I now have two items hanging in my studio. The aforementioned, and this beauty of an heirloom with a place of honor over the mantle. I am pleased to report that he loved it and was so surprised by the note on the back. It reads:

"My mom loves me 1st. My mom loves me 2nd. My mom loves me forever. I love my mom more than Floppy Dog."


http://gingerpeachstudio.com/wp-content/uploads/photo-5.jpg

Funny side note. Floppy Dog is a Beanie toy that he has loved since he was very little. He has had other loved toys that cycle in and out depending on what he's interested at the particular moment, but Floppy Dog is different. Floppy Dog is a mainstay. He sleeps with him almost every night. He told me after I showed him the quilt that he was glad the note was on the back because if it were on the front Floppy Dog might see it and get his feelings hurt. Kids are so sweet and innocent.


Now you're probably wondering where the other mini comes into play. For that story I must backtrack a bit. After the night of coloring and movie watching I had given up on my coloring skills and decided that Delbert's design was the one. The next morning my sister is at my house and I tell her the story of what had happened the night before and my frustration with the colored pencils. She looks at me with the most nonchalant face and says, "Why don't you just color them in Photoshop?" She then shows me exactly how that is done. A process which I documented and blogged here. This was the about the same day that Diane had blogged about using the value test to choose your colors. I had never chosen colors this way and decided that it was necessary skill builder exercise for me. I decided that if I wasn't going to make a whole quilt, I certainly could make two minis. One to preserve a precious memory and one to help me build technical skill. One to keep and one to give away. Guess which one I'm keeping. Hint, not the one in the photo below. ;-)

http://gingerpeachstudio.com/wp-content/uploads/photo-3.jpg

I followed Diane's instructions for the value test and decided I would use solids to make the 'average' value of the grey be easier to see. My plan was to first choose one of my greyscale designs that I liked. From there, I went to Design-Seeds to find a fresh color palette. I made a new coloring page in Photoshop using the color palette that I chosen. After doing so I realized that my color page didn't exactly "line up" with the grayscale page when I applied the value test to the two coloring pages. My solution to this was to pull several similarly colored fabrics for each color in the palette I was using and then choose the one that best matched the greyscale version.


After narrowing down all the solid options I settled on these colors and went to work on them.

http://gingerpeachstudio.com/wp-content/uploads/cc.jpg

I am so happy with the way this mini turned out. I love the color palette. and I especially love the way the quilting makes the center star come to the foreground. I chose an adorable print from the Crafty Chloe line for the back and finished her off with some Liberty love.

http://gingerpeachstudio.com/wp-content/uploads/photo-2.jpg

I truly loved these projects. Both for different reasons. I relished the new method for choosing colors. The value test was completely new for me and I think it really added dimension to the finished quilt. The Love Note quilt, however, will be cherished. For now it hangs above the mantle and I suspect it will remain there for a very long time. Regarding the other mini, I have a happy bit of news for all you readers out there. How would you like to hang it up on your studio wall? All you have to do is enter the rafflecopter below and this pretty little mini could be yours. Thank you so much for reading my long-winded story. If you're looking for me in the future, or you'd like to know what I'm up to, you can find me at the Ginger Peach Studio where I sew and do things that make me happy.

a Rafflecopter giveaway


Thank you Jennifer!! I love your story! What a great memory to have and be able to cherish for years to come. Isn't that what quilting is all about? The special experiences and memories those quilts create. Your minis are SO beautiful!! I wish I could win yours! ;)


Thanks for stopping by and good luck everyone!! :)

Diane

Thursday, September 11, 2014

Celestial Star QAL: QUILTING


Celestial Star QAL with from blank pages...

Today's Topic: Quilting 
Assignment: Create a quilt sandwich and start quilting!
On the Blog: Blog about it and link it up using the link up at the end of this post. OR you can also link up photos from Flickr* or Instagram.  

On Instagram: Take a picture and tag it using hashtag #CelestialStarQAL.


There is a giveaway!!!
When you link up on this post, or on Instagram, (You can enter both places) you will be entered to win one of two fat quarter bundles:
Heather Bailey Bundle of Up Parasol (9 FQ's), your choice of colorway, 
sponsored by I Don't Do Dishes

Moda Crossweave FQ bundle, 
sponsored by Material Girl Quilts


The giveaway will be open until I pick a winner on Thursday September 18th.
To enter, share a picture of your quilting. You don't have to be finished, but you need to have started. 


You can pick up a pattern on Craftsy and in my new shop!.

*If you are sharing pictures from Flickr, I started a Celestial Star QAL group, where you can also share your photos, or start up a discussion, ask questions, etc. I don't get on Flickr much anymore, but I'll try my best to keep my eye on it for any activity going on there. I still think Flickr has a pretty good platform for groups, even if the rest of the site has changed.
**If you decide to work faster than my schedule, which is fine, be sure to take pictures along the way so you can come back and enter the different giveaways!


 Let's Get Started:
Be forewarned: It's a little lot wordy and I don't have any photos. But I'll add some when I get my quilt back finished and start basting my quilt. So skim it, or don't. It's ok. It just didn't happen. You know, life... it's what happens. ;)


First, after creating your quilt top, you need to create a back for your quilt. On minis or one block quilts, pillows, etc, I usually make the quilt back about 1 inch larger on all sides than the quilt top. And cut the batting about the same. For larger quilts, I've seen people make the back 2-4 inches larger on all sides than the front. Sometimes I forget this, and then it's a pain trying to match up the front and back when making a quilt sandwich. So, remember:

Make the back larger than the front!!

 It is also a good rule to make the batting larger than the front, but not necessarily larger than the back, though I often do when I'm making small projects.


Creating a Quilt Sandwich:

 There are a billion tutorials online for creating a quilt sandwich, and I honestly haven't looked at many of the newer ones (as in the last year and a half). I know there are some that people swear by, so you should go check those out. :) I kind of just do my own thing because it works for me. And one day I want to find a better way, because that's always a good thing. But for now, I'll share my tricks with you in case they work for you too! :)

I, like probably many of you, I don't have a designated basting spot. I kind of have to improvise with the room that I do have. I do LOVE spray basting, and that can mean a big mess. So the first thing I do is lay down a few old sheets and spread them out nice and flat. I make sure they cover a much wider area than my quilt is big to help catch any spray that goes beyond my quilt. This is also a good way to keep your quilt clean if you have to baste outside in your driveway or sidewalk or somewhere like that, which I have done in the past.

Next, place your batting right side up. Yep! There is a right and wrong side to batting. Here is a little blurb from APQS website. Read the full article HERE ("Batting has an 'up' and 'down'", January 22, 2013, http://apqs.com/blog/2013/01/22/batting-has-an-up-and-down/).

"The "right side” vs. the "wrong side”
"Batting that has been needle punched during its formation has a right side. Look at the batting and search for small pin holes or dimples in the batting. Needle-punching methods drive small needles from one side of the batting to the other as they compress the fibers together. These small holes will reveal the right side of the batting. You want your machine's needle to penetrate the batting in the same direction as the needle-punching machine.
"The wrong side of the batting will have more slubs, which are tiny balls of batting. The wrong side looks much like a sweater that has been worn one too many seasons. If you have this side inadvertently facing up when you layer your quilt, your needle can catch one of these dense little balls of batting and try to force it back through the batting and out the back of the quilt, resulting in bearding."

So, next I lay the "right side" of my batting UP. Spread it out flat, but don't stretch it.

On small quilts or projects I spray the entire batting and then place my small project over it. On a larger quilt like the one I'm working with, I lay the entire quilt over the batting, making sure it is aligned straight. Then I sit in the middle and carefully pull back one end. I spray a small section, about a foot at a time from one edge to the other edge (to the sides of me, not the edge in front of me, or parallel to the "fold" where I've pulled the quilt back). Then I carefully smooth the quilt over the section I just sprayed, working from the center to the outer edges. Be carefully you aren't stretching anything or your batting/quilt top will start to bunch. You want to smooth it just right so they are perfectly together without any bumps on either layer.

Then I repeat by spraying about a foot, then smoothing, spray a foot, smooth, etc. Repeat until you have finished with that side of the quilt.

After the first side is finished, I go back tot he center of the quilt, pull back the opposite side and do the same thing until the entire top is completely basted.

After the top is basted, I flip the quilt/batting over, smooth it out, and baste the back in the same manner as the front.

Now you have a "quilt sandwich".


Quilting:

Quilting. This is the fun, scary, adventurous, sometimes frustrating, very creative and where the possibilities are limitless stage. You can quilt by hand, on your sewing machine, on a longarm, or have someone else do it for you. I am not going to talk about how to quilt, because I don't claim to be an expert. I have a few tricks I like, and I'll share those later. But mostly I want to spotlight how you can showcase your quilt with how you quilt it.


Hand Quilting:

I love hand quilting! I think it looks amazing and I love the texture and emphasis it adds to the quilt design. Here are two of my examples of projects I've quilted by hand:


My Giant Granny Square quilt

DSC_0546


DSC_0558

The stitching is very simple, and shows up the most around the outside boarder. I used really large stitches around the outside as well as on the inside squares, which you can kind of see in the top photo. A fun way to emphasize the quilt.


My very first Celestial Star Block before I named it that, which I made a year ago using liberty prints.

DSC_0156


DSC_0151

I hand stitched around it using black pearl cotton. It's not anything flashy, but I like it. I think it really goes well with the overall feel of the liberty prints. And it's held up really well living on our couch for the past year+.


Machine Quilting:

You of can easily quilt straight lines on your home machine. I love to make wavy lines with my walking foot, a technique I really want to share when I get a moment to do so! Those are both risk free (mostly) and scare free ways to quilt your quilt.


My example of straight lines, on the diagonal. I used rainbow thread to spice it up a bit! :)

DSC_0118
 I made this quilt for my niece. It was fun, and the biggest quilt I've made.


Echo quilting is a really fun way to quilt in straight lines, but still add interest. Here is an example from a quilt I made a few years ago:

DSC_0081
 A quilt I made for my SIL as a Christmas present.


I love my BSR (Bernina Stitch Regluator) and although I didn't learn to FMQ (free motion quilt) with this, it's made it quite easy to be lazy on improving my skills. When I first was learning how to FMQ, I made a large picnic blanket and I practiced a different quilting design in each block. We use the quilt all. the. time. It usually lives in our van and we use it for picnics whenever we get the chance! Or for whatever else we are doing. It's been fun to have.


Anyway, there are lots of ways you can quilt using FMQ designs. I'll share a few from my picnic quilt. These pictures where taken as I was making it, so just know I took them a long time ago. ;p and remember, I was JUST LEARNING! and I wasn't using my BSR. So they are horrible, but worth it, and it doesn't even matter that they are horrible. :)


You can do simple designs, all over designs, or stippling:

IMG_2394
 Originally shared on this post.


 Originally shared on this post.

Here is an all over design that I did on my daughters doll quilt. I love this with the variegated thread.

DSC_0962


Or you can do fun designs to fill in the spaces.

 DSC_0970

 DSC_0972
 My daughter's car quilt. That we actually don't use in the car.


Or you can be a bit more artsy and "draw" some designs. This last one is the back of my picnic quilt, or a block that I "traced" as I quilted. I love the how the design shows up on the back.

IMG_2384
I really love this one!
Originally shared on this post.

IMG_2195
 I made up this design. Can you tell?!? haha.
originally shared on this post.


Originally I wasn't going to share my own quilting photos, but that was kind of fun to look back in time. ;) I had started a Pinterest board of quilting ideas, which you can check out, or browse for more ideas.

There are so many more quilting ideas and designs, and tutorials than when I made this picnic quilt a few years ago. Mostly I want to say, don't be afraid!! Get your hands dirty and do something daring!! No regrets! Have fun! And love whatever you decide to do!! Sure, it could possibly make or break your quilt. But who cares?! One thing I strive to do, is "OWN IT". Accept where you are right now in your skills, and keep doing things to help you get to where you want to be. And whatever you do, don't compare! How's that for a little quilting pep-talk?! :D


Alright, so now I want to see some of YOUR quilting! Use the linky below to share your blog posts or photos of how you are quilting your Celestial Star block(s)! I can't wait to see them! I'll pick one winner from this link up on the blog, next Thursday, to win one of the FQ bundles mentioned above.


Happy Quilting!!


Diane

Tuesday, September 9, 2014

Sponsor Introduction: Material Girl Quilts

Celestial Star QAL with from blank pages...

I am so excited to introduce you to Amanda of Material Girl Quilts!

We probably met on Flickr, a long time ago. I don't even remember. But we've been friends for a long time. She actually was one of my pattern testers for the My First Alphabet pattern, and I actually saw her post about it on her blog today, so I have to share. ;) lol. (My browser pulled it up somehow as I was looking for something else. funny.) Anyway, Amanda has amazing talent!! And she's super duper nice! And I'm so happy she is a part of the Celestial Star QAL! So now I'll let her share a little of her story...

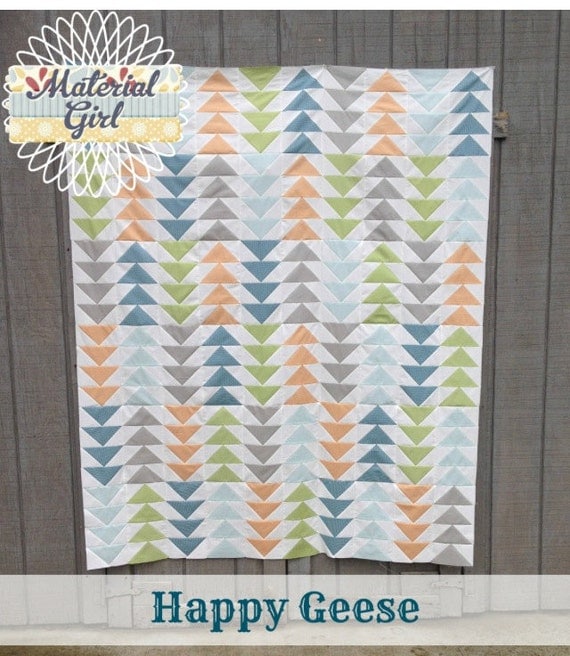
First I have to share a picture of this beautiful quilt she made, Happy Geese. This is just one of the patterns you can purchase in her shop.


Happy Geese quilt pattern by Material Girl Quilts (pdf download) 


Material Girl Quilts
My name is Amanda and I’m a fabric addict! I love to sew, craft and most importantly quilt. I enjoy sharing handmade items and ideas with others and hope to never stop finding new things to create.

This passion for creating led me to open a shop on Etsy www.materialgirlquilts.com that sells gorgeous fabrics, patterns and quilts (with a dream to some day open a brick and mortar shop near me). My goal with the shop is to help others like me find beautiful fabrics for their handmade creations. Whether it be in quilts, clothes, personal accessories or whatever makes their heart happy! I specialize in pre-cuts and hand picked fabric bundles. And even though I'm starting out small, I have BIG dreams for the shop in the future :)


Amanda has generously offered to giveaway this beautiful bundle of Moda Crossweave!


I would love to sew something up with this!!


You can enter to win this bundle, as well as a bundle of Heather Bailey's Up Parasol, when you link up your quilting photos starting tomorrow!  Come back for details. :)


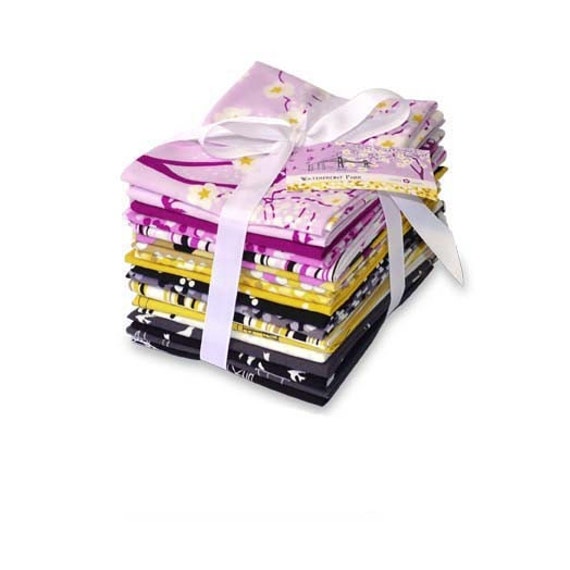
Amanda has a lot of beautiful fabrics in her shop. Including yardage, bundles, and precuts. Here is one that always catches my eye. Waterfront Park by Violet Craft.

Michael Miller Waterfront Park Fat Quarter Bundle in Iris by Violet Craft

Thank you so much Amanda!! 
I hope you will all stop by and say hi, check out her blog, and/or follow her on Instagram! (@MaterialGirlQuilts)


Diane

Celestial Star QAL: JOINING BLOCKS

Alright, who is ready to join their blocks?? Sorry for the delay. I was racing last week to finish my last five blocks! I knew if I didn't spend all my time finishing them, I wouldn't. We also had a two week delay for school to start due to renovations on the school buildings. Today yesterday (I did write this yesterday) was the first day for my cute first grader, and then we decided this morning yesterday morning to put my two middle children in preschool, which also started today yesterday, and there went my whole day! I'm so excited about it, but a little nervous for my little girl. I have a tender heart for her, as she's such a sweet tender girl, but I think this will be good for her, and make us both stretch and grow. It's hard to let your children grow up.... anyway, lots of life going on right now. :)

Anyway... let's get on with this QAL already!!!


Celestial Star QAL with from blank pages...


Today's Topic: Joining Blocks  
Assignment: Sew all your blocks together to create a quilt top.   
On the Blog: Blog about it and link it up using the link up at the end of this post. OR you can also link up photos from Flickr* or Instagram.  
On Instagram: Take a picture and tag it using hashtag #CelestialStarQAL.


You can pick up a pattern in my shop!
*If you are sharing pictures from Flickr, I started a Celestial Star QAL group, where you can also share your photos, or start up a discussion, ask questions, etc. I don't get on Flickr much anymore, but I'll try my best to keep my eye on it for any activity going on there. I still think Flickr has a pretty good platform for groups, even if the rest of the site has changed.
**If you decide to work faster than my schedule, which is fine, be sure to take pictures along the way so you can come back and enter the different giveaways!


Joining blocks really isn't anything technical, but I have a few tips I find helpful in create a polished quilt top. If you are only creating a one block project, then this post isn't really applicable, but perhaps I can share a few things that will help you with other projects. :)


At this point I still have all the paper on my blocks. Some people take it off, but I like the added structure it gives my fabric, and helps me feel a little more confident about not stretching and distorting my fabric. Sometimes it does get in the way, or shift, so it does include a little improvising and adjusting. But it works for me.

This is how I joined my quilt (scroll down for a picture of my completed quilt top! I still need to take a really good one... this is a tough quilt to photograph. The pictures just don't do it justice.) ;)

I sew my quilt in rows/columns. I decided to sew it in three columns first (but you can easily do four rows. It doesn't matter.) I started by sewing my blocks in pairs (The numbers represent the order I sew my seams):


Now my 12 blocks are 6 sets. I'll sew the 2 sets in each column together to make three columns.


Then sew the columns together.


Here is the important step to remember, and this goes for ANY quilt where you are joining rows and/or columns.

You need to alternate the direction in which you sew the seam. I have arrows indicating which direction I sewed my blocks, along with the number referencing which step I sewed them in. Notice how in column one the side I start from alternates as you go down the column?! Same with each column, and then the end I start sewing with when I sew the columns together also changes.


Why is this important??? For some reason when you sew lots of blocks together, or strips. If you always start from the same end and sew in the same direction, your quilt will start to curve, or fan out. Everything will be tighter on one side and be just a hair wider at the other. I know there is reasoning behind it, but I won't go into all that. Just trust me.

One trick that I use to help me remember where to start from, without giving it to much thought, is to find a pattern. In my quilt every other block is a blank background alternating with a designed background. If your blocks have some sort of alternating design or element, find that pattern. For me, I when I sewed my blocks together, I always sewed with the designed background print on TOP as I fed it through my machine. This technique, or pattern, ensures that I will always alternate my starting end. It would be really hard to feed a block through on both edges starting from the same end. Does that make sense?! Trust me. I've seen it in other people's projects, and am grateful my step-mom taught me this when she first taught me to quilt, as it's been something I've happily been able to avoid. :)


Another trick I find highly important: MATCH YOUR SEAMS!! Sometimes it happens that one block is a little wider than the other, or one section is wider than the section you are joining it to. You may think it's more important to make it flat and just sew it flat. In MY OWN opinion, I think it's more important that your seams line up. If you are making a show quilt - go somewhere else to learn all those tricks, I am no professional. BUT if you are going to make a quilt you'll use and love = you are quilting it, it will be washed a lot and often = a little bump in your fabric won't be noticeable.  I'm not talking about puckers. You don't want puckers. But if your fabric has a little bit of wave to it, no one will know it once it's washed and comes out fluffy and crinkly from the dryer. (I'm not talking about huge errors here either, just little ones where you can pull your fabric just enough as you feed it through your machine to get the seams to line up without puckering.) What you WILL notice no matter how many times you wash your quilt, are those seams that don't match and don't line up. You can't crinkle or quilt those mistakes away. :)

So, match your seams. And that is my own inexperienced unprofessional quilting advice. I don't know how people always avoid these little "errors" but I get them, and I just roll with them and don't beat myself up about them. And this is how I fake that I'm awesome at quilting. ;)


Here is my diagram for matching seams. I've pointed to the seams to align.


HOW TO:

I like to glue baste my blocks together. I can align them just right, and not worry about shifting as I transfer my blocks to my sewing machine, or am working with it in the machine. Which was especially helpful with my ginormous 24" blocks.

I don't have any diagrams. I'm sorry. If you want some I can make some. :)

1. Lay one block face up on your ironing board, with the edge your going to be sewing first in the middle of your ironing board (or where ever you can iron it.)
2. Draw a thin line of glue right along the edge of the side you will be sewing.
3. Lay your second block on top of the first block. Pay special attention that your edges are even (you want to have an even 1/4" seam allowance on both blocks when you sew them. If one block sticks out further than the other, your seam allowances won't be even.
4. Also pay attention that you are matching your seams. I like to start in the center and work out toward the edges.
5. As you align your block, press it where you have glues to set the glue. You can still reposition it if needed, but this really strengthens the bond if you are ready to sew!
6. Sew your blocks together with a 1/4" seam allowance. 
7. Press your seams to the side, alternating the direction for each column.
8. Repeat until your quilt top is done!


And now you should have a beautiful quilt top!! Wahoo!

Here is a picture of mine! I'm so in love with it!! But I need to find a good place for pictures. ;)


Be sure to link up your progress!!

Tomorrow I'll share some quilting ideas and open the link up for the quilting giveaway - sharing your quilting designs! (You don't have to be finished quilting, just starting, or sharing your ideas.) :)


Happy Quilting!!


Diane


Monday, September 1, 2014

Nothing's Allowed PenPals +

 photo Nothings-Allowed-button_zps42775850.jpg

This whole idea started with THIS POST, and subsequent follow-up posts.


I created a sign up form for the Nothing's Allowed Penpals group! You can sign up HERE. or just scroll below, I think I can embed it in this post. :)

To be clear, EVERYONE is invited. My posts lately have been more directed to those who may or may not be struggling with habits they see forming in their own lives, or are trying to overcome them. But this group is for anyone and everyone who likes happy mail, loves to support and lift others, loves to receive support and encouragement, just likes mail, etc. You don't have to relate in any way to any of the posts I've recently shared to join. Everyone is welcome!! So if you are interested in sending out letters or receiving letters, I hope you'll join in! Read through the questionnaire for more details.


I'll be honest, I myself am not always great at sending mail, and responding. I think this will be a fantastic way for me to strengthen my skills in this area. I am going into this with no expectations from myself or from others. I am so excited to send out mail to everyone! But I don't expect everyone to respond. I won't be disappointed or discouraged if they don't. And I hope others won't be when I forget or life gets in the way. I'm not sure how "no expectations" will keep this group going, but hopefully because it's based on our own freedom to join at-will, it will at least for some, become a great and wonderful thing in our lives!! :)

If you ever at any point find yourself struggling, with anything in your life, this is a great distraction to turn your attention to something else! Thinking of others and serving others ALWAYS makes my problems seem smaller or disappear altogether. Please remember this! And if you ever are feeling the need for some mail, just shout out and we can in mass send you some #happymail!! :)

***

I have so many thoughts in response to the responses I've received from my posts from last week. Thank you all for your love and support, and thank you for sharing your stories and experiences. It is wonderful to feel the comradery and trust that we have as a group of strangers, who share in the same hobbies and joys as well as struggles. If you find yourself in over your head with your habits and struggles, PLEASE get some help. I would love to help and support everyone, but I'm not a professional, and I do not have that ability to help to the extent that you may need it. I wish I had received help when I first recognized my situation. Don't make the same mistake I did. It's not worth it. I support you 1000% to get the help you need!! I did a google search for "shopaholic support group" and there are a LOT of links for online support groups, "12 Steps" and other steps and how to overcome links. Unfortunately this is something you have to go through. No one can do it for you. Getting help and support is critical!! Please don't do it on your own. And please don't shrug it off and leave for another day, or expect it to just go away. It won't.


I love the ideas that I've heard for fabric swaps and shopping each other stashes, to avoid purchasing more but still being able to get fabrics you may need or want for specific projects. If you want to start up groups on Flickr, or Instagram, I will do all I can to spread the word and give you the support you need. As much as I'd love to start these groups and get them up and going, I do not have the time right now in my life to do that. My family is at a stage where they need me more and more and I am in a balancing act trying to fit everything in already. So please understand that I'm hear to help you how I can. You have great ideas, and I have no doubt that you can do wonders to help others, so lets all help each other and work together!!! And please keep me updated in what efforts are being made so I can share!! :)


I love this quote that was in my inbox the other morning, and find it applicable.


In my own experience, the only way to truly overcome, is not to replace one habit with another, but to find healing and love. To change the patterns of thought that lead to the problem in the first place. I could go on and on about what has helped me. If you want to know, I'm happy to share. But as I have tried to write all my recent thoughts, I don't even know where to begin.

The world is not going to change. It will just keep becoming more difficult to overcome on our own. The fabric markets will keep pushing the new collections, people are still going to keep trying to make a living, I'm going to keep trying to sell my patterns. Selling isn't bad, buying isn't bad. But there is a balance that needs to be found within ourselves. I'm so glad I could help some of you resist the urges of the Labor Day sales. And that you for helping me to do the same!! :) I don't want fabric shops to hate me. I'm not out to destroy anyone!! I have my own coupon code going on for the rest of the day as well (Code: "LaborDayLove" for 10% off $5 or more). It's a fine balance, but when we are in the depths of our struggles, avoiding our temptations is the most important place to start! (ok, sorry to put my code right there, but I want to share for those who want to use it, but don't want to tempt anyone.... urg. it's a tight spot to be in. ;)


I hope you know how much I really care for all of you, even if I don't know you. The struggle I shared last week is so real, and my heart goes out to all of you who relate to one degree or another.

Hugs!! 

 I can't wait to start the penpal group!! :)


You can read all of the posts in this little mini series of ideas in these places:

Hi. My name is Diane, and I'm a fabric-addict.
So Many Thoughts + Thank You! + "Nothings Allowed Pen Pals"
Shop Your Stash Weekend!!!
Nothing's Allowed PenPals +

Diane