Home * Patterns * Tutorials * Made It * Our Story

Monday, July 14, 2014

Celestial Star QAL: COLOR & DESIGN

Welcome to the Celestial Star QAL!! 

Celestial Star QAL with from blank pages...


I am thrilled that so many of you are so excited to quilt along with me using my Celestial Star pattern! My goal is to make this QAL as beginner friendly as possible. As well as help everyone, to the best of my ability, to create a finished project that you will love! I have chosen my blog topics based on what elements I think are most important in creating a successful finished project. Since many of you are probably already experts ;) I will include the important information first, followed by the discussion portion, in each blog post. That being said, I don't claim to be an expert, and will share what I have learned, although that doesn't mean I'm perfect in execution. I hope you will share your experiences and knowledge and we can all learn and succeed together!


Today's Topic: Color & Design!
Assignment: Print out the coloring pages. Decide on the design(s) and colors you want to use for your project.  
On the Blog: Write a blog post about it, sharing pictures of your design(s) (please share as many as you've come up with, whether you are going to use them or not! Let's inspire each other!), and link it up using the link up at the end of this post. OR you can also link up photos from Flickr* or Instagram. 
On Instagram: Complete the assignment (create your Celestial Star design), take a picture and tag it using hashtag #CelestialStarDesign AND #CelestialStarQAL.

*If you are sharing pictures from Flickr, I started a Celestial Star QAL group, where you can also share your photos, or start up a discussion, ask questions, etc. I don't get on Flickr much anymore, but I'll try my best to keep my eye on it for any activity going on there. I still think Flickr has a pretty good platform for groups, even if the rest of the site has changed. 
**If you decide to work faster than my schedule, which is fine, be sure to take pictures along the way so you can come back and enter the different giveaways!


This weeks link up is sponsored by Pink Castle Fabrics
 Pink Castle Fabrics

They have graciously offered to giveaway two fat eight bundles! (Which is a perfect amount to create a large Celestial Star block with!) I will pick one winner from the link up on the blog, and one winner from the Instagram hashtag #CelestialStarDesign (so make sure you are tagging your photos!)


So pretty!!

Come back on Thursday to learn more about Pink Castle Fabrics and all the amazing events they have going on right now! You don't want to miss it!

I will announce the winner on Tuesday July 22nd, so you have just over a week to come up with your design.

See this post for the schedule of posts so you don't miss any! :)


And that's it for the short version! Keep reading if you like, or start coloring away! :)
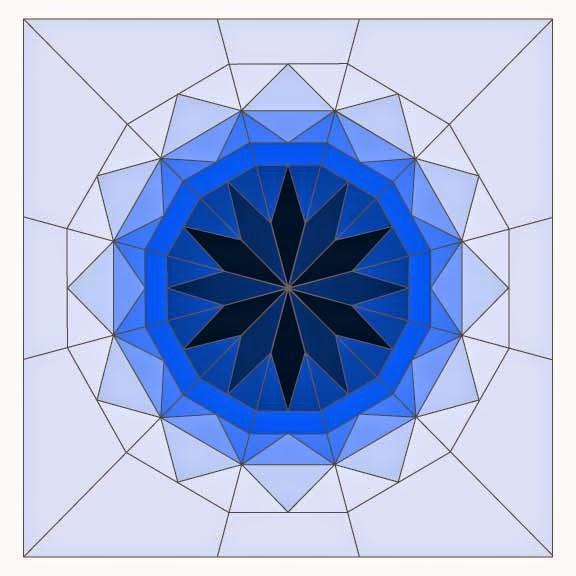
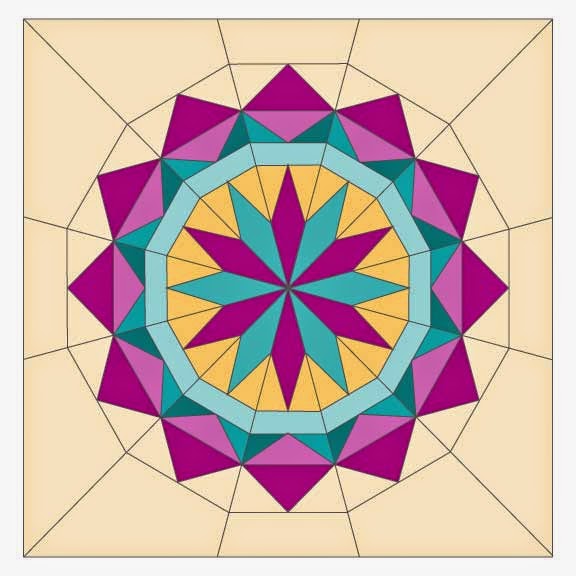

Coloring Pages:

One of my favorite things that I like to include in my patterns are coloring pages. They are simply an outline of the pattern design. I often include a single block as well as the design on repeat. The Celestial Star pattern also comes with a border pattern, and I have coloring pages with the border as well. Especially with this pattern that has SO many design possibilities, I think this is an invaluable resource.


 I'll explain this more on the 21st, but I labeled the coloring pages to help you know which pattern piece to use in relation to how you colored your block.

Simply print out the coloring pages you want to use, pick some colors and start coloring. I like to print out a few copies of the pages I will be coloring.


Designs:

Here are a few designs I've come up, disregard the colors I've used, at this point I'm just coming up with designs. I'll share my final selection with the right colors on Wednesday when I talk about Fabric.


I will be making a quilt that is 3 blocks by 4 blocks, using the 24 inch pattern = 72 in by 96 in quilt. So I've also been playing around with the idea of creating a subtle background design, tying all the blocks together. I'll share what I've decided on Wednesday. :)

Some people have already started sharing their coloring pages on Instagram. If you are on there, check out #CelestialStarQAL and  scroll through to see the blocks my testers have made, or check out #CelestialStarDesign.

Have fun with this part! I've really loved seeing everyone's creativity!! I have more design options that I've shared in the past on this blog post, and this blog post.


About Color:

One of my favorite art classes in college was Color Theory. I'll try not to go into too much detail, but I do have some basic info that may be helpful when it comes to picking and combining colors. Then I'll share with you mistakes that I make and things I am learning when it comes to transferring my color knowledge to putting together fabric combinations.

A Review: The color wheel is another invaluable tool when it comes to picking fabrics and combining colors. Here's some quick basics:


Primary Colors: Red, Yellow and Blue


Secondary Colors: Two primary colors mixed together: Green, Purple, Orange


Tertiary (Intermediate) Colors: One primary and one Secondary colors mixed together: Red-orange, Yellow-Orange, Yellow-Green, Blue-Green, Blue-Violet, Red-Violet


Warm (Aggressive) Colors: Yellow to Re-Violet


Cool (Receding) Colors: Yellow-Green to Violet


Other Terminology: 

Hue simply means Color.

Value: lightness or darkness of a color. The center is the darkest values, going lighter as it goes out.

Tint: Color + White (lighter color or low value - what a lot of people have been referring to as low volume.)
Tone: Color + Grey
Shade: Color + Black (darker color)
Key Color: the dominant color in a color scheme
Intensity: the brightness or dullness of a color.

That's the basics of color. Now lets talk about combing colors.


Color Schemes:

I think it's fun to combine colors and come up with different color combinations. Sometimes they turn out awesome, and often times they aren't so good. Leaving it up to trial and error can be risky business when you are using your precious fabrics.  Here are the most basic color schemes that in general, are pretty fool proof:

Monochromatic: A combination of Hue, Tint, Tone, or Shade of one color.


Complementary: Two colors that are opposite on the color wheel. (red, green. Can you say Christmas??)


 Split Complementary: Pick a color and the two colors that are on either side of it's compliment. (yellow, red-violet, green)
Triad: Three colors that are equally spaced on the color wheel. (Red-violet, yellow-orange, blue-green)


These are the basic rules of creating these different color schemes. You can apply them to any key color.

OR come up with color schemes the easy way! Use Design seed (the link actually goes to Pinterest, I searched Design Seed. I like looking at them on there because it's easy to save the ones I like), or other sites where you can upload your own photos to find a color scheme (there are quite a few websites and I don't know which is best, simply google "color scheme from photo upload" and you should be able to find some good ones. Which do you like?)


The Point:

The purpose in going over all of this is to make you aware of one important thing: The illusion of color.

Which is:
No matter what your key color is, placing it next to different colors, will change the appearance of that color. The color(s) you use in combination with your key color, can do a multiple of things to your key color. They can make it brighter and POP, make it dull  (giving it a flat appearance), make it recede, make it mucky, or make it bold, even make it look more saturated than it really is. 
What does that even mean??? (Don't take offense by my following analogy) If you take a super model and place her in a classroom of computer science students, that super model is going to stick out like a sore thumb. She is going to shine and glow and be the focus of the classroom. She will POP. That is what happens to your favorite fabric(s) when you combine them with contrasting fabrics. (The most extreme contrasts will come with different values of contrasting colors.)

If you take that same supermodel and place her in a room full of supermodels, even though she may be beautiful, she is going to become just one of the crowd. She won't stand out any more than anyone else in the room. The room becomes flat. That is what happens when you throw that key print in a combination of fabrics that, although stunning on their own, are the same in value and/or warm/coolness on the color wheel.

Mix your supermodel fabrics with some computer science student fabrics (I'm not talking about ugly fabrics. I'm talking about contrasting fabrics) = Your design will stand out and be a strong design.

Mix supermodels with supermodels, or computer science student fabrics  with computer science student fabrics = Your design will be soft and get lost.

 Neither is wrong. It's your quilt! I just want to help you do it on purpose!


Examples:

I think the easiest way to learn is by example.

First of all, I created a Pintrest board with examples of strong contrasts in design, as well as some different color schemes, and a few pictures that have a mix of strong contrasting colors and prints as well as some that aren't so strong. None of them are wrong. But they are different.  Look at the different examples and see if you can figure out the color schemes used, notice the contrast in value, how they use tints and shades of a color to create contrast, etc. Decide what you like, and what you don't so you can mimic that in your own quilt.

Second, here are two examples of my own, where I wanted a design to be strong, but it ended up being flat and soft. The design itself got lost in the fabrics.

 Here is the design I wanted to make:

The fabrics I pulled for the project. I love these fabrics together!


Here is how my project turned out.

 To me, it's flat, the design is bland and doesn't pop. Part of the issue is probably the placement of my fabrics, as well as the pattern. This stack could probably work wonderfully with a different pattern. OR with the addition of some neutrals to break up the fabrics. Isolating the fabrics, or substituting a few prints with neutrals that create a more distinctive background or foreground, will help them shine better. Now what I'm attempting to do, is make it pop with my quilting. I am not finished yet, so we'll see if I can save this. But until then, I'm a bit bummed about it.


A second example: My 60's Granny Quilt. I created a Giant Granny Quilt a few years ago and love it! Here I am attempting to enlarge the idea into one giant, scrappy, granny square that will finish as a 60" x 60" quilt.  I love the colors together. They remind me of Starburst candy. My stacks of fabric were fabulous and appeared to have enough contrast, but in the following picture, the pink and orange do not contrast much.


So, what is the problem? The colors are different, but the scrappy mix of value is pretty even throughout. An easy way to check the value of your fabric is to change the picture to black and white:

 See how you can't even tell the difference between the orange and pink squares? They are exactly the same!

Do you also notice how the teal Simple Star block is also the same value in the black and white picture? BUT in the colored picture it has a strong contrast? Your values CAN be the same for a fabric combination to work. What the difference is here, is that the pink and orange are both warm colors, next to each other on the color wheel. The teal is a cool color, opposite on the color wheel. If you use all warm colors, you need the variations of value and intensity to help you out. If you have a stronger contrast in color (warm vs cool) value doesn't necessarily matter as much, though it will still do a lot to add interest. See my mock up examples below where I've added variation in value to add depth to the designs.

These are using a Triadic color scheme: Green, Purple, Orange. The images on the left are all the same value, no variation. The images on the right have lighter values mixed in. See how it changes the appearance of the block?


Do It on Purpose!

The Celestial Star block is a pattern where the designs are limitless and can be quite striking. But they can also easily get lost when these certain elements aren't given enough attention. If you want your design to stand out and be noticeable, do it on purpose! If you want your design to be soft and muted, do it on purpose!


 On Wednesday I will take this a step further and talk about how this applies to fabrics, because for myself,  when color is applied to fabric it is an entirely different language. :)
 
How was that for a novel of information??? ;) I hope it is helpful! The more I quilt the more I realize how important this information actually is. I can't wait to see what you come up with!


Link Up:

Link up your Coloring Pages and Designs below.


Diane

Thursday, July 10, 2014

Patchwork Summer Series with Ellison Lane: Patchwork Tissue Covers

 Have you been following along with Jennifer's Patchwork Summer Series over at Ellison Lane? If you haven't, you need to! There have been so many wonderful projects. I wish I had time to make them all. :) I was lucky enough to be a guest blogger and share a tutorial for a variation of my tissue covers I made a few years ago. You can find my original post on Ellison Lane.com HERE. Today I'm going to share the same tutorial on my own blog.

**********************

Whenever I think of patchwork, for some reason, I think small. I instantly thought of these tissue covers I made a few years ago, and how they would be cute with patchwork. I jotted down some ideas, and instantly went to work! I love how they turned out!

Aren't the little fussy cut squares of Lizzy House's Catnap collection cute?!


I have a tutorial for my original Tissue Covers on my blog, here. But today I'm going to show you how I adjusted the pattern to add in some patchwork! That way you can make your own. These would be perfect to throw in your beach bag, have in the car for road trips, send with your little ones to camp, the pool, or whatever else you might be doing this summer! These are also reversible! (I love having options.) :)


First, pick the fabrics you want to use.


You will need:
  • One piece for the inside. Cut: 7.5 inches by 6.5 inches
  • Two pieces for the main outside (from the same fabric, or different fabrics). Cut: 1 - 7.5 inches by 3.75 inches; 1 - 7.5 inches by 2.25 inches
  • 7 pieces for the patchwork. Each cut: 1.5 inches by 1.5 inches.

ALL SEAMS ARE 1/4 INCH.


If you want to fussy cut your smaller squares: Cut out a piece of paper (I use card stock) 1.5 inches by 1.5 inches. Measure in .25 inches (1/4 ") from all sides, and mark lines parallel to the outer edge. Cut out a 1 inch square from the exact center (using the lines you drew). You now have a little window. Line up your window until you are happy with the design that shows in the center, and cut around the outside of the square.


Line up your 1.5 inch squares in the order you want to sew them. Sew them together. Press seams open. Then trim them down to 1.5 inch by 7.5 inches.
Here is the back of my patchwork strip. If one of your squares is off a little, that's ok. As long as you can still get a scant 1/4" seam allowance out of it.


Next we will piece the outside of the tissue cover together. Sew the 3.75 inch piece to the top, and the 2.25 inch piece to the bottom of the patchwork strip.


Press your seams away from the patchwork. Here is what my back looks like.


 Square it up to 6.5 inches by 7.5 inches.


Place your outside and inside piece right sides together. Pin at the corners and in the center of the sides. Mark the center of one long side as your opening, and do not sew between those two pins. Usually 1.5 inches to 2 inches is enough room to turn your cover after you sew. Make sure to backstitch and the beginning and end.


Trim your corners like so: First cut the corner off as on the left corner in the picture. Then trim at an angle on both sides of the corner as on the right corner in the picture. Be careful not to cut through your stitches. Repeat so all of your corners look like the right one in the picture.


Turn your tissue cover right side out. Push out the corners. My favorite tool for pushing out corners is a crotchet hook. Press all your edges and corners so they are nice and flat.

One side will overlap the other when we sew this into the tissue cover. Decide which side you want to have on the outside, and that is the side you will fold in first.

Find the center of the rectangle and mark, or crease. Fold in one side so it overlaps the center by 1/4 inch. Fold the second side over so it overlaps the center on the other side by a 1/4 inch. You should now have a 1/2 inch overlap of the two sides. Pin in place.


Sew along each end with a scant 1/4 inch. You can add some extra personality to it by using a decorative stitch here. (This also closes your opening, and is why it is important that your opening is in the center of a long side of the tissue cover.)


Turn your tissue cover right side out and your finished!! Or leave it as it as is.

 The Front


 The Back


 Don't forget the tissues! ;)


I used Carolyn Friedlander's Botanics collection for the tissue cover in the tutorial.

I hope you enjoy making these!! And I hope you'll share the ones you do make. Be sure to link up with Jennifer, and if you do share them on Instagram, I'd love it if you tagged them with #fbpPatterns so I can see them, too. 

Thank you Jennifer for having me!


**********************

These really are a quick, and practical gift. I love making these! I hope you enjoy them too! :)


Diane

Monday, July 7, 2014

Celestial Star Quilt Along: Schedule and Sponsors!! Are You Ready???

I cannot begin to tell you how excited I am for this quilt along!!! Your excitement is contagious! Thank you! I hope that it will all run smoothly, and perfectly, and you won't see my nervousness come through. ;) But no matter what happens, I am ready to have fun and make something gorgeous!! And I hope you are too!

Celestial Star QAL


Before I share the schedule, I want to share with you to the amazing line up of sponsors! I am so excited to have each of these shops as sponsors for this QAL, and for the generous prizes they have offered and I wish I could win them all! In no particular order:


Material Girl Quilts  i don't do dishes  Llama Fabrics  Knotted-Thread  Westwood Acres  Pink Castle Fabrics  Fat Quarter Shop


I hope you will visit them and support them! Not only are they great shops, but they are wonderful people with lives and stories just like us. (I think it's easy to forget that when we only associate through a screen.) I will be spotlighting each sponsor throughout the QAL so you can learn about the wonderful things each shop has to offer!


Celestial Star QAL

The full schedule is below. Each week I'll post link ups and hashtags (on Instagram) for the specific week/topic. Three of the weeks will have prizes attached when you link up/tag your photos on time. So make sure to check back here for details on each post! No one needs more WIPs to add to the pile, so this will hopefully be some great motivation to keep us all on track. Note the guest bloggers!! They are awesome!


Celestial Star QAL Schedule:
(updated 9/15/14)

July 
Mon, 14th: Color & Design (a giveaway linky begins, IG: #CelestialStarDesign)
Wed, 16th: Fabric
Thurs, 17th: Sponsor Introduction: Pink Castle Fabrics
Sat, 19th: All the Prizes! and IG Hashtag and Link Up Guidelines
Mon, 21st: Cutting Fabric (I'll teach you all about my favorite thing: cutting templates!!)
Tues, 22nd: Giveaway Winners Announced!
Wed, 23rd: Paper Piecing
Thurs, 24th: Sponsor Introduction: Llama Fabrics
Fri, 25th: Guest Blogger: Cristy Fincher
Mon, 28th: Trim & Join Segments
Tues, 29th: Sponsor Introduction: Queen Bee Fabrics
Wed, 30th: Join Wedges/Create a Quilt Block (a giveaway linky begins, IG: #CelestialStarBlocks)
Thurs, 31st: Sponsor Introduction: Fat Quarter Shop

August
Fri, 1st: Guest Blogger: Courtney Lyons
4th - 8th: Progress Week: Time to catch up!
Thurs, 7th: Giveaway Winners Announced!
11th - 15th: Progress Week
18th - 22nd: Progress Week
Mon, 18th: Exciting Announcement
Tues, 19th: Sponsor Introduction: Westwood Acres  
25th - 29th: Progress Week
Tues, 26th: Sponsor Introduction: I don't do dishes

September
Mon, 1st: Progress Week
Mon, 8th: Joining Multiple Blocks
Tues, 9th: Sponsor Introduction: A Material Girl Quilts
Wed, 10th: Quilting (a giveaway linky begins, IG: #CelestialStarQuilting)
Fri, 12th: Guest Blogger: Jennifer Rossotti
Tues, 16th: Progress Post: ALL 12 blocks
Wed, 17th: Binding
Wed, 17th: Sponsor Introduction: Knotted-Threads
Thurs, 18th: Giveaway Winners Announced!
15th - 16th: Progress Weeks! Time to finish up!
Mon, 29th: Finish and Final Link Up! Open until Oct. 5th

October 
Mon 6th: Final Winners Announced!


The last week of the QAL will be the final link up, for everyone to share your FINISHED project. There will be three categories:
  • Single Block: any finished project using only 1 block, such as a mini or pillow
  • 2-4 Blocks: however small to however big that may be (You can enter a project that has 2-4 blocks in the single project OR you can enter all of your single block projects together as one entry (if you make 2-4 pillows, they can be entered together, though they CANNOT also be entered as single blocks.) ALL projects may only be entered once.)
  • 4+ blocks for those who create a larger quilt). 
There will be a grand prize awarded for each category, so don't feel like you need to do more than you want, or have time for, in order to win something. :)


Please note:
  • There will be more link ups than what is shown, the ones listed are the ones that are tied to prizes, so you know the dates to keep up with. You must be caught up to be eligible to win.
  • My blog posts will be as detailed as possible with the techniques I use to complete each step. I want to make this as beginner friendly as possible!! LET'S CONQUER THAT PAPER PIECING FEAR TOGETHER!! :D
  • I may add or cut posts as needed.
  • On Saturdays I will share progress pictures from the link ups and hashtags on Instagram. If you don't want me to share yours, just send me a note and let me know. Let's keep each other motivated!
  • IF YOU HAVE QUESTIONS during any part of the QAL, leave a comment on the blog! I will do my best to answer all questions during the Progress Weeks, if not before.
  • Dates may be scheduled to change. If there is a majority vote to add more progress weeks for those making full quilts, I will be happy to do that. BUT I don't want to drag this out too long... so no guarantee. 
  • International Participants are welcome! All sponsors will ship internationally, so no one will be left out! :)
  • Patterns are for individual use ONLY. Please do not share copies with others. Thank you for respecting this and for your support!

Added 7/17: Fabric Requirements: It is impossible for me to tell you how much you will need. Because of the diversity of designs that can be created, I have no idea of knowing the number of fabrics you will use, or how much of each. To give you a starting point, here is a basic idea of how much fabric per 1 block you will need. These are estimates only, and are based off using the cutting templates. If you do not use the cutting templates, the amount of fabric you use could be much more, depending on how you cut your fabric. These amounts do not include fabric for the border.

UPDATE 9/18/14: I just looked at this and realized I made a huge error! I am pretty sure these amounts are for 12 blocks of that size. I may be wrong, but there is no way that one 24 inch block uses 2.5 yards of fabric. That's crazy. one 12 inch block probably only uses about a fat quarter of fabric at most. So for one block, you can probably divide these number by 3 and be at a closer estimate. SORRY about that!
24 inch block: approximately 2 1/2 yards total (maybe a half yard at most for one block)
18 inch block: approximately 1 1/3 yards total (less than a half yard for one block - probably just over a fat quarter (FQ))
12 inch block: approximately 3/4 yard total (~FQ for one block)


There is only 1 Rule: Be Kind! 
Let's make this fun for everyone! I am hoping that there will be a wide range of skill levels joining in, lets be encouraging and supportive in all of our communications, whether we like something or not. All hurtful or negative comments will be deleted and you will be ineligible for all giveaways. Negativity simply won't be tolerated. :)


Ok, 2nd Rule for Instagramers: 
On ALL of your pictures, despite the week, use hashtag #CelestialStarQAL so we can all see what each other are doing! For the giveaway weeks there will be a second hashtag to use, which I will draw that weeks winner from. The topics are:
Coloring pages and Fabric Pulls: #CelestialStarDesign
Complete Celestial Star block (as in pieced and wedges joined): #CelestialStarBlock
Quilted block or quilt top (show us how you quiltedit): #CelestialStarQuilting


Are you on Threadbias? If so, I created an event which you can join and participate on that website.


Now let's get Started!!!

If you haven't already, grab your pattern on Craftsy or Etsy or now in my shop!! (Patterns are available as a collection or in individual sizes).

Starting NOW I am doing a quick flash sale, which will last for 24 hours ONLY! 
sale is now over. Thank you!

Start printing out some of the Coloring Pages and start playing around with designs! Monday will come quicker than we realize!! :)  I'm so excited!!


Congrats to Iris (comment 5) and Amy (comment 12)! Random.org picked you both as winners for a free copy of the pattern!! :) I'll contact you!


Thanks again for all your excitement and support!
Love ya all!


Diane

Wednesday, July 2, 2014

Something Springy! A Great Scrap Buster Star!

In the fall of 2012 I was so excited to write this blog post as part of the Quilt Maker's 100 Blocks Magazine, vol 6 Blog Hop! I am so happy to announce that my Something Springy pattern is now available on Craftsy as well as in my Etsy shop!!


This is a great scrap buster!!! All the strips are made with strips 1.25 inches wide, ranging from 2.5 inches to 6 inches long. I'm sure we all have some scraps in that range! The center and outer pieces are larger, but I know I can still find those sizes in my scrap bin.


The pattern can be totally scrappy, like my block I made above (mock up below)


Or you can create the layers with the same fabrics. This gives it a little bit different effect (or a strong effect depending on the fabrics you use) as the above picture.


A few mock ups of the block on repeat:


And there you go!! If you make a block I'd LOVE to see it! You can share here, through email, or on Instagram: use hashtag #fbpPatterns

Hope you are having a wonderful Wednesday!!


Diane

Tuesday, July 1, 2014

Quilt Journal

I having been preparing for a HUGE destash, as I want to send a lot of my fabric to homes that will use it and enjoy it more than I am. (I'd love to keep it all, but that's just loco. I don't have the time to use it all.) ;)

As I've been going through my fabrics, I realize that there are some that I don't want to get rid of, even though I'll never use them again. Most of the time it's because they are fabrics that I used in quilts for my children, or other special quilts or projects. That emotional attachment can be a pain when you are trying to lighten your load. So I decided to create a Quilt Journal! A place that I can document each of my special quilts, or projects, and save a snippet of the fabrics I've used. That way I don't have to keep moving these fabrics all over the country, but still be able to see them and remember them.

I finished my first quilt journal entry yesterday morning!

This is the first quilt I ever made. When I was pregnant my step-mom told me I should make a quilt for my first baby, and she taught me how to quilt. I picked a pattern out of one of her quilt books, we went shopping at Joann's. She taught me how to piece, use a rotary cutter, iron, and all that good stuff! It was awesome! I hadn't yet discovered modern fabrics, or the modern quilt crave, so when I finished this quilt I was good to not necessarily do it again. Although I did enjoy it. When I was pregnant with my second son I figured I needed to make a quilt for him too... and for my third baby. Third times a charm I guess because that's when I found all the beautiful fabrics (my first FQ bundle purchase was Heather Bailey's Nicey Jane - I knew she would be a girl!) and all the amazing bloggers and modern quilters. Let the love of quilting begin! So anyway, those will be my next quilt journal entries. And I'm glad that I've kept those scraps from those quilts so that I can tape them into my little journal! :)


To explain the above picture: There is a space for the Project: Hunter's Baby Quilt; For (as in recipient); Date: (I put the start and finish dates); Place: I started it in Logan and finished when we lived in Orem; Pattern: to document which pattern you used; Story: the story behind the quilt; Fabrics: if you used a certain collection or designer or something.

My story was long so I just continued it into the fabric section, which works perfectly. Both sides of the paper are completely lined for as much writing as you want to do. I printed a picture of the quilt, front and the quilting on the back. I taped it to the page on the right side only. It can be easily flipped up and underneath I have layered and taped fabric pieces in the same manner - they can also be flipped up on the left so you can better see each print. This works really well and actually isn't bulky at all. I'm sure after I enter a lot of quilts, it will bulk up a little, but this is awesome for now. :)


Here's a screen shot of the cover: you can write your name on the front. I'll also add the dates that my quilts cover once I get enough in there. If I make enough quilts in one year, I'll make a book for every year.


Here's a screen shot of the inside pages:


I included some basic instructions on how to create your Quilt Journal, as well as simple binding instructions. I love making books, and though I only know the basics in skill level, it's still fun and I love them!  


 You can easily create your very own quilt journal! I printed mine on card stock, hoping it will hold up a bit better to the added weight of taping in fabrics and photos.


If you would like to purchase my template you can do so on Craftsy and Etsy. and if you do I'd love to see them in use!! If your on Instagram you can tag them with #fbpQuiltJournal and #fbpPatterns. :) Or send me an email! I love that too. :)


Diane