The larger blocks will be 18" blocks, and the strip is 9 - 6" blocks.
Showing posts with label quilt blocks. Show all posts
Monday, March 16, 2015
Star Gazing Baby Quilt and More Fab Blocks!
I decided on Saturday night that I am going to make my baby's baby quilt out of these Star Gazing blocks! Here's the layout I came up with:
and I think that my Erin McMorris collection will be perfect for it!
Tuesday, September 16, 2014
Celestial Star QAL: ALL 12 Blocks
Someone asked to see all my blocks all together, and I have been on a mission to do so!! I have been trying to get a good picture of my quilt and all the blocks since I finished the quilt top. It has not been an easy task, but I think I finally got some decent shots.
So here they are!! I am in love...
A quick bench shot. It's a large quilt!
They aren't all perfect, but I am pretty darned pleased with them!! ;)
I asked my little boys if they would help me hold it up so I could get a picture of the entire quilt. They are so sweet and did their very best! My little guy just isn't quite tall enough yet, but he is as sweet as can be!! love their little fingers and tops of their heads. <3 br="">3>
So there are all 12 blocks!!
You can purchase the Celestial Star pattern HERE.
I am planning on compiling an instruction PDF document that will show in detail how I constructed each block: fabric placement, value scheme, cheater cutting templates, etc for all the blocks. It won't be ready until after the QAL is finished probably, as I need to finish my quilt first. So if anyone wants to duplicate any of these blocks, but feels intimidated at all, hopefully this will help out! ;)
(Updated 10/20/14) Until I get the PDF completed, here are some posts that will hopefully help you recreate this quilt, whether you want to make the entire quilt or just one or two blocks:
This post talks about color and value. These are important to pay attention to in order to create a design that pops! Or not pop, if that's not what you are going for. :) It also shows how I used the coloring pages to come up with designs. http://fromblankpages.blogspot.com/2014/07/celestial -star-qal-color-design.html This post talks about design and shows each of the blocks I created. You should be able to use these pictures for reference, and can transfer them to the coloring pages at the end of the pattern. I also share how I used value for picking fabric. http://fromblankpages.blogspot.com/2014/07/celestial -star-qal-fabric.html There is also a post about cutting templates. These make crating certain blocks much much easier!! http://fromblankpages.blogspot.com/2014/07/celestial -star-qal-cutting-fabric.html
How is everyone doing?!! Have you started quilting?? I need to hurry up! The link up and giveaway for your quilting progress ends on Thursday!! (well, the link up will remain open for any late comers, but I'll announce two winners on Thursday!)
Link up your quilting progress on THIS POST.
Friday, January 18, 2013
My Words for 2013
Peace. Love.
As I read the words that others picked as their motto words for 2013, I thought a lot about what my word should be. Peace and Love are going to be my words for this year. In the last two years or so I've been overcome with feelings of anxiety, stress, worry, depression, anger... So many negative emotions. I've been sick with this or that. I don't know where it's all come from, but I want my health back. I want to feel good again, and I want to feel like I can go through my day and not worry about what I will have the stamina or feel-goodness (yes, I made up that word) to do ten minutes from now. (some days I just don't feel good and I don't know how else to explain it.)
It's time for peace. Peace on the outside, but even more so on the inside. My OBGYN told me thre other day how research shows that if during pregnancy the mom is stressed, the baby will more likely have anxiety and other emotional issues. I don't doubt at all that my feelings and emotions influence my baby as it grows. The first three months of this pregnancy were the worst for stress. I was so stressed out to the point that I was constantly physically ill. I don't think I would have been as sick as I was had my circumstances, or attitude, been different. After the first day at Sewing Summit I felt amazing!! The day after I got home I was so sick again. Looking back I can totally see how much the stress at home had affected me. I'm so grateful for that amazing weekend I had to get away and enjoy with amazing friends!!
After Mabel was born I had an incident that left me with some post traumatic stress disorder = panic attacks and high anxiety. Then I dealt with thyroid problems for a few months that were tightly connected with my anxiety, if not the cause of it. It was rough to say the least. If you were reading my blog at that point you might remember me talking about it a little bit. It was impossible some days to be alone. I was glad my mom was just a few doors away, despite her not always being available. I didn't drive for months. I really felt helpless and scared.
Though the worst of that is over, and my anxiety has subsided almost completely, I have a worry in the back of my mind of what is going to happen after this baby is born. Now there is a great distance that divides me and the world (we are in isolation Iowa. lol). I have three little, love to run around and cause mischief, kids instead of two. I'm prego with number 4. If my body doesn't want to adjust smoothly from being prego, I don't even want to imagine what it's going to be like trying to deal with it out here. I really want to send good vibes to this baby. I want him to be happy and at peace. I want to be happy and at peace. With myself and with my world.
Thus my word for this year. Peace. I was going to pick quality as my word. Focus on quality projects, spend time on quality activities. Focus on quality relationships and family life. Quality not quantity. etc. but I decided to simplify even more. Everything I do and focus on will be something that brings me peace, instills peace in my soul and those around me. I don't want to be stressed. I don't want to take on too much. I don't want to be overwhelmed by my to do list. I just want peace. I also don't want to be haunted by the anger and hurt and disappointment from my past. That's another story, but I really want to find peace with myself and who I was and who I am now, as well as my feelings towards others.
Love.
I think Love plays such a huge part of peace, healing, and letting go. Anxiety is fear, if I can be filled with love, then hopefully that would eliminate my anxiety. I have been praying everyday that I can be filled with God's love. I want to be more patient. I want to stop yelling and being frustrated. I want peace. Peace and love within my family. We do love each other very much! And we are very happy, but it can be better. and I want to be better.
I really like all the words I've seen people come up with. Create, Finish, Simplify, ... there are so many good ones out there. But I think no matter what I do or focus on this year, I want with it the peace of enjoying it, and peace in doing it. I feel like I've been in a race with myself to get to point A or point B or Z, and I need to do it now. But it's kind of just made me crazy. Instead of focusing on my destination so much, I want to focus and enjoy the journey. I don't want to worry about if I reach this goal or be that person. I just want to be at peace with how things are, and how they will be. Have peace knowing that I am living the way that God wants me to live and that I'm doing what He needs me to do. That is another thing I have not had peace with in the last few months. But things are looking up, and I know that His hand is in my life and I'm grateful for that. I'm grateful for the peace He does give me despite my own worries and craziness. ;)
and just one more note, of course I am hopeful that peace and love will also bring with it taking better care of myself, eating better, getting back in shape, and all that good stuff. I know those things play a part in our overall health as well. :)

As I read the words that others picked as their motto words for 2013, I thought a lot about what my word should be. Peace and Love are going to be my words for this year. In the last two years or so I've been overcome with feelings of anxiety, stress, worry, depression, anger... So many negative emotions. I've been sick with this or that. I don't know where it's all come from, but I want my health back. I want to feel good again, and I want to feel like I can go through my day and not worry about what I will have the stamina or feel-goodness (yes, I made up that word) to do ten minutes from now. (some days I just don't feel good and I don't know how else to explain it.)
It's time for peace. Peace on the outside, but even more so on the inside. My OBGYN told me thre other day how research shows that if during pregnancy the mom is stressed, the baby will more likely have anxiety and other emotional issues. I don't doubt at all that my feelings and emotions influence my baby as it grows. The first three months of this pregnancy were the worst for stress. I was so stressed out to the point that I was constantly physically ill. I don't think I would have been as sick as I was had my circumstances, or attitude, been different. After the first day at Sewing Summit I felt amazing!! The day after I got home I was so sick again. Looking back I can totally see how much the stress at home had affected me. I'm so grateful for that amazing weekend I had to get away and enjoy with amazing friends!!
After Mabel was born I had an incident that left me with some post traumatic stress disorder = panic attacks and high anxiety. Then I dealt with thyroid problems for a few months that were tightly connected with my anxiety, if not the cause of it. It was rough to say the least. If you were reading my blog at that point you might remember me talking about it a little bit. It was impossible some days to be alone. I was glad my mom was just a few doors away, despite her not always being available. I didn't drive for months. I really felt helpless and scared.
Though the worst of that is over, and my anxiety has subsided almost completely, I have a worry in the back of my mind of what is going to happen after this baby is born. Now there is a great distance that divides me and the world (we are in isolation Iowa. lol). I have three little, love to run around and cause mischief, kids instead of two. I'm prego with number 4. If my body doesn't want to adjust smoothly from being prego, I don't even want to imagine what it's going to be like trying to deal with it out here. I really want to send good vibes to this baby. I want him to be happy and at peace. I want to be happy and at peace. With myself and with my world.
Thus my word for this year. Peace. I was going to pick quality as my word. Focus on quality projects, spend time on quality activities. Focus on quality relationships and family life. Quality not quantity. etc. but I decided to simplify even more. Everything I do and focus on will be something that brings me peace, instills peace in my soul and those around me. I don't want to be stressed. I don't want to take on too much. I don't want to be overwhelmed by my to do list. I just want peace. I also don't want to be haunted by the anger and hurt and disappointment from my past. That's another story, but I really want to find peace with myself and who I was and who I am now, as well as my feelings towards others.
Love.
"Perfect love casteth out all fear."
I think Love plays such a huge part of peace, healing, and letting go. Anxiety is fear, if I can be filled with love, then hopefully that would eliminate my anxiety. I have been praying everyday that I can be filled with God's love. I want to be more patient. I want to stop yelling and being frustrated. I want peace. Peace and love within my family. We do love each other very much! And we are very happy, but it can be better. and I want to be better.
I really like all the words I've seen people come up with. Create, Finish, Simplify, ... there are so many good ones out there. But I think no matter what I do or focus on this year, I want with it the peace of enjoying it, and peace in doing it. I feel like I've been in a race with myself to get to point A or point B or Z, and I need to do it now. But it's kind of just made me crazy. Instead of focusing on my destination so much, I want to focus and enjoy the journey. I don't want to worry about if I reach this goal or be that person. I just want to be at peace with how things are, and how they will be. Have peace knowing that I am living the way that God wants me to live and that I'm doing what He needs me to do. That is another thing I have not had peace with in the last few months. But things are looking up, and I know that His hand is in my life and I'm grateful for that. I'm grateful for the peace He does give me despite my own worries and craziness. ;)
and just one more note, of course I am hopeful that peace and love will also bring with it taking better care of myself, eating better, getting back in shape, and all that good stuff. I know those things play a part in our overall health as well. :)
Monday, January 14, 2013
Starburst!
I feel like I've been a pattern maniac lately. Yep. I have another one. I created this one in one day start to finish. It was just one of those things. You've probably already seen it and maybe some test blocks if you follow me on Instagram. (Instagram is killed the blogging world - sing it like Video Killed the Radio Star) :)
Anyway, this was a fun one. And I LOVE how the blocks turned out. First a few mock ups. I think I'm going to use this in mini version for my DQS13 quilt. Hoping my partner will love it.
a few more I put together while creating
yes, these are phone pictures of my computer screen. :}
I am so lazy.
Anyway, I had some SUPER wonderful testers for this! I am so grateful and impressed. Thank you so much!!
Jennifer of Mr. Chicken and the Ninja Kitties, made two blocks.
Lisa of A Day in the Life of Raising Six Munchkins, made this beauty. I have some of this fabric and it really makes me want to use it in this block. :)
Thank you lovely gals!! :)
You can find Starburst in my Craftsy store as well as in my Etsy Shop.
and for this week only, you can bid on it as part of a pattern bundle for the charity auction for Newton! be sure to go check out all the handmade goodies up for grabs!
Happy Monday everyone!
I am enjoying my lovely new curtains this morning! ;)
oh, I still need to share those on here.
Saturday, November 10, 2012
On a Roll!
I am loving being well and having energy again! I've been sewing and crafting, going to the post office in a timely manner (aka, not months after I said I would send something). I've started on Christmas presents already, and even made a few quilt blocks to be added to some Hurricane Sandy quilts. I even cleaned my house (and while that is an ever work in progress, it still fills so good to know I can when I want, and I no longer am leaving everything up to my hubby to take care of.) Oh good health how I love you! (besides this awful sore throat that won't go away. ha. I guess I will never be totally free.) Anyway, I want to share with you some of the goodies I've been working on! I guess I could then also add that I'm also on a blogging roll!! Wahoo!! It feels good to share things with the world again! :)
Here are my blocks for Jennifer. She's accepted 300+ quilt blocks to make quilts to take to New Jersey and hand out in December. Wow! They are still accepting fabric for the back as well as binding fabric if you would still like to help out. GO HERE. :) (You can also send her finished quilts to hand out. or there is someone else who can hand out quilt. For that info, or at least who to get in contact with, GO HERE.)
I also made these blocks for Angelina. Her quilt quild is making this AMAZING quilt to action and donate for the Red Cross. She needs blocks by the 13th, so it's quick, but these are fast. If you would like to help with these, GO HERE. :)
I of course finished my little pouch for yesterdays post. Love it. :)
And I have been working on my pouch from Sewing Summit. I wanted to finish it there, but decided to do some embroidery on it. I used the thread I won at the Salt Lake Modern Quilt Guild mixer. A HUGE pack of Cosmo thread. Wow. I still need to blog about that. Anyway, it's all variegated, and I'm not sure how to use it, but I tried it on this Denyse Schmidt fabric, and I think it turned out fun. :)
Hunter's piggy bank broke, so I made him this little coin pouch instead. I really love how it turned out. It's really simple, but that's ok. He insisted on black fabric. That's all he wanted for everything. I asked what his favorite color was and he said, "black". News to me. ;) But I love it with this birch fabric on the inside.
I of course can't show Christmas presents yet, or that would ruin the surprise. ;) But I have all my supplies and am ready to do some mass producing. lol.
I finally got the back of the Candy Land quilt put together. I kind of forgot I needed to do that, so when I went to quilt it, I had no back. Lol.
I also fixed these blocks. I had assembled this top a while ago, but didn't love the center block with the rest of them. So I traded out the very center block! And now I love it. I'm going to finish this up and send it to Jennifer. Hopefully a little baby in Jersey can use it.
And, best of all.... ok, not best, but so excited. My curtain fabrics arrived already! Privacy here we come!! lol. :) (I just hope I ordered enough fabric. I think I may have changed my mind on how to make them. :/ )

F.y.i. This is basically a WiP's/Progress post. but I am definitely overdue for one. ;)
Here are my blocks for Jennifer. She's accepted 300+ quilt blocks to make quilts to take to New Jersey and hand out in December. Wow! They are still accepting fabric for the back as well as binding fabric if you would still like to help out. GO HERE. :) (You can also send her finished quilts to hand out. or there is someone else who can hand out quilt. For that info, or at least who to get in contact with, GO HERE.)
I also made these blocks for Angelina. Her quilt quild is making this AMAZING quilt to action and donate for the Red Cross. She needs blocks by the 13th, so it's quick, but these are fast. If you would like to help with these, GO HERE. :)
I of course finished my little pouch for yesterdays post. Love it. :)
And I have been working on my pouch from Sewing Summit. I wanted to finish it there, but decided to do some embroidery on it. I used the thread I won at the Salt Lake Modern Quilt Guild mixer. A HUGE pack of Cosmo thread. Wow. I still need to blog about that. Anyway, it's all variegated, and I'm not sure how to use it, but I tried it on this Denyse Schmidt fabric, and I think it turned out fun. :)
Hunter's piggy bank broke, so I made him this little coin pouch instead. I really love how it turned out. It's really simple, but that's ok. He insisted on black fabric. That's all he wanted for everything. I asked what his favorite color was and he said, "black". News to me. ;) But I love it with this birch fabric on the inside.
I of course can't show Christmas presents yet, or that would ruin the surprise. ;) But I have all my supplies and am ready to do some mass producing. lol.
I finally got the back of the Candy Land quilt put together. I kind of forgot I needed to do that, so when I went to quilt it, I had no back. Lol.
I also fixed these blocks. I had assembled this top a while ago, but didn't love the center block with the rest of them. So I traded out the very center block! And now I love it. I'm going to finish this up and send it to Jennifer. Hopefully a little baby in Jersey can use it.
Yes, I bribed them with a treat to come hold this for me. ;)
Happy weekend everyone!
We are off to go shopping... not my favorite thing.
But we are in need of food!!!
What are your plans for the weekend?
Monday, October 8, 2012
Candy Land Quilt Progress!
Can you believe this quilt has taken me so long? Ok, I can. But still. I am SO happy to at least have the top done! It will be complete once I get back from the Sewing Summit! This quilt is the do.Good Stitches quilt from February (hanging my head in shame), from the Harmony Circle. The pattern is the Candy Land quilt, and I have a tutorial for each block style that can be found here. The measurements are for 1 or 2 blocks, not the whole quilt, so this is great if you want to use it for a quilting bee, or where multiple people will be contributing blocks.
Man, what an awesome group of girls we had! I still miss them and wish I could be back sewing with them some days. :) Rachel finally sent me a message last month giving me the kick in the butt I needed to get going on this. Trust me, this has been at the top of my list, or 5 lists, for months and months! Thanks Rachel for the welcomed nagging. ;) I needed it. I guess I'm good at skipping around on my lists... Anyway, I think this is the ONLY thing I worked on in September (darn that feeling sick!).
I finished the top Sunday morning and had fun taking pictures! They don't give a super clear picture of what it actually looks like in normal light (except the first picture), but I LOVE the "stained glass" look. :)
The softest, lightest blocks went in the middle, with the darker blocks around the outside. I think my two straight blocks actually ended up being the darkest. oops. I'm super impressed with how well they all go together!
I think it's interesting how all the different columns look with the sun light behind the quilt. Everyone ironed their strips just a little bit differently and it makes it look like the columns are different widths. They really are all the same!
Everyone did such an excellent job! I really had no problems lining up all the different blocks, and they all match great! I'm so glad that my tutorial really did work since I was the last one to use it!! lol.
Thanks to all the wonderful ladies who helped me!! I can't wait to quilt this!! :)Thursday, August 16, 2012
Winterkist Blog Hop
WOW! I am SOO excited to share my project with you today. If you are visiting for the Winterkist Blog Hop put on by the lovely Katie of There & Back, Welcome! I hope you'll stop and stay a while! :) (For a little shameless self-promoting, there is a lot of fun things going on! Today is the from blank pages... linky party where you can share the beginnings of your projects. There is also The Master List of linkies, where you can link up your own linky parties to help get the word out. The Charming Travelers is still traveling and has made a stop over at Pinks Sweet Treats. You can check out the map here to see all the stops it's made along the way! There's also Quilting For a Cause, The One Stop Giveaway Shop, and my biggest new event, the Friendship Quilts Blog Hop! Coming in September. Click on any of the links to find out more.)
Ok, sorry about that, I just couldn't help myself! I hate to skip the introductions, and hope you'll stop and leave a comment and introduce yourself too. :)
Now onto the good stuff...
I made some 2-in-1 serving mats/bowls! LOVE I love anything that can double as something else. And I know these will definitely get used and loved. I was going to make some of my Grandma's amazing Christmas cookies to show off how these would work, but this week as been SO busy so there is no way for that. I'll share those pictures come Christmas time. ;)
I went ahead and shared the beginnings of my project in today's linky, so you can go read all about it here. Now I'm going to share with you how I made it! YAY! Tutorial time! :)
When I started this I wondered if I'd gone mad, but it actually came together really fast! There is a process with it that I found, so I am going to have a rediculous amount of photos to try and help you be successful. (I know... I did this twice and the second time went MUCH smoother with a lot more smiles and way less ripping my hair out! lol.)
First, the stats:
I made two mats, 1 - 12.5" x 12.5", 1 - 12.5" x 19.5"
A Fat 8th of 6 different fabrics was plenty for the two combined. I also used a lot of Kona White, maybe a Fat Quarter - more or less.
I also had the fabric for the back, some fuseable fleece, heavy weight interfacing, and velcro, but those are not a part of this tutorial. (though I will quickly show you how to assemble everything for the dual mat/bowls. This tutorial is basically only how to assemble this design. You can change it however you want to finish with your desired size.
I cut my fabric into strips that were 3.5" wide and then cut the strips into 2" wide pieces. = 3.5" x 2" will give you 3" by 1.5" finished pieces. Cut however many you will need. I also cut a few pieces that were 2" x 1.25" for around the edges. All white squares were cut 1.25" x 1.25". I'm really leaving this open for you to make yours as big as you want.
***If you make your pieces bigger or smaller, here's how to figure it out:
Ok, now to the pictures:
Arrange all your pieces in such a manner. (I already skipped to the first step in this photo, but you get the idea.)
Sew the white squares to each of the border pieces (2" x 1.25" pieces)
Notice the pattern, and how I picked the center pieces, and sewed the white squares to each corner. BUT WAIT! DO NOT sew all the way through the white squares. You need to leave 1/4" UN-SEWN along the long side of the piece.


THE FOLLOWING STEPS UNTIL *** WILL BE ONE PROCESS THAT YOU WILL REPEAT MULTIPLE TIMES. I AM MARKING THIS SECTION SO YOU CAN EASILY FIND IT TO GO BACK TO IT
Orient your fabric how it will be when it's sewn together.
Flip the WHITE piece over (folding the grey piece) so it is Right Sides Facing the pink fabric, like so
IF you are starting from the center of the pink piece, Line up your sewing foot so you are 1/4" in from the edge of the white piece.
Sew ALL the way through to the edge of the fabric
It will then look like this when you unfold it
Here it is from the back. See, 1/4" unsewn
Flip it over, RS (right side) Up, and arrange your layout again. Now we will repeat with the other white square
Flip the white piece over (folding UP the grey piece) so it is RS facing the pink fabric. Line up so your corners and edges are all flush.
On this piece we are starting from the edge, so line up your sewing foot even with the edge of the fabric
But this time STOP 1/4" in from the edge of the white.
Here's what it looks like
Now the pink is connected to each WHITE square, but is NOT sewn to the grey piece. DON'T sew them yet.
SEE! No seams going through the pink fabric with the grey.
*** Why it is important to leave the 1/4" open. When you try to sew the white squares to the adjacent fabrics, and you DON'T leave that 1/4" on the edges, it will be a nightmare! and your work will not lie flat. Trust me. ***
This is impotant too... so I'm sharing another picture. :)
Repeat this process connecting the other pink piece to the grey piece on the opposite side. Repeat until all the pieces with the four white squares are sewn in this manner.
This is what it should look like
*** If you are making your project with much more pieces and rows, follow this same process, the difference would be that you may have 20 pieces across, and maybe 6 rows instead of just the two I show here. It's all the same, just keep going until your sections are all together like this. It's all about patterns and following the patterns. Like putting together a puzzle. :)
Notice how the pink piece in the center now looks the same as the sides of the grey piece did? Repeat the previous steps to join those center green pieces.
It's the same thing for the row below
Again, when you sew on the white piece, make sure to leave the 1/4" open at the bottom edge of the white. You've probably already noticed how easy it is to get the pieces sewn. You really want to stop right at 1/4". If it's too narrow you run the risk of sewing your other colored piece of fabric in there. If it's too wide, then you'll have holes as well as the risk of stitches coming loose. It's tricky.
Here's what it looks like. 3 of the edges sewn! You're getting there! :)
So you can see what you should be looking at now
Repeat until you have all the vertical pieces sewn in.
*** If you are working with more columns than just the one I have, repeat this process with all the vertical pieces. You will have holes in between them all, but we're getting there.
Next you'll slide in the grey piece (compare with the picture above)
Here's where it changes just a little bit. Orient your pieces.
Notice how here there aren't just the white pieces, but you have a complete strip that fits along the side of your loose piece? We will be sewing along that whole side now.
Flip over the top pieces (have you notice how I ALWAYS sew with the white on top?!) Line up your fabrics so they are flush.
Now bring out the pins
I have been finger pressing all of my white seems open. Here is where this is really good to do! The only thing I ironed, which you can still do, are the very outside border pieces. Otherwise It's all been finger pressing. Thus why pins help here too.
Start sewing right from the edge
And keep sewing right through to the other end. No need for 1/4" spaces here.
Tah-dah! :)
Repeat with the other long side
Well, fold those over and sew that up! Use pins to help keep it lined up.
You don't have to start on the very edge since those white squares already have seams in them, but it doesn't hurt to at least sew over some of it to help reinforce them. MAKE SURE YOU STAY ON THE LINE! OR ON THE INSIDE OF THE FIRST SEAM! (as in on the side of the seam allowance. Otherwise it will make it funny on the front and you could get some weird puckers.
It should now look like this
Repeat with the grey piece on the other side.
Continuing on that same center row, attach the pink piece.
Orient it,
Line up the corners/edge and sew to the white/grey/white strip all the way through.
It will look like this
Fold that piece down and line it up with the green fabric and pin it. Sew.
It should look like this
Repeat with the top, and the other end.
You will have this
Wahoo! All your pieces should now be connected. But you're not quite through. We still need to sew up all the holes.
Go ahead and sew up all the holes EXCEPT the ones with the pins. (Can you see the pins? There are four: orange in the top left, green in top right, purple in bottom left, blue in bottom right - even though I say left and right, they are still in the center-ish) Save those for last. It will make it easier.) Be sure to use pins to help keep everything straight!
Since all the seams around these holes are sewn, it's easy for the edges to have a curve. Try and straighten it as much as you can while you sew.
HORRAY!!! You are FINISHED!!!! A HUGE PAT ON THE BACK! IT'S BEAUTIFUL! (Yes, I'm talking about yours because I know it will be!)
Anyone want to test out my instructions and let me know how they work for you??? I would love it if you share your creations in my flickr group too!! :) I LOVE seeing what you make! :)
I was going to share with you how to turn it into the mats/bowls, but I think I'll share that tomorrow since this is already quite a bit to process. :) Obviously with the boxes you can make them with solid fabrics and not just this design, so I hope you'll come back.
Thanks Katie for letting me join you on this awesome blog hop! Make sure to stop by everyone else's blogs to see the other wonderful projects (here's the schedule again!). And be sure to comment to be entered into the weekly giveaway!! You're choice of a FQ bundle from the Fat Quarter Shop!
p.s. Do you want to get these (similar) results in a MUCH simpler way? I have put the "VERY SIMPLIFIED VERSION" of this on my To-Do list of tutorials to post. I'm sure some encouragement for it will help push it to the top of the list. ;) just saying.

Ok, sorry about that, I just couldn't help myself! I hate to skip the introductions, and hope you'll stop and leave a comment and introduce yourself too. :)
Now onto the good stuff...
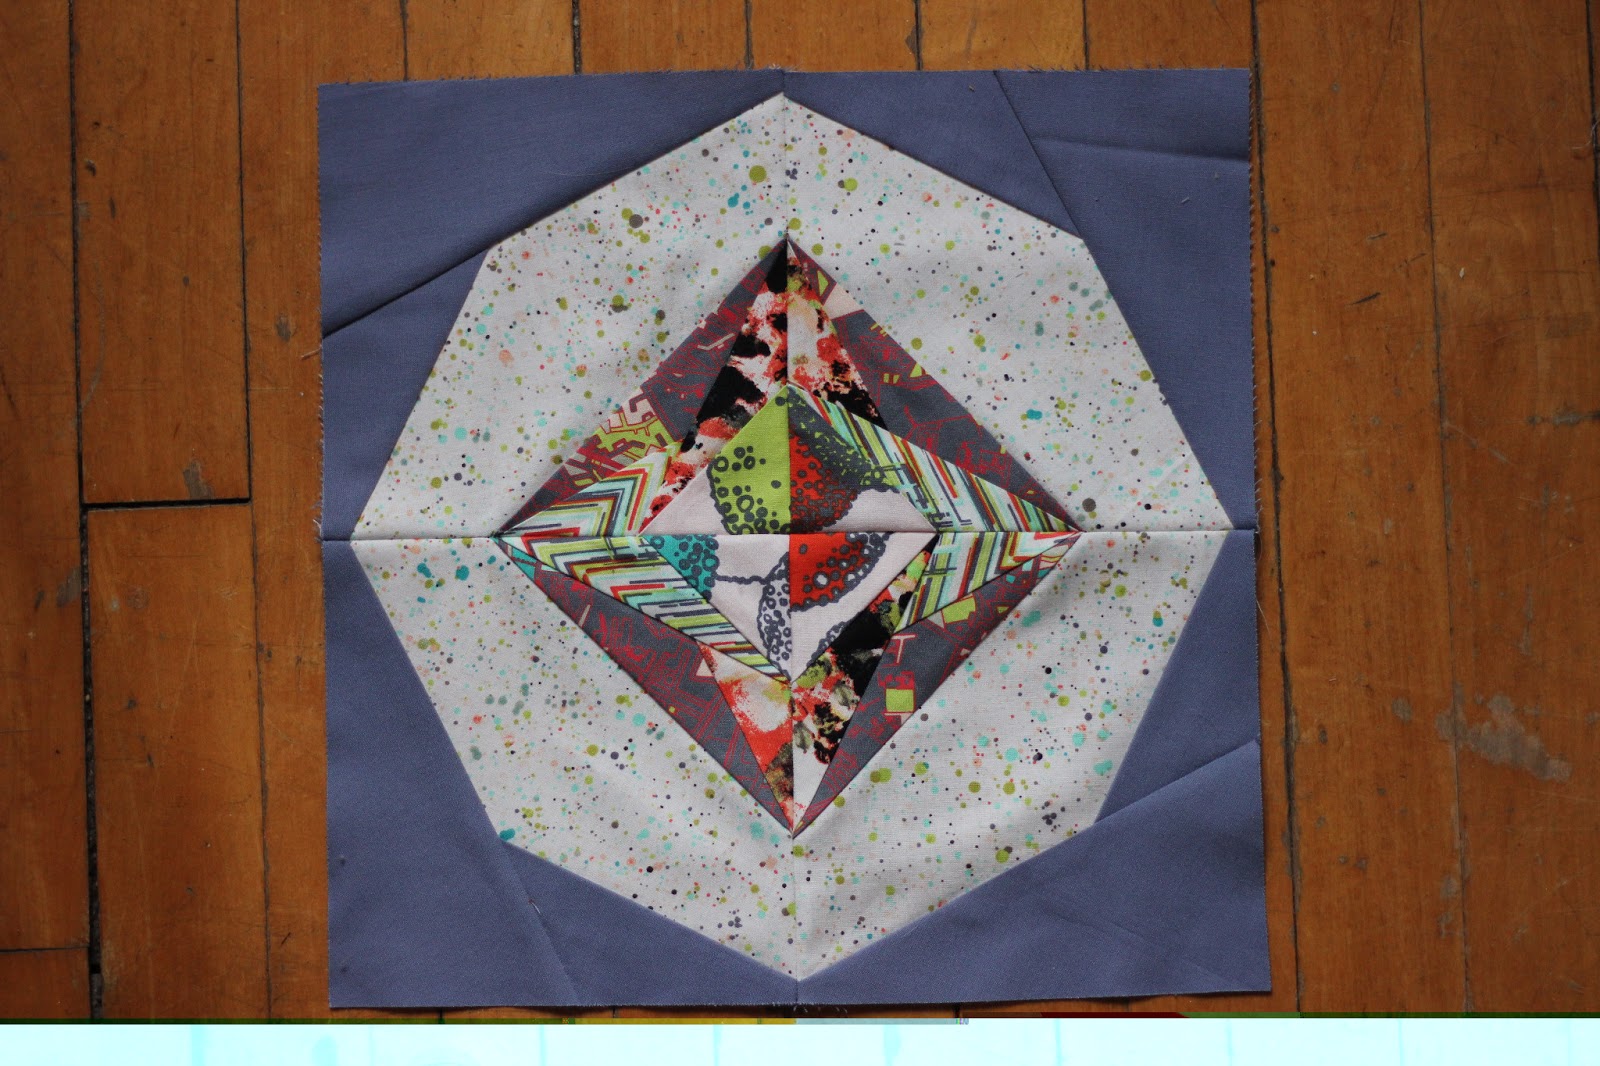
Out of all my photos, this picture is the most accurate for how saturated and vibrant the colors of the fabric is! Aren't they fantastic?! (my floor on the other hand is not this orange... still learning how to use my camera.) ;)
I went ahead and shared the beginnings of my project in today's linky, so you can go read all about it here. Now I'm going to share with you how I made it! YAY! Tutorial time! :)
When I started this I wondered if I'd gone mad, but it actually came together really fast! There is a process with it that I found, so I am going to have a rediculous amount of photos to try and help you be successful. (I know... I did this twice and the second time went MUCH smoother with a lot more smiles and way less ripping my hair out! lol.)
First, the stats:
I made two mats, 1 - 12.5" x 12.5", 1 - 12.5" x 19.5"
A Fat 8th of 6 different fabrics was plenty for the two combined. I also used a lot of Kona White, maybe a Fat Quarter - more or less.
I also had the fabric for the back, some fuseable fleece, heavy weight interfacing, and velcro, but those are not a part of this tutorial. (though I will quickly show you how to assemble everything for the dual mat/bowls. This tutorial is basically only how to assemble this design. You can change it however you want to finish with your desired size.
I cut my fabric into strips that were 3.5" wide and then cut the strips into 2" wide pieces. = 3.5" x 2" will give you 3" by 1.5" finished pieces. Cut however many you will need. I also cut a few pieces that were 2" x 1.25" for around the edges. All white squares were cut 1.25" x 1.25". I'm really leaving this open for you to make yours as big as you want.
***If you make your pieces bigger or smaller, here's how to figure it out:
- Decide on the FINISHED size of one piece (mine are 3" x 1.5")
- Minus the width from the length (3-1.5= 1.5)
- Divide your answer by 2 (1.5/2= .75)
- This final answer is the size you will need for the filler squares (my white pieces)
- Add .5" to each number and that is how big you should cut your pieces - the UNFINISHED size (my FINISHED size: 3 x 1.5 = 3.5 x 2 UNFINISHED)
Any Questions???
Ok, now to the pictures:
Arrange all your pieces in such a manner. (I already skipped to the first step in this photo, but you get the idea.)
Sew the white squares to each of the border pieces (2" x 1.25" pieces)
Notice the pattern, and how I picked the center pieces, and sewed the white squares to each corner. BUT WAIT! DO NOT sew all the way through the white squares. You need to leave 1/4" UN-SEWN along the long side of the piece.
See on the sides where I left 1/4"? Do sew through to the other end.
THIS IS SO IMPORTANT TO FOLLOW THROUGHOUT THE PATTERN!!!!!
Next, go ahead and sew the boarder pieces to it's neighboring piece along the long sides.
Sew the left side of the pink piece to the white/green/white piece.
Sew the top of the green piece to the white/grey/white piece.
(don't leave 1/4" open. DO sew all the way through your pieces. see picture below.)
THE FOLLOWING STEPS UNTIL *** WILL BE ONE PROCESS THAT YOU WILL REPEAT MULTIPLE TIMES. I AM MARKING THIS SECTION SO YOU CAN EASILY FIND IT TO GO BACK TO IT
Now go to one of the center pieces that has the four white squares. Bring in the perpendicular pieces (the pink) and we will connect these to the white squares. BUT NOT TO THE GREY!!
Orient your fabric how it will be when it's sewn together.
Flip the WHITE piece over (folding the grey piece) so it is Right Sides Facing the pink fabric, like so
IF you are starting from the center of the pink piece, Line up your sewing foot so you are 1/4" in from the edge of the white piece.
Sew ALL the way through to the edge of the fabric
It will then look like this when you unfold it
Here it is from the back. See, 1/4" unsewn
Flip it over, RS (right side) Up, and arrange your layout again. Now we will repeat with the other white square
Flip the white piece over (folding UP the grey piece) so it is RS facing the pink fabric. Line up so your corners and edges are all flush.
On this piece we are starting from the edge, so line up your sewing foot even with the edge of the fabric
But this time STOP 1/4" in from the edge of the white.
I LOVE the 1/4" markings on my 1/4" foot for this purpose!!
Here's what it looks like
Now the pink is connected to each WHITE square, but is NOT sewn to the grey piece. DON'T sew them yet.
SEE! No seams going through the pink fabric with the grey.
Don't get ahead of yourself and sew these together. It will save you a LOT of hassle if you stay patient and wait for that part.
*** Why it is important to leave the 1/4" open. When you try to sew the white squares to the adjacent fabrics, and you DON'T leave that 1/4" on the edges, it will be a nightmare! and your work will not lie flat. Trust me. ***
This is impotant too... so I'm sharing another picture. :)
*************************
Repeat this process connecting the other pink piece to the grey piece on the opposite side. Repeat until all the pieces with the four white squares are sewn in this manner.
This is what it should look like
the first row
both rows
*** If you are making your project with much more pieces and rows, follow this same process, the difference would be that you may have 20 pieces across, and maybe 6 rows instead of just the two I show here. It's all the same, just keep going until your sections are all together like this. It's all about patterns and following the patterns. Like putting together a puzzle. :)
Notice how the pink piece in the center now looks the same as the sides of the grey piece did? Repeat the previous steps to join those center green pieces.
It's the same thing for the row below
Again, when you sew on the white piece, make sure to leave the 1/4" open at the bottom edge of the white. You've probably already noticed how easy it is to get the pieces sewn. You really want to stop right at 1/4". If it's too narrow you run the risk of sewing your other colored piece of fabric in there. If it's too wide, then you'll have holes as well as the risk of stitches coming loose. It's tricky.
Here's what it looks like. 3 of the edges sewn! You're getting there! :)
So you can see what you should be looking at now
Remember, we're ONLY sewing on the white pieces here.
Repeat until you have all the vertical pieces sewn in.
*** If you are working with more columns than just the one I have, repeat this process with all the vertical pieces. You will have holes in between them all, but we're getting there.
Next you'll slide in the grey piece (compare with the picture above)
Here's where it changes just a little bit. Orient your pieces.
Notice how here there aren't just the white pieces, but you have a complete strip that fits along the side of your loose piece? We will be sewing along that whole side now.
Flip over the top pieces (have you notice how I ALWAYS sew with the white on top?!) Line up your fabrics so they are flush.
Now bring out the pins
I have been finger pressing all of my white seems open. Here is where this is really good to do! The only thing I ironed, which you can still do, are the very outside border pieces. Otherwise It's all been finger pressing. Thus why pins help here too.
Start sewing right from the edge
And keep sewing right through to the other end. No need for 1/4" spaces here.
Tah-dah! :)
Repeat with the other long side
Notice how the green part is still not connected to the grey.
Well, fold those over and sew that up! Use pins to help keep it lined up.
You don't have to start on the very edge since those white squares already have seams in them, but it doesn't hurt to at least sew over some of it to help reinforce them. MAKE SURE YOU STAY ON THE LINE! OR ON THE INSIDE OF THE FIRST SEAM! (as in on the side of the seam allowance. Otherwise it will make it funny on the front and you could get some weird puckers.
It should now look like this
close up
Repeat with the grey piece on the other side.
*** If you are working with a larger project, keep filling in these holes until you get to the ends.
Continuing on that same center row, attach the pink piece.
Orient it,
Line up the corners/edge and sew to the white/grey/white strip all the way through.
It will look like this
Fold that piece down and line it up with the green fabric and pin it. Sew.
It should look like this
Repeat with the top, and the other end.
You will have this
it's coming together!
Now onto the next pieces
Just like before, sew these too sides together
Should look like this
Go ahead and sew the other side of it to the green piece
Repeat with all the other similar pieces in the similar places. :)
Now to sew on those last corner pieces.
Sew the long edge first with the white/green/white edge
Wahoo! All your pieces should now be connected. But you're not quite through. We still need to sew up all the holes.
Go ahead and sew up all the holes EXCEPT the ones with the pins. (Can you see the pins? There are four: orange in the top left, green in top right, purple in bottom left, blue in bottom right - even though I say left and right, they are still in the center-ish) Save those for last. It will make it easier.) Be sure to use pins to help keep everything straight!
HORRAY!!! You are FINISHED!!!! A HUGE PAT ON THE BACK! IT'S BEAUTIFUL! (Yes, I'm talking about yours because I know it will be!)
I think I am going to put this into a PDF... this is a LOT of pictures. :)
Anyone want to test out my instructions and let me know how they work for you??? I would love it if you share your creations in my flickr group too!! :) I LOVE seeing what you make! :)
I was going to share with you how to turn it into the mats/bowls, but I think I'll share that tomorrow since this is already quite a bit to process. :) Obviously with the boxes you can make them with solid fabrics and not just this design, so I hope you'll come back.
Thanks Katie for letting me join you on this awesome blog hop! Make sure to stop by everyone else's blogs to see the other wonderful projects (here's the schedule again!). And be sure to comment to be entered into the weekly giveaway!! You're choice of a FQ bundle from the Fat Quarter Shop!
After all of this I am definitely in love with this line... now to go get the other colors. :)
p.s. Do you want to get these (similar) results in a MUCH simpler way? I have put the "VERY SIMPLIFIED VERSION" of this on my To-Do list of tutorials to post. I'm sure some encouragement for it will help push it to the top of the list. ;) just saying.
Thanks for stopping by!!
Subscribe to:
Posts (Atom)